Table of Contents
Microsoft Defender Antivirus already uses real-time protection and automatic maintenance, but you can add a recurring scan time that better fits your routine. Windows includes a built-in Windows Defender Scheduled Scan task; adding a trigger to that task is the simplest graphical method.
A scheduled scan is an extra check, not a replacement for real-time protection, security intelligence updates or safe browsing. If another compatible antivirus product is the active provider, Microsoft Defender's antivirus task may not run as expected.
Choose a useful schedule
- Prefer a quick scan for routine scheduling. It examines active processes and common locations and is designed to work alongside real-time protection.
- Use full scans selectively. They inspect more files, take much longer and are better reserved for a specific concern or security guidance.
- Pick a time when the PC is normally awake. A task cannot scan a computer that is shut down, and wake behavior depends on the task, power plan and hardware.
- For a laptop, connect power for longer scans. Battery conditions can stop or defer scheduled work.
For an explanation of quick, full, custom and offline scans, see TipsMake's Windows Security guide.
Schedule the built-in Defender scan
- Open Start, search for Task Scheduler, and launch the matching Windows app.
- In the left pane, expand Task Scheduler Library > Microsoft > Windows.
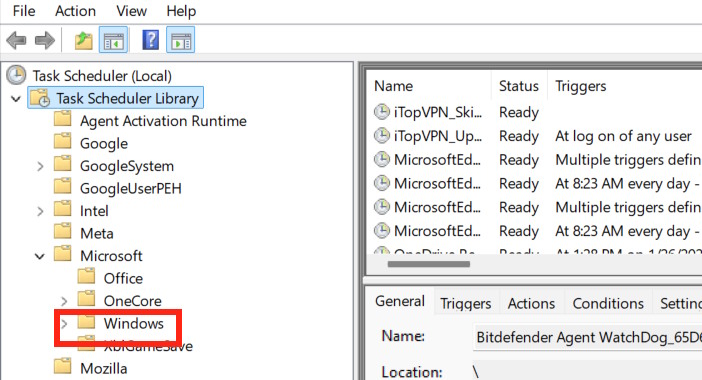
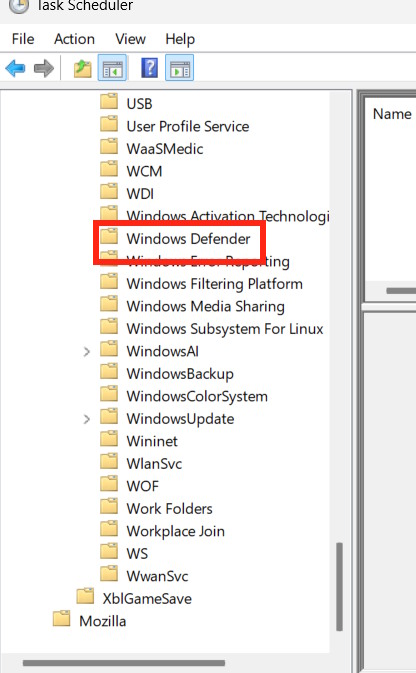
- Scroll down and select the Windows Defender folder. Windows retains this folder name even though the product is now called Microsoft Defender Antivirus.
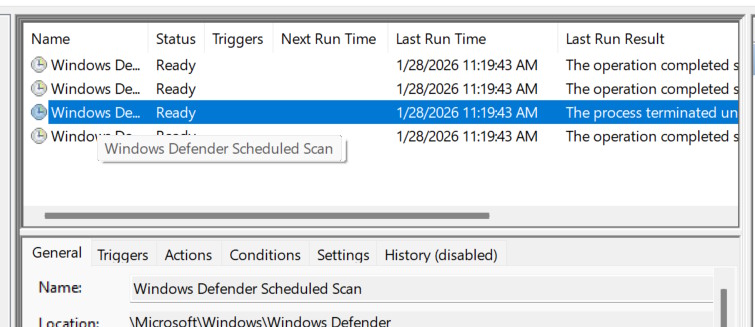
- In the center pane, double-click Windows Defender Scheduled Scan. Do not disable or delete the built-in task.
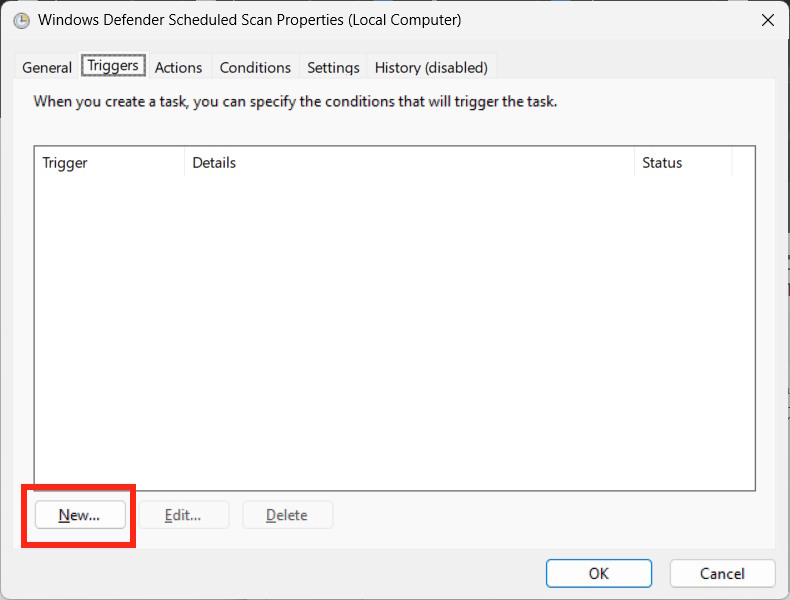
- Open the Triggers tab and select New. Adding a new trigger preserves the task's existing definition.
- Set Begin the task to On a schedule.
- Choose Daily, Weekly or Monthly and set a start date and local time. A weekly routine is usually easier to keep than an unnecessarily frequent full scan.
- Make sure Enabled is selected, choose OK, and approve administrator credentials if Windows requests them.
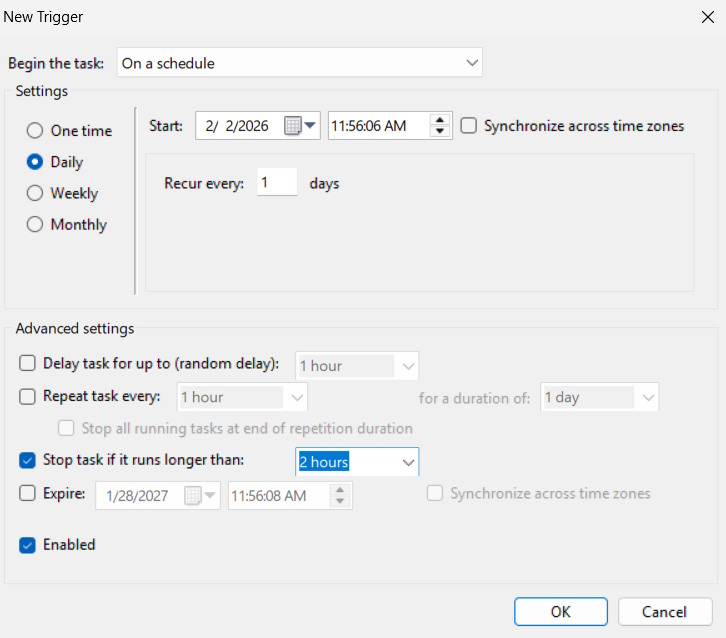
The displayed start time is not always the exact moment scanning begins. Windows maintenance load, a sleeping device and Defender schedule randomization can shift the start. Microsoft Defender normally checks for updated security intelligence shortly before a scheduled scan.
Review conditions before relying on the task
In the task properties, inspect the Conditions and Settings tabs without removing Microsoft's existing options. Depending on how the PC is used, consider:
- whether the task may run only when the computer is idle;
- whether it should wake the computer, if supported;
- whether it may start while the device is on battery power;
- whether Windows should run the task as soon as practical after a missed start.
Changing these options can affect battery life and performance. On a managed work or school device, security policy may lock or overwrite the schedule; contact the administrator instead of bypassing it.
Confirm that Microsoft Defender is active
- Open Windows Security from Start.
- Select Virus & threat protection.
- Under the current antivirus provider, confirm that Microsoft Defender Antivirus is active and that protection updates are current.
If a third-party antivirus suite is registered as the active provider, use that product's own scheduler. Do not try to run two real-time antivirus engines simultaneously for “double protection”; they can conflict.
Test and verify the schedule
After saving the trigger, select the task in Task Scheduler and review Next Run Time. To test the task, right-click Windows Defender Scheduled Scan and select Run; expect CPU and disk activity while it works.
Task Scheduler's Last Run Time and Last Run Result show whether the task launched, but they are not a malware report. Open Windows Security > Virus & threat protection to review the last scan information, and use Protection history for detections and actions.
If malware is detected, leave uncertain items quarantined while you verify them. TipsMake's malware-protection guide explains when to use a custom, full or Microsoft Defender Offline scan.
Edit or remove only your custom trigger
- Return to the task's Triggers tab.
- Select the trigger you created.
- Choose Edit to change its time, or Delete to remove that recurring schedule.
Avoid deleting the Windows Defender Scheduled Scan task or changing its action. If the built-in task is missing, disabled by policy or repeatedly returns an error, install Windows and Defender updates, restart, and check Windows Security. On an organization-managed PC, escalate the issue to the administrator rather than recreating protected tasks manually.
Related Articles
 3 Ways to Scan Windows 10 System-wide Viruses with Microsoft4 minutes read
 How to Schedule a Scan in Microsoft Defender Antivirus on Windows 104 minutes read
 How to Schedule Automatic Scans for Windows Defender on Windows 83 minutes read
 Microsoft Defender Atp Will Be Available on iOS and Android Later3 minutes read
 Instructions for Using Windows Defender14 minutes read
 Compare Microsoft Defender and Bitdefender8 minutes read
Reader Comments 0
Sign in with email or Google to join the discussion.