Table of Contents
This practical guide walks through how to reset Windows terminal to default settings on Windows, explains the main requirements, and highlights common issues that may appear along the way.
How to restore Windows Terminal to factory settings
Unlike many other applications on Windows 10, Windows Terminal does not have a dedicated option for you to reset the installation state of software. Instead, the user will have to manually delete the installation files that were previously added to return the program to its original default setting.
First, open the ' Start ' menu , find the keyword ' Windows Terminal ' and click on the corresponding application in the results.

In the Windows Terminal window, click the down arrow icon and select ' Settings '.

When Windows Terminal asks you how you want to open the installation file, select ' Notepad ' from the list and click ' OK '.

When the installation file opens, press Ctrl + A to highlight the entire file contents. Then, press Backspace to delete all of this content.
( Warning : To keep your custom settings, make sure you copied them over to a new Notepad document before deleting. Thanks to that, you can easily restore your settings. Then).

Your installation file is now empty. Click File> Save in Notepad to save this blank file.
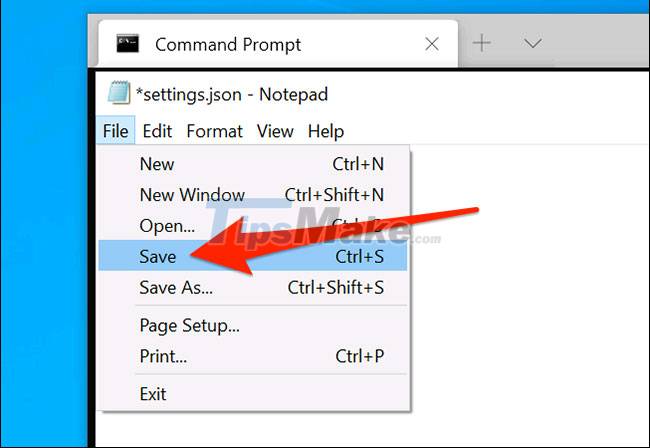
Exit Windows Terminal and re-access it. The application will notify that your installation file is empty and will automatically generate a new installation file with default values.
Key Takeaways
Use the information above as a practical reference for how to reset Windows terminal to default settings on Windows. Review each step carefully, confirm any requirements, and choose the option that best fits your situation.
FAQ
What does this guide explain about Reset Windows Terminal to Default Settings on Windows?
It explains the main concepts, practical considerations, and useful steps related to reset Windows terminal to default settings on Windows without requiring advanced knowledge.
Who can benefit from learning about Reset Windows Terminal to Default Settings on Windows?
This information is useful for readers who want a clear overview, practical guidance, and reliable steps related to reset Windows terminal to default settings on Windows.
What should I check before applying this information?
Review the requirements, confirm that your device, software, or situation matches the instructions, and back up important data before making major changes.
Related Articles
 How to Reset Google Chrome to Default4 minutes read
 3 How to Reset Win 7, Factory Reset Windows 78 minutes read
 Fix Windows Settings Reset to Default on Reboot9 minutes read
 Steps to Reset All Apps on Windows 104 minutes read
 3 Ways to Reset Folder View Settings to Default in Windows 116 minutes read
 How to Reset the Default Folder View Settings in Windows 104 minutes read
Reader Comments 0
Sign in with email or Google to join the discussion.