How to recover lost partitions with TestDisk
TestDisk is a software that recovers lost partitions and recovers lost data.
Table of Contents
In case the computer partition is lost, it can be caused by a virus infection, operation error when re-dividing the computer drive, etc. When a partition of the drive is lost, it means the entire volume News and folders will also disappear. If the user is experiencing the above situation, he / she can use the TestDisk software, retrieve the lost partition and the data disappears in that partition.
The TestDisk in addition to retrieving lost partitions can also rebuild missing boot components on Windows, fix partition tables, etc. The following article will guide you how to use the tool. TestDisk retrieves the lost partitions on the computer.
- How to use Recoverit to recover data on your computer
- Recover lost data on SSD
- How to recover data from "Ghost" hard drive (or image) error / mistake
Instructions to retrieve the partition using TestDisk
Step 1:
Users click on the link below to download the TestDisk zip file to the computer. Next, extract the file.
- Download the TestDisk software

Step 2:
In the directory unzip the user click on the file testdisk_win.exe to start TestDisk.

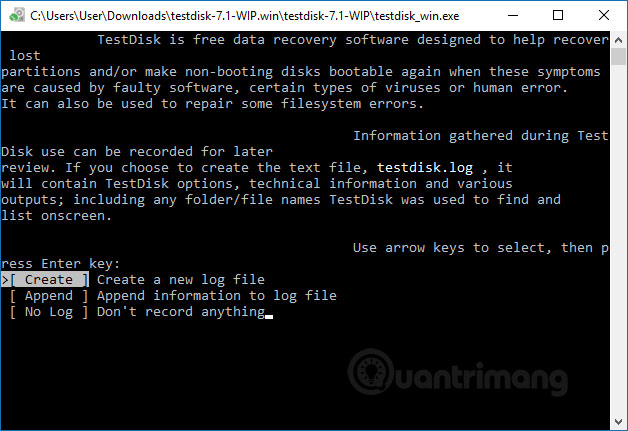
Step 3:
Display the command line input dialog interface. We use the arrow to move to the Create a new log file option and press Enter.
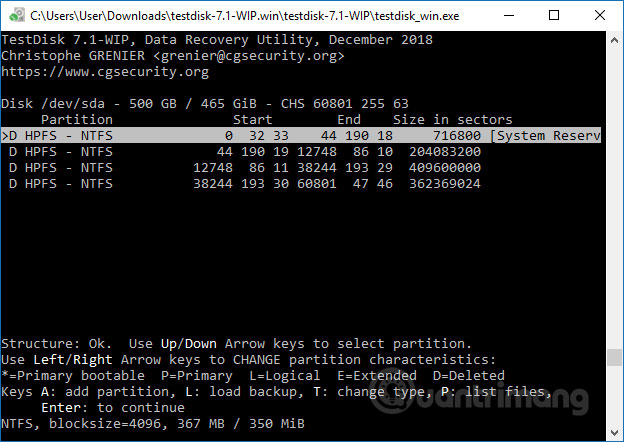
In the display interface immediately after that will appear a list of partitions in the drive, including lost or hidden partitions, connected devices such as DVD / CD, USB drives. Move to the lost partition and press the Enter key.

Step 4:
In the list view of the partition formats listed by TestDisk, click Intel and press Enter. If your computer uses EFI GPT, click on EFI GPT.

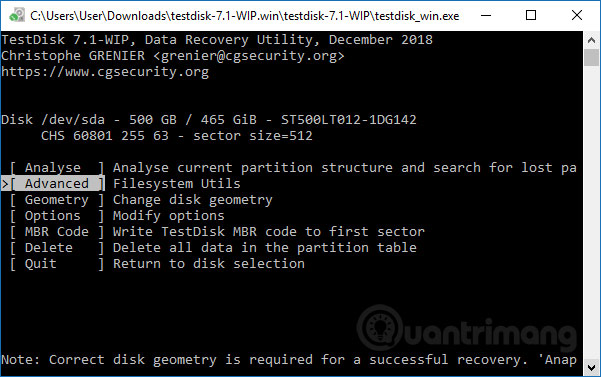
Step 5:
In the new list, click on Analyze and press Enter.

The tool then proceeds to scan the drive to find the data in the hidden partition. This process depends on the size of the drive on the computer, which is fast or slow. As a result we will have the list that TestDisk found. In case the search partition does not display in this list, click Quick Search and press Enter.

The tool then checks to quickly list the broken or missing partition. The result of finding the lost partition, click on the partition to be restored and press the letter A into the interface, press the Enter key to proceed with the recovery process.
Step 6:
Besides being able to recover a lost partition, we can retrieve the data in that partition. We perform the steps as above, but to the screen below, click on Advanced , instead of clicking Analyze when searching for partitions.
The results show that the data has been deleted on the partition, move to the data and press the C key to restore.
You can also use software that can restore partitions such as Active Partition Recovery or Easeus Partition Master Professional.
Losing partitions definitely affects users and the use of TestDisk, as well as partition recovery software, is essential. Also if the data on the computer is lost, data recovery tools such as Easeus Data Recovery Wizard, or Recuva can also be used.
See more:
- How to recover data on iPhone?
- How to backup and restore data on Windows Live Mail?
- Ultra-fast data recovery solution
I wish you all success!
Was this article helpful?
Your feedback helps us improve.
Related Articles
 TestDisk - Download the latest TestDisk here4 minutes read
 PhotoRec - Tool to recover lost data7 minutes read
 How to recover deleted photos with EXIF metadata7 minutes read
 Restore deleted drive partitions with Active Partition Recovery3 minutes read
 Invite Any Data Recovery - software that helps recover lost data on a Mac, costing 56 USD, is free2 minutes read
 Detailed guide on how to recover lost Word documents on Mac.7 minutes read
Reader Comments 0
Sign in with email or Google to join the discussion.