Table of Contents
Wondershare Free Disk Manager, Hard Drive Partition Guide is easier to approach with a clear overview and reliable steps. This guide organizes the essential information, highlights practical details, and explains what to check along the way.
Key Takeaways
- Review software user manual.
- Follow the recommended steps in order to avoid common mistakes with wondershare free disk manager, hard drive partition guide.
- Review compatibility, settings, or requirements before making changes.
Software User Manual
Step 1: Download and install Wondershare Free Disk Manager here.
Step 2: Open the program interface as shown below.
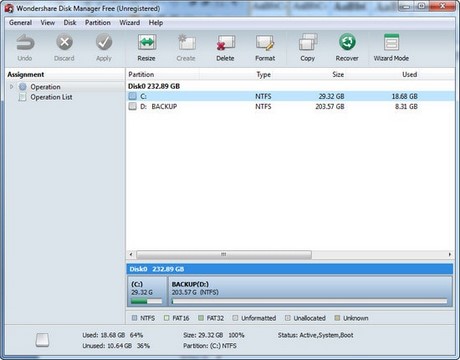
Step 3: First, you need to select the drive to partition in the Partition section, then, look on the left side of the Assignment section --> Operation, there are options for you to choose from:
- Resize Partition: Change the partition capacity - Delete Partition: Delete partition - Format Partition: Format partition - Explore: access the contents of the selected partition - Copy Partition: Create a copy of the partition - Change Label: Rename the partition - Change Driver Letter: change the wildcard character of the partition. - Check Partition: check the status of the partition - Hide allows you to hide the current partition.
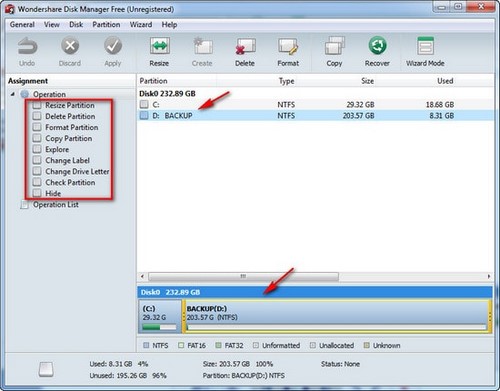
- Select Resize Partition to change the size of the computer hard drive partition.
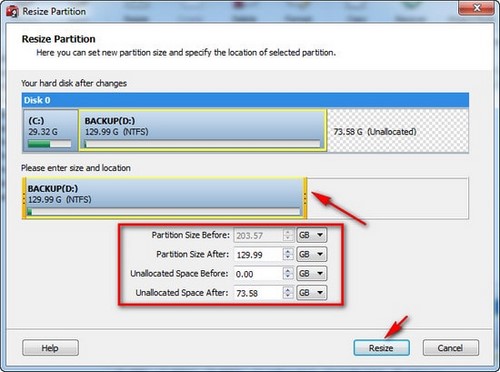
Then the Resize Partition dialog box appears for you to partition the hard drive by holding the left mouse button and moving the mouse to the left to create a new partition from drive D as shown below, at the same time the Partition Size After and Unallocated Space After items also change accordingly. Finally, click Resize
Step 4: In addition, you can perform other operations on the hard drive.
- Delete Partition option allows you to delete the selected partition, After selecting delete partition, press Delete to confirm.

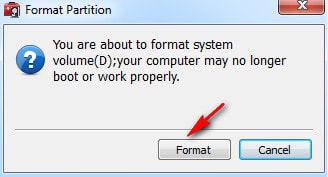
- Format Partition option to reformat the partition. Click Format to confirm formatting.
Step 5: After setting up the options, select Apply on the toolbar to confirm, Undo to return to the previous operation, Cancel all operations to perform previously, click Discard.
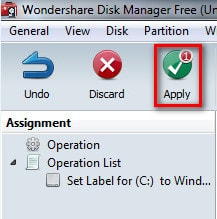
Wondershare Free Disk Manager not only supports splitting and merging partitions but also helps check hard drive errors and optimize device performance. This is a choice worth considering if you are looking for a simple solution to create hard drive partitions without losing data.
Final Thoughts
The most reliable way to handle wondershare free disk manager, hard drive partition guide is to follow the process in order, verify each important setting, and test the result before moving on. Use the guidance above as a practical reference, then adjust the details for your device, software version, or specific goal.
FAQ
What should I know first about Wondershare Free Disk Manager, Hard Drive Partition Guide?
Wondershare Free Disk Manager software has a simple interface, straightforward to use.
How do I get the best results with Wondershare Free Disk Manager, Hard Drive Partition Guide?
Use current software or equipment, follow the steps in order, review the recommended settings, and test one change at a time so you can identify what improves the result.
What should I do if Wondershare Free Disk Manager, Hard Drive Partition Guide doesn't work as expected?
Check compatibility, permissions, connectivity, and version-specific settings. Restart the relevant device or app, then repeat the process carefully before trying a more advanced fix.
Related Articles
 Top 10 Free Windows Partition Management Software7 minutes read
 Extended Fdisk: Partitioning for the Hard Drive15 minutes read
 Ultimate Boot CD: 10 Free Partitioning Tools15 minutes read
 Instructions to Divide and Merge Drives Right in Windows 75 minutes read
 Paragon Partition Manager: Complete Guide4 minutes read
 2 Ways to Hide Hard Disk Partitions on Windows3 minutes read
Reader Comments 0
Sign in with email or Google to join the discussion.