5 Simple Ways to Partition Hard Drive Without Losing Data on Windows
Partitioning your hard drive without losing data is a simple way to ensure the safety of your data. Learn carefully and follow it to get the best results!
Instructions on how to partition a hard drive using Disk Management tool
Step 1: Right-click on Computer > Manager .

Step 2: In the Computer Management window > click Disk Management .

Step 3: Right-click on the drive you want to split > Select Shrink Volume .

Step 4: In the Enter the amount of space to shrink in MB section , enter the capacity to be divided > Click Shrink for the software to start the division process (capacity is calculated in MB, every 1024 MB = 1 GB).

Step 5: After dividing, you will see a black area , continue.
Step 6: Right click on the black partition > New Simple Volume .

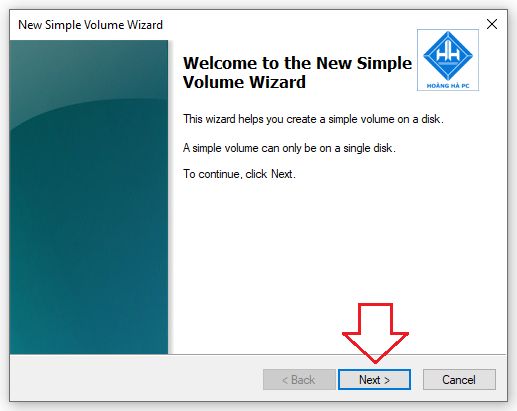
Step 7: A new window appears, click Next .
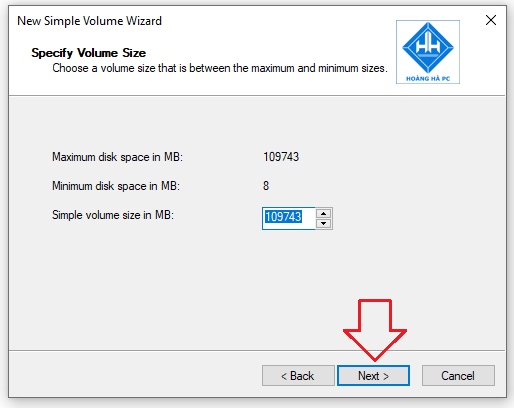
Step 8: Select the capacity for the drive to be divided, the default will be the maximum capacity > Click Next to go to the next step.
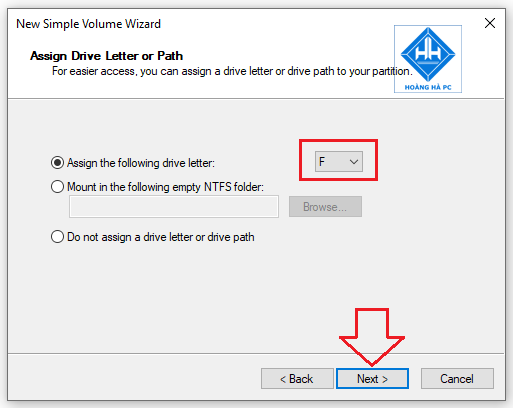
Step 9: Select the drive name, you can choose A, B, C, D,… depending on your needs. The drive name must not be the same as other drives that exist on the computer.
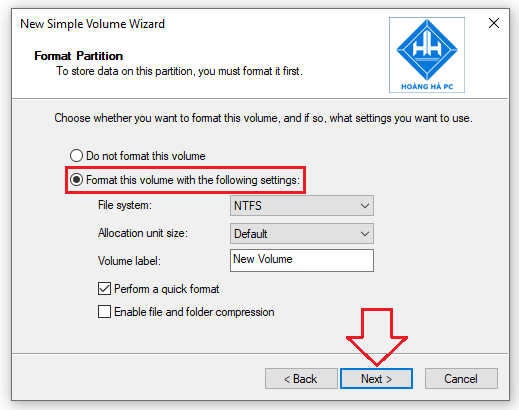
Step 10: Select Format this volume with … > Select Perform a quick format > Click Next to confirm repartitioning the newly created drive (required).
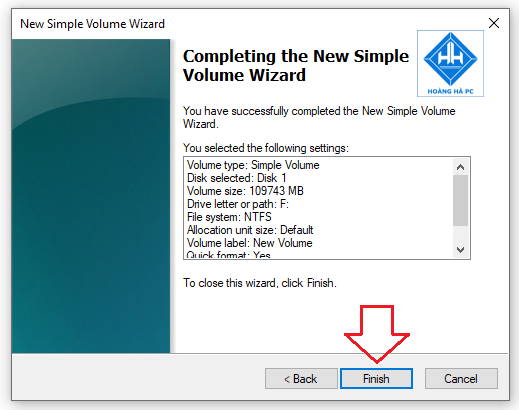
Step 11: Click Finish to complete the process of dividing and partitioning the drive.
How to partition hard drive without losing data using software
Minitool partition wizard
The program is extremely compact with an installation file size of less than 20MB. You can download it completely free at: https://download.cnet.com/MiniTool-Partition-Wizard-Free-Edition/3000-2094_4-10962200.html
Click the green ' Download Now ' button and choose where to save the downloaded app.
Step 1: After completing the software download, double-click on the downloaded file (or right-click and select Open).
Step 2: The screen displays the terms, continue to press Next to agree and continue.
- Next you can choose to install the program or leave it as default and press Next to continue.
- Alternatively, you can leave it as default and press Next .
Step 3: You are allowed to name the shortcut for the program in the Start Menu . At this step, you can let the installer automatically create a shortcut to open the program on the computer screen. Click the Next button to go to the next step.
- You choose Install to proceed with the installation.
Step 4: When finished, click the Finish button and the program will open immediately.
At the program interface, you can observe the hard drive status as follows: drive E (Data) with a capacity of 824GB and drive F (Data 2) with a capacity of 107GB.

Step 1: Right-click on drive E and click on the ' Move/Resize ' function .

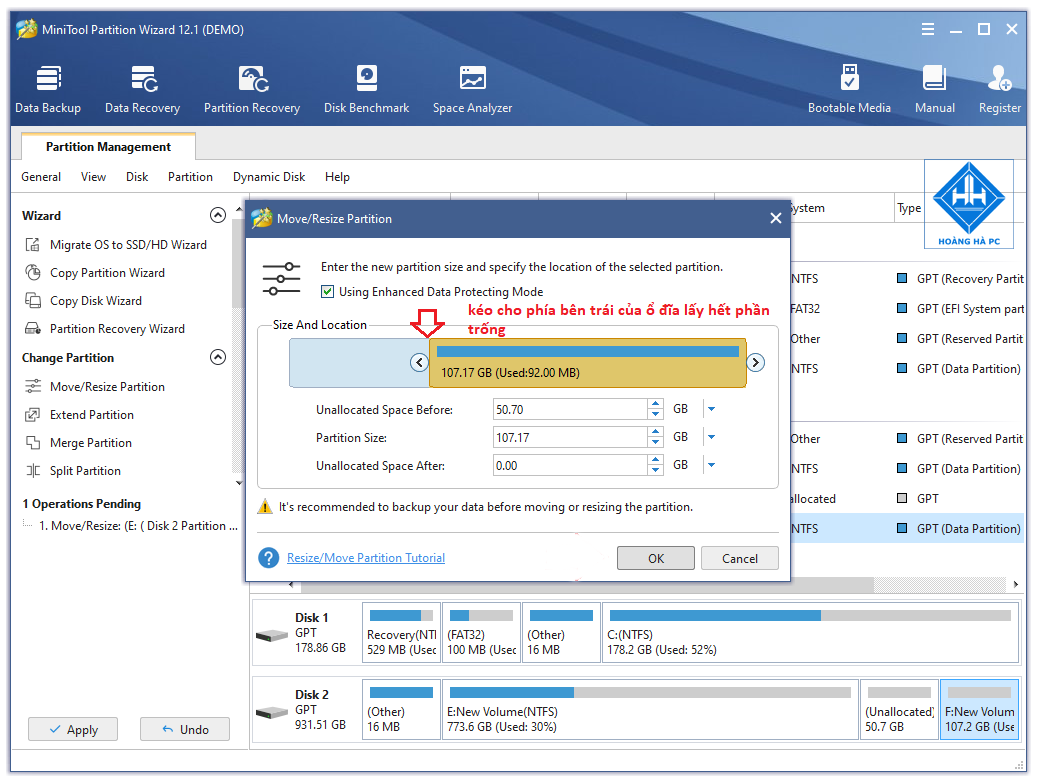
Step 2: The ' Move/Resize ' function window appears as shown below.
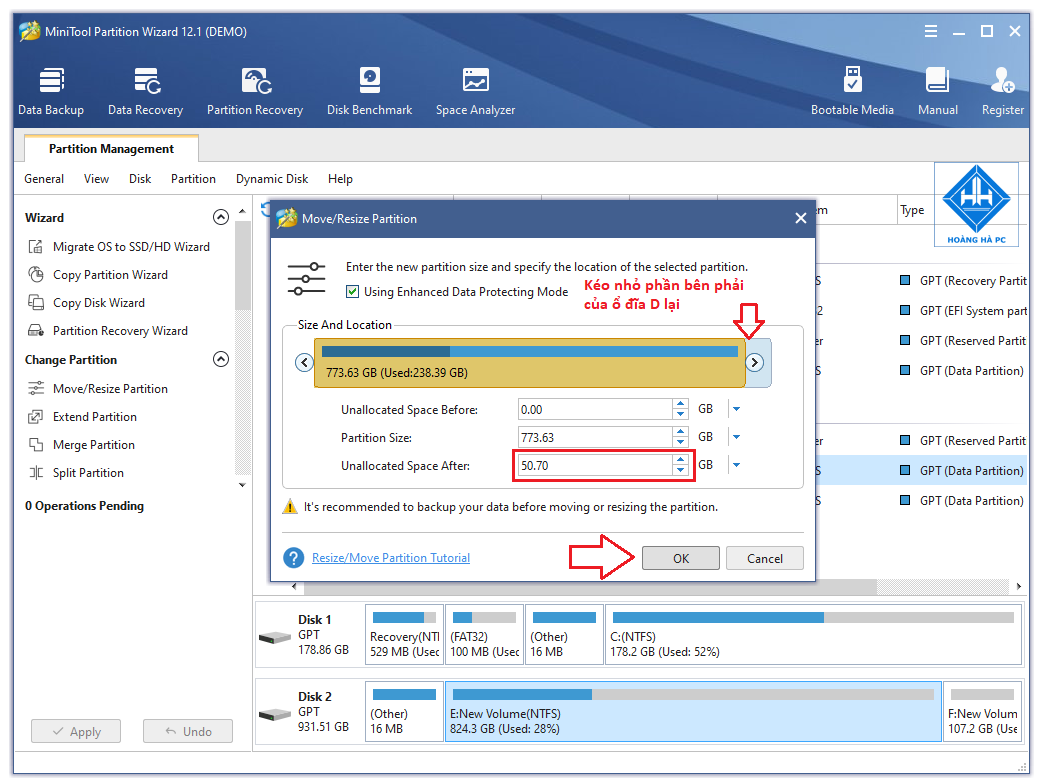
You can use the mouse to drag the right side of drive E to 50.70GB or type the exact number in the ' Unallocated Space After ' section to create an empty space on the right side of drive E and then press OK to continue.
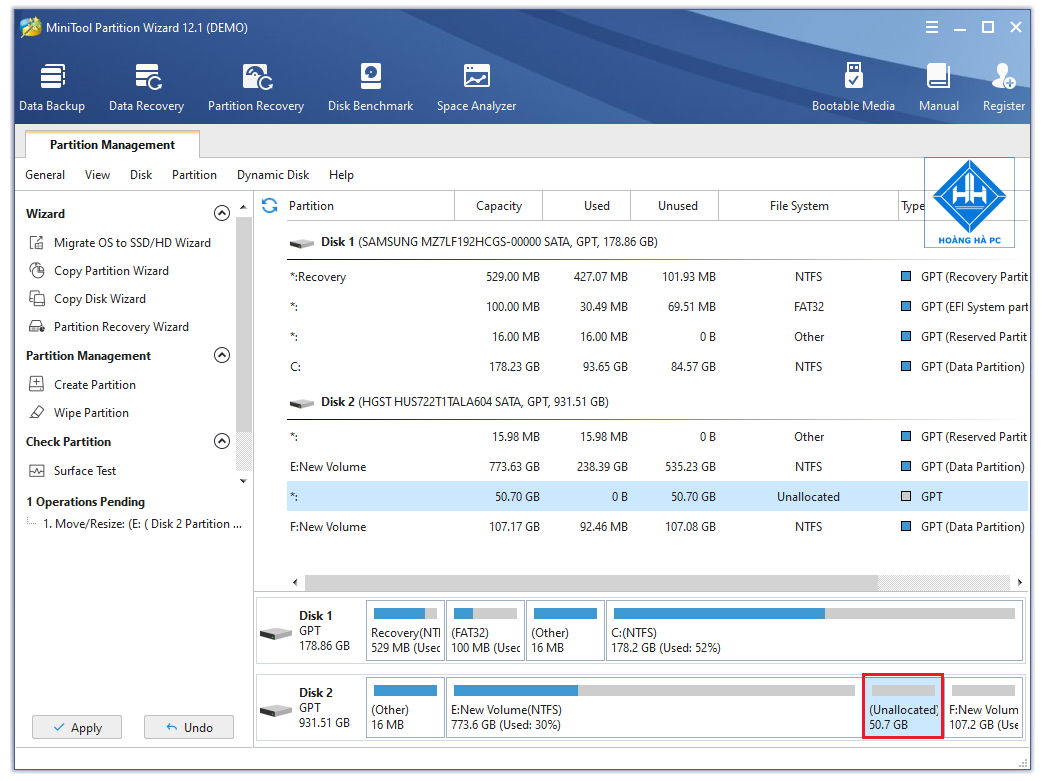
Step 3: As you can see, a 50.70GB free space has been created on the right side of drive E .
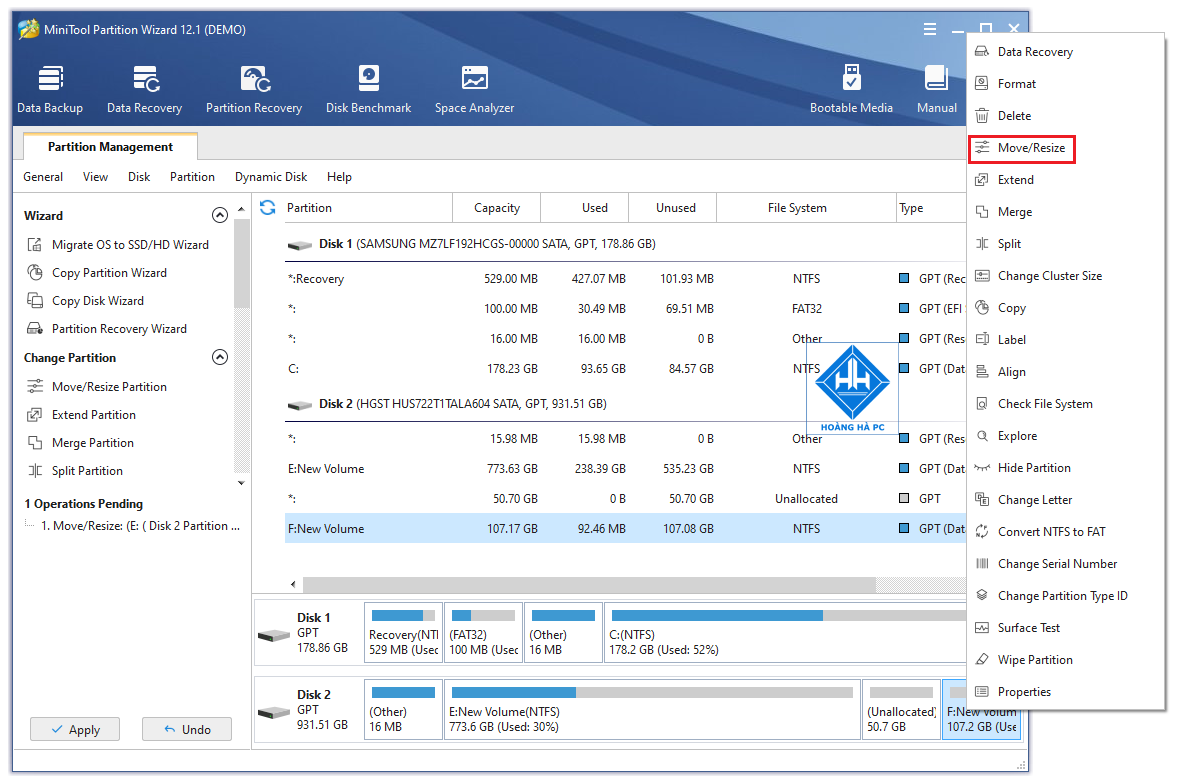
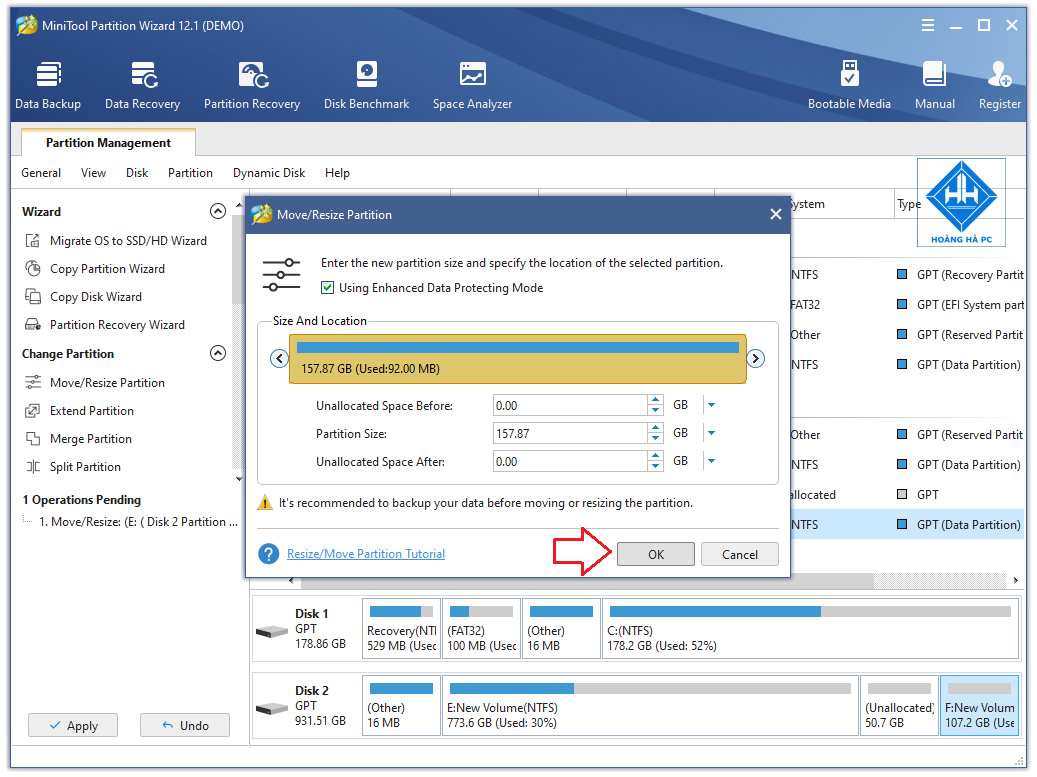
Step 4: Continue to select drive F to add 50.70GB , right - click and also select the ' Move/Resize ' function as you did with drive E.
Step 5: Use the mouse to drag the left side of drive F to take all the free space created from drive E.
- Then you select OK to go to the next step.
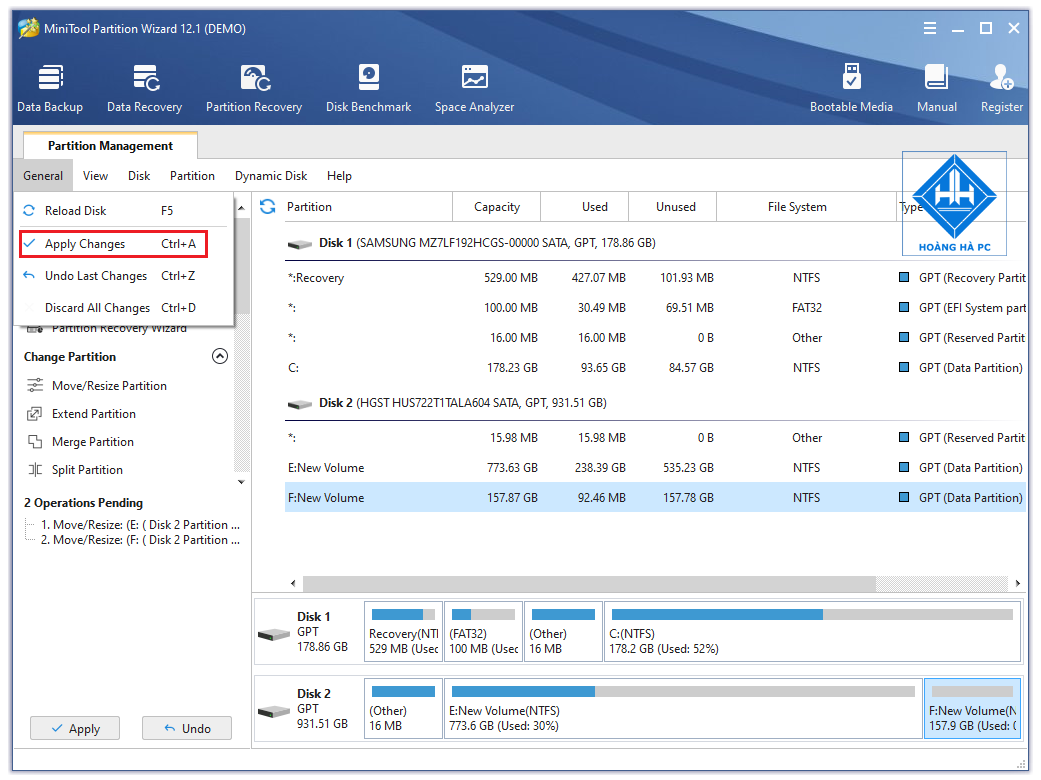
Step 6: You can see the state we want to achieve is displayed. Click on the Apply Changes button .
A dialog box will appear, reminding you to turn off power saving and other applications before proceeding with the repartition. You can follow the prompts and press the Yes button .
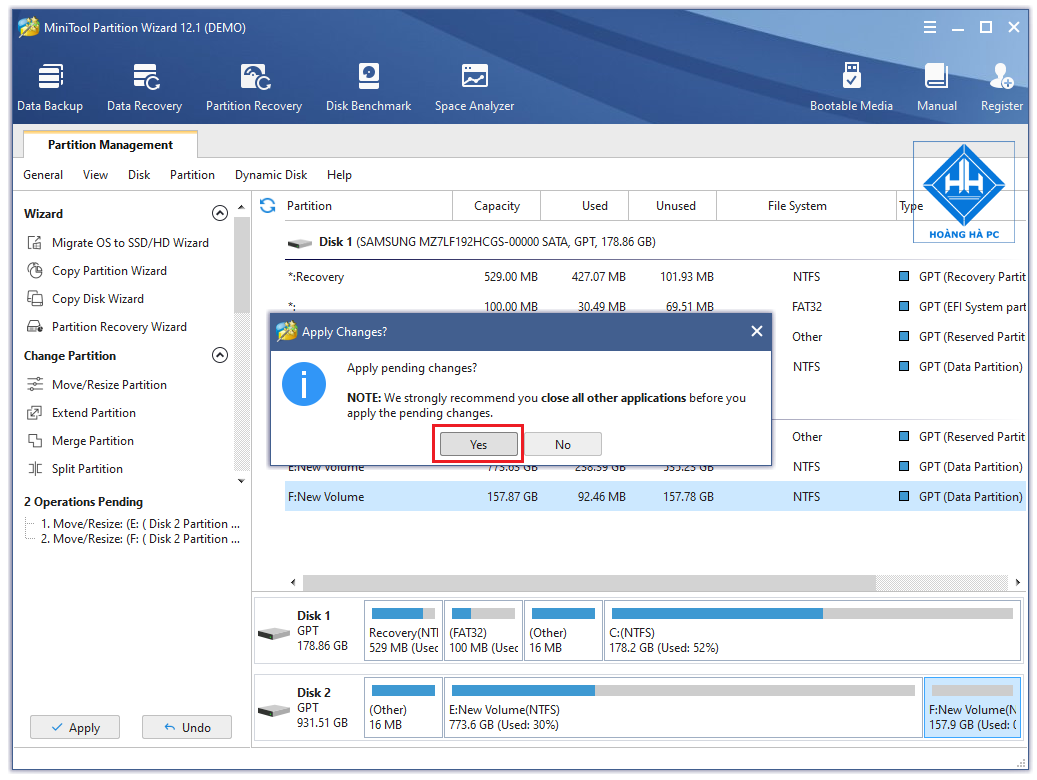
As soon as you press the Yes button , the program launches the necessary tasks to perform the repartitioning of the partitions. The dialog box notifies that the tasks have been successfully performed, you just need to press the OK button .
Partition hard drive without data loss with EaseUS Partition Master
EaseUS Partition Master is a disk partition management tool. This software has three main functions, including: . You can also create a bootable disk in case of system boot failure. The ways to partition a hard drive with EaseUS Partition Master include the following steps:
Step 1: First, you need to download this EaseUS Partition Master software here .
Step 2: After installation, open this software and you will see its working interface.
Step 3: Select the drive you want to split, then right-click and select Resize/ Move partition to split the hard drive.
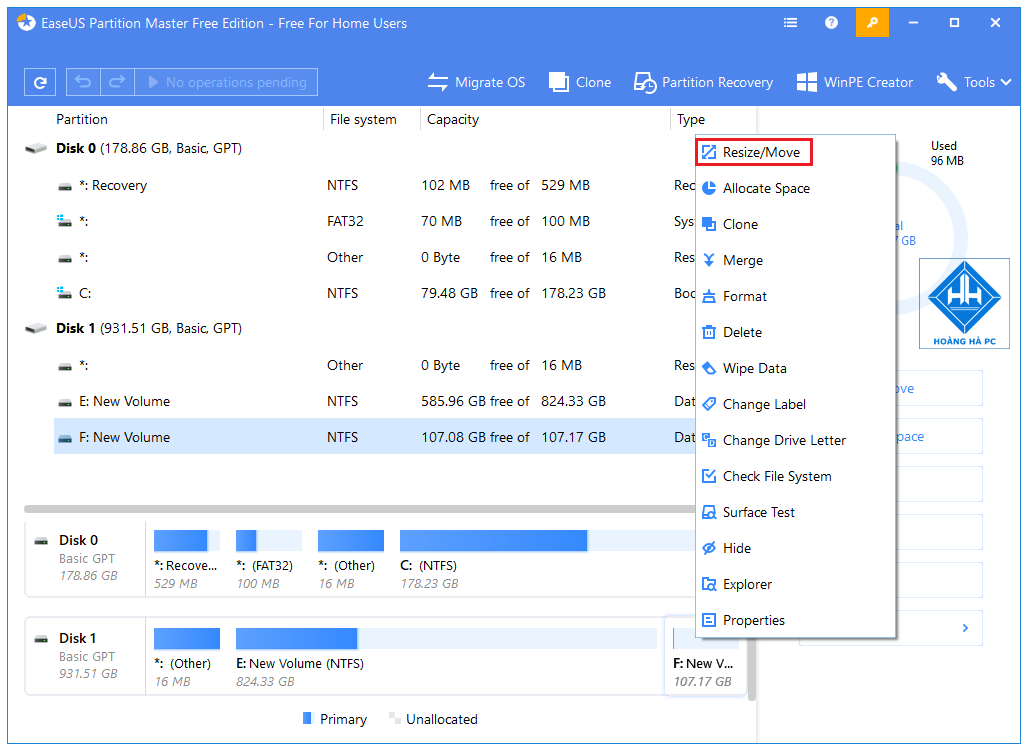
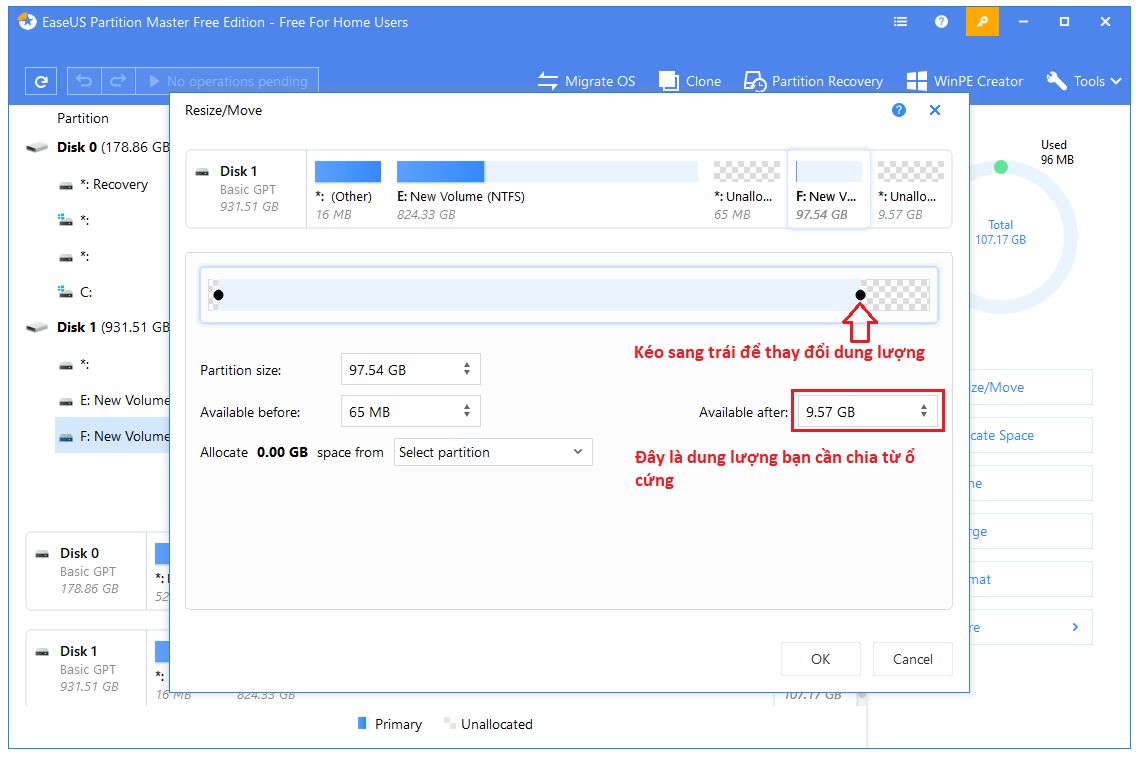
Step 4: Here are 2 parts that you need to pay attention to when repartitioning the drive with EaseUS Partition Master as follows:
Partition Size is the total capacity of the current drive. Including used and unused. Next is Available After , this is the parameter you want to divide the drive into how many MB.
In addition to changing the numbers to divide the drive, you can also directly drag the bar above to change the capacity. And when you drag the bar above, the numbers below will change accordingly.
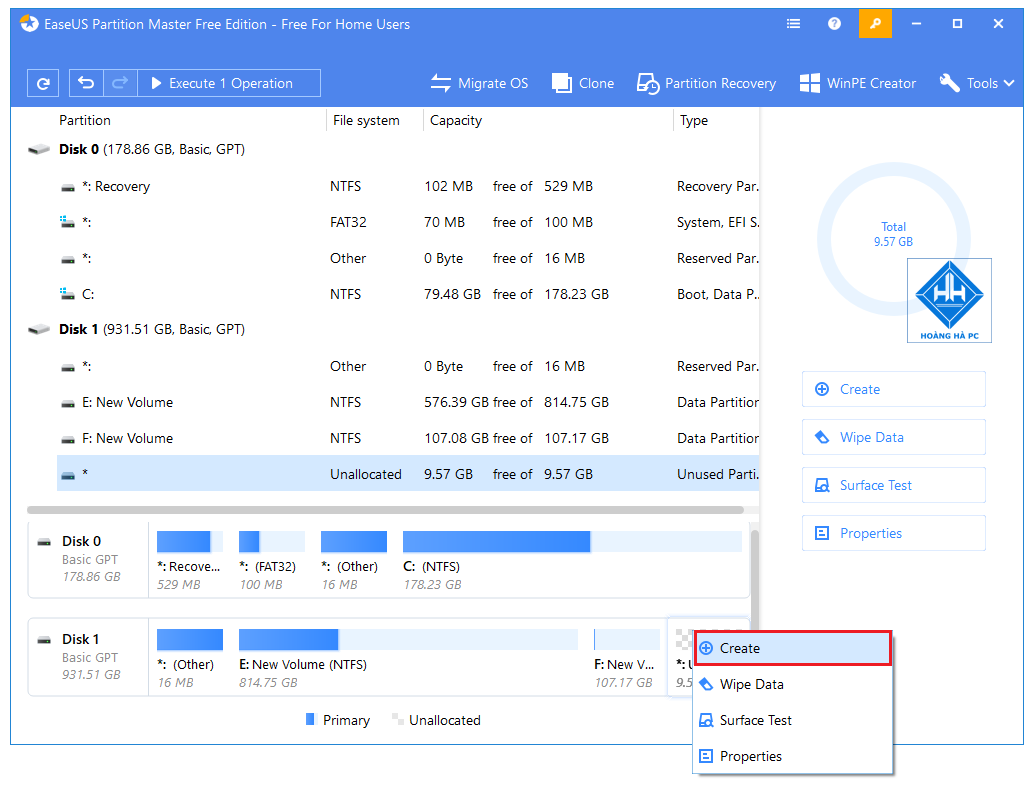
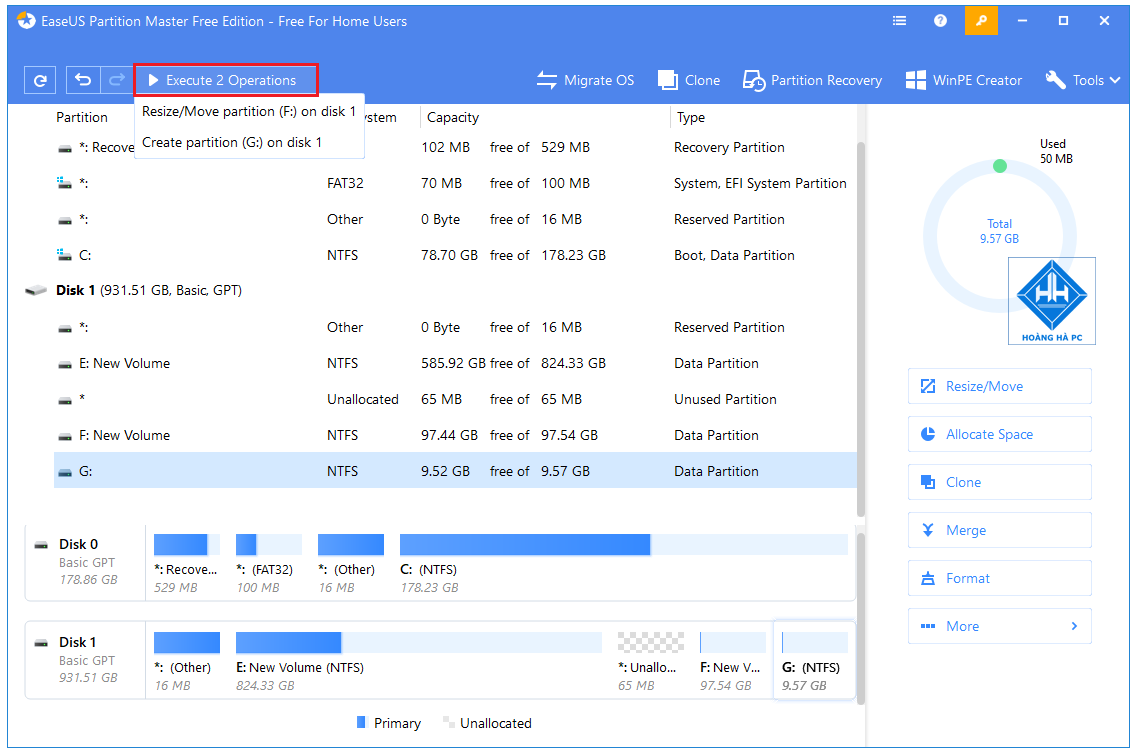
Step 5: After dividing, right-click on the new partition and select Create partition .
Step 6: In this step, you just need to fill in the drive name, assign it a name like drive G or any character you want and then press OK .
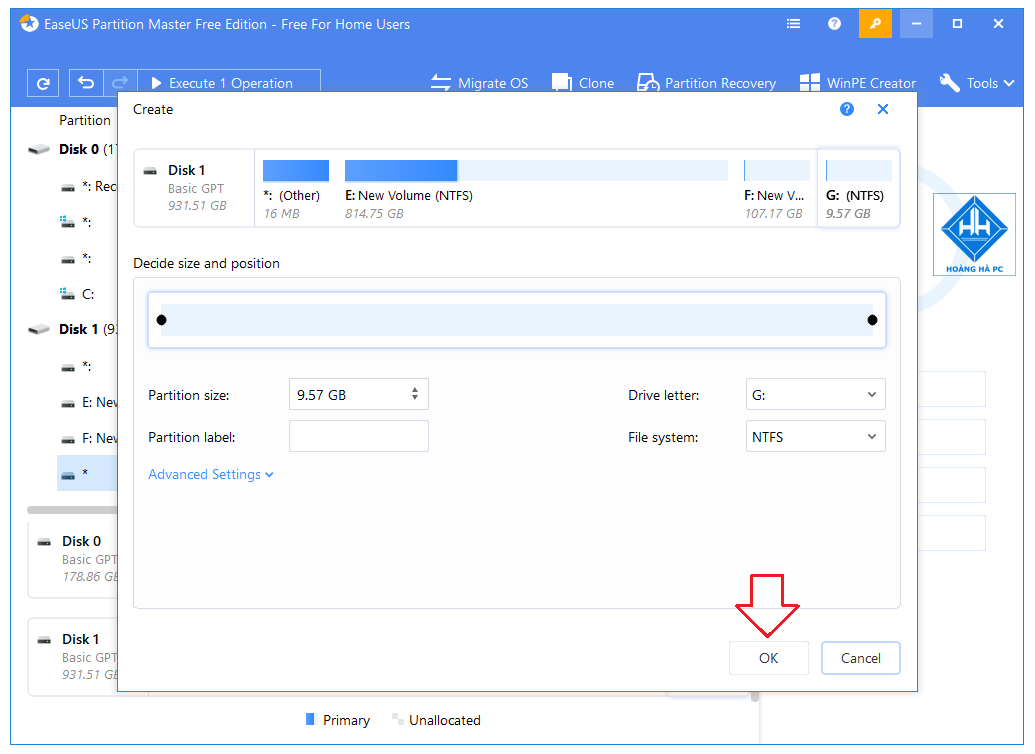
Step 7: Check again. If the repartitioning of the drive using EaseUS Partition Master is correct, click Apply to let the system run automatically.

How to merge hard drives in windows
Windows 10 does not limit us to partition or merge drives on Windows 10. So if we want, we can do this without too many obstacles, as long as the hard drive has the basic system conditions. Currently on the market there are many software that help us partition hard drives, divide and merge drives extremely well and easy to use. But with Windows 10, you do not need to do that to be able to partition hard drives or merge Windows 10 drives because the available capabilities are so great.
Step 1: To merge Windows 10 drives , you need to go to the hard drive management section on your computer or laptop. Press the Windows + X key combination to open the Power Menu.
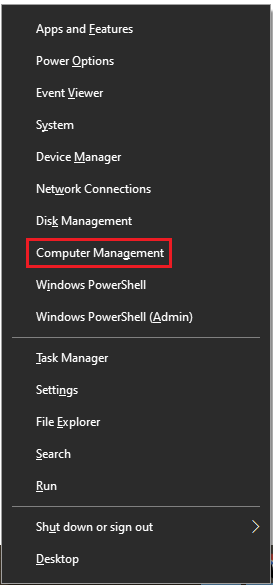
- Then select Disk Management .

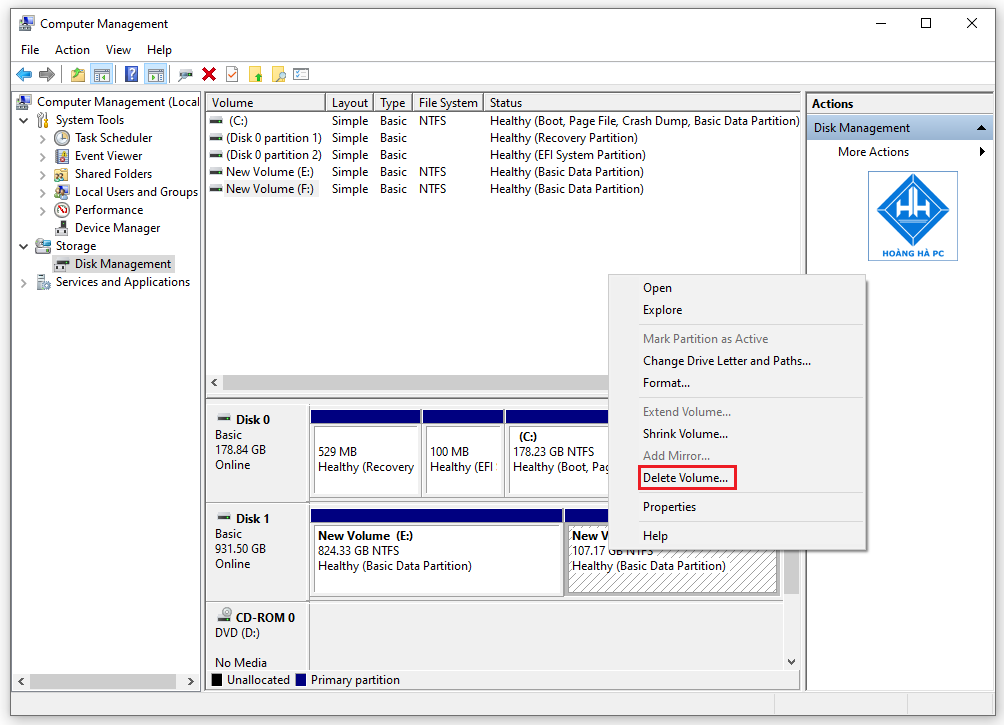
Step 2: Right-click on New Volume (F:) . Then select Delete Volume to delete the drive.
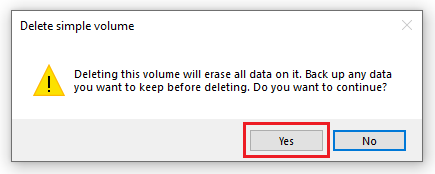
Step 3: Windows 10 system will ask you to confirm again to delete the hard drive, select Yes if you agree.
Step 4: Proceed to the main step, merge the Windows 10 drive. Click on New Volume (E:) and select Extend Volume .
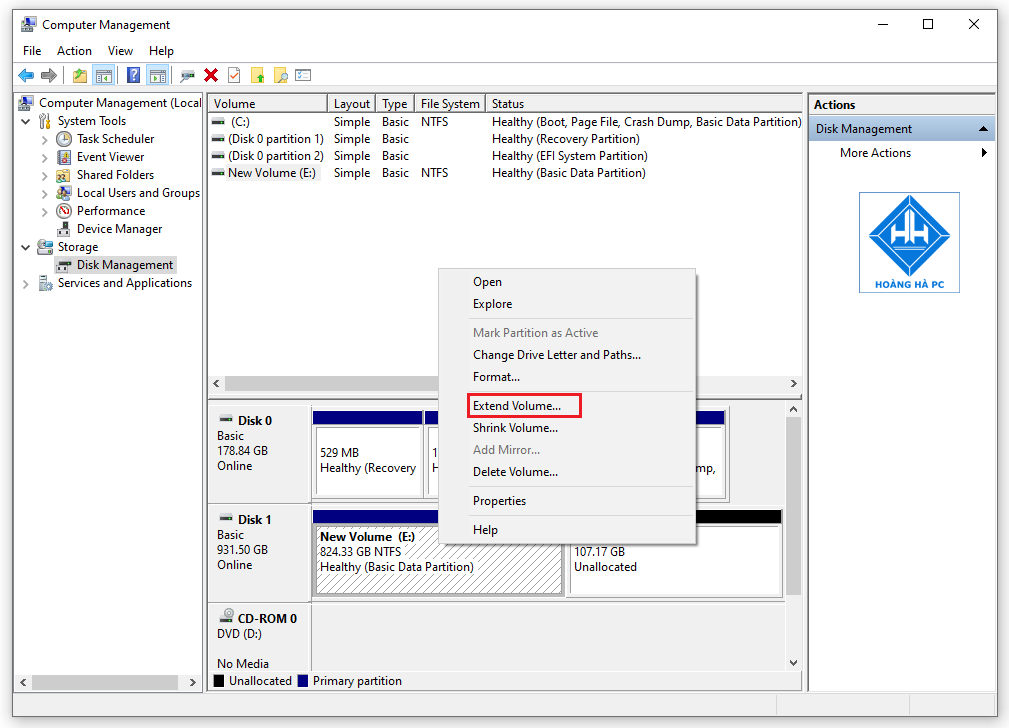
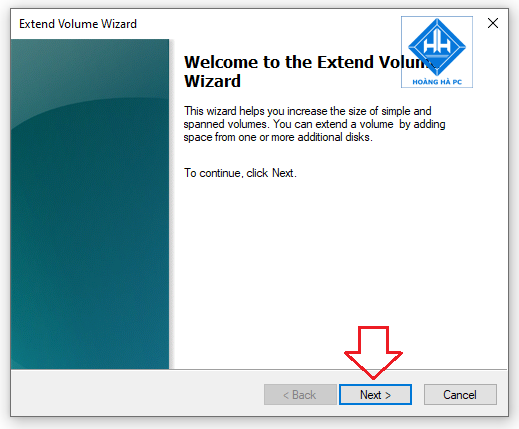
Step 5: Select Next .
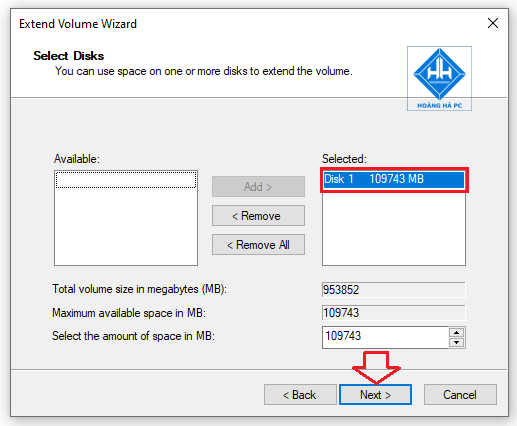
Step 6: In the Selected section , select Disk 1 as shown in the picture and select the capacity you want to merge. To merge all, keep the original parameters and select Next .
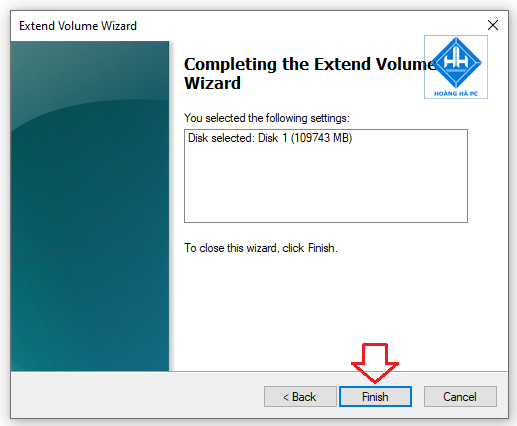
Step 6: Wait for the system to finish merging the Windows 10 drive, select Finish to close the window.
- How to partition a hard drive in Windows 11, 10, 8, and 7 without losing data.
- How to safely partition an SSD on Windows without losing data.
- How to partition a hard drive on Windows 11 without losing data, safely.
- Convert MBR to GPT on your hard drive without losing data using Aomei Partition Assistant.
- Instructions for dividing hard drives right in Windows 10
- 2 ways to hide hard disk partitions on Windows
- What causes a hard drive to be lost on a computer?
- How to merge a hard drive in Windows 10 does not lose data with MiniTool Partition Wizard
- How to easily connect Bluetooth on a Windows 10 or 11 computer.
- Instructions to turn off tab content display on Google Chrome
- Six steps to minimize desktop icons
- Install safe home network
- Protect WiFi network before hackers
- How to use Google Notebook
- Create your Windows XP SP2 installation disc yourself
- Macromedia Flash - Program flash download design
- Macromedia Flash - Create great photo slideshows
- Macromedia Flash - Customize cursor


-
 How to use Zperiod to automatically balance chemical equations.
-
How to center a table in Google Docs
-
How do I use the Learn Step by Step mode in Perplexity?
-
Instructions on connecting Gmail to n8n via Google Cloud Console
-
Instructions on how to fill in PDF files on iPhone using PDFgear
-
Instructions on installing and using Yenka to simulate science experiments.
 How to use Zperiod to automatically balance chemical equations.
 How to center a table in Google Docs
 How do I use the Learn Step by Step mode in Perplexity?
 Instructions on connecting Gmail to n8n via Google Cloud Console
 Instructions on how to fill in PDF files on iPhone using PDFgear
 Instructions on installing and using Yenka to simulate science experiments.