Table of Contents
Learning how to install fonts on windows simply and quickly doesn't have to be complicated. This updated guide presents a clear workflow, practical checks, and troubleshooting advice you can use while completing the process.
Key Takeaways
- Review popular fonts on windows.
- Explore instructions for installing fonts on windows.
- Understand method 1: install via windows explorer.
Popular Fonts on Windows
- TrueType Font (TTF): The most popular format, supports clear display at all sizes. Suitable for text, graphic design, printing. - OpenType Font (OTF): Developed from TrueType, supports many extended characters and professional fonts. Used in printing, advanced design. - System Font (FON): Windows' default system font, displayed on the interface, icons, menus. Cannot be edited or replaced directly.
Instructions for Installing Fonts on Windows
Method 1: Install via Windows Explorer
Step 1: Download the full font to your computer.
- Unzip (if the downloaded file is in.zip or.rar format). - Copy the font (Ctrl + A to select all => Ctrl + C to copy).

Step 2: Open the Fonts folder:
Press Windows + R, type C:WindowsFonts, press Enter.

Method 2: Install via Control Panel
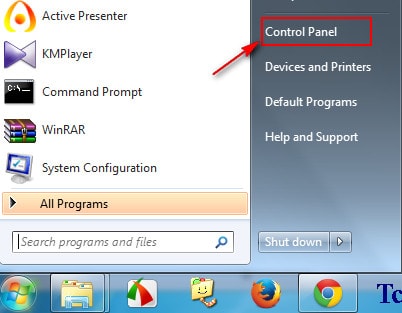
Step 1: Click Start Menu > Control Panel.
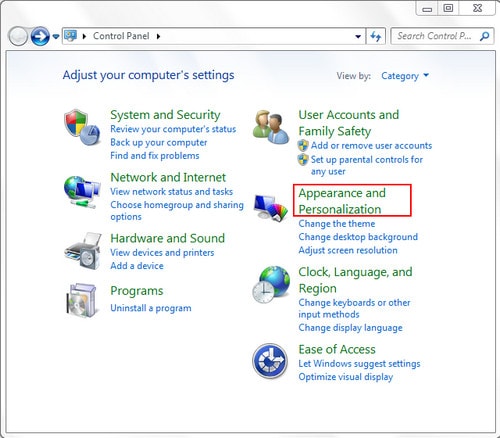
Step 2: The Control Panel window opens --> select Appearance and Themes (Windows XP) or Appearance and Personalization (Windows 7).
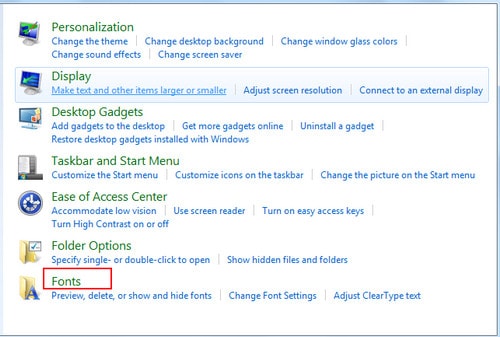
Step 3: Search and open the Fonts folder, Paste the copied fonts here.
Tips for Managing and Using Fonts Effectively
- Delete unnecessary fonts: Open C:WindowsFonts, select font => Press Delete. - Create a favorite font set: Save fonts to a separate folder for easy management. - Check fonts before installing: Double-click the font file to preview the font style.
Installing fonts on Windows is very simple, helping you easily expand your display options in editing and designing. You can download free fonts on this guide if you need more beautiful fonts.
Final Thoughts
The most reliable way to handle install fonts on windows simply and quickly is to follow the process in order, verify each important setting, and test the result before moving on. Use the guidance above as a practical reference, then adjust the details for your device, software version, or specific goal.
FAQ
What should I check before I install fonts on windows simply and quickly?
Use the latest available software, confirm that your device meets the requirements, and make sure you have the necessary permissions, account access, or backup before changing anything.
Why might I be unable to install fonts on windows simply and quickly?
Common causes include outdated software, missing permissions, incompatible settings, incomplete setup steps, or a temporary network problem. Recheck the process from the beginning and restart the app or device if needed.
Is it safe to install fonts on windows simply and quickly?
It is generally safe when you use official tools, review every permission, and back up important data before making system-level or account-level changes.
Related Articles
 How to Download and Install Fonts on Windows 11 Simply5 minutes read
 How to Install and Uninstall Fonts on Windows 11: Step-by-Step Guide5 minutes read
 How to Install and Remove Fonts on Mac: Install Fonts on Mac11 minutes read
 How to Install (and Uninstall) Fonts on Windows 114 minutes read
 Add Fonts to Canva Simply and Quickly: Step-by-Step Guide6 minutes read
 Steps to Install Fonts for Windows 116 minutes read
Reader Comments 0
Sign in with email or Google to join the discussion.