Table of Contents
This guide provides a clearer, better-organized overview of The Simplest Way to Install Additional Fonts for Computers. It focuses on the essential facts, practical steps, and common questions readers are most likely to have.
After installing the operating system for the computer, the default fonts are quite few and limited, and also cause errors during use. Therefore, you can find fonts using images and install additional fonts on your PC to avoid errors, while creating eye-catching articles or impressive presentations for readers.
Article content: Method 1. Install fonts via C: WindowsFonts. Method 2. Install font directly. Method 3. Install font via Control Panel.
Install More Fonts on Your Computer
To install additional fonts on your computer, you first need to download the font to your computer.




Method 1: Install Fonts via C: Windowsfonts
Step 1: After downloading the fonts, open the file, select the fonts you want to install, then choose Copy .
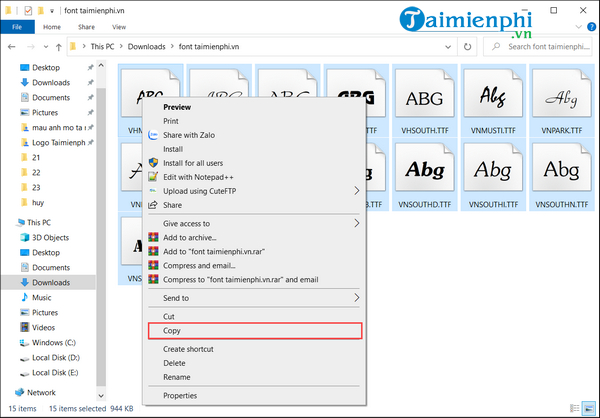
Step 2: Open My Computer, copy the font you want to install into theC: WindowsFonts Folder.
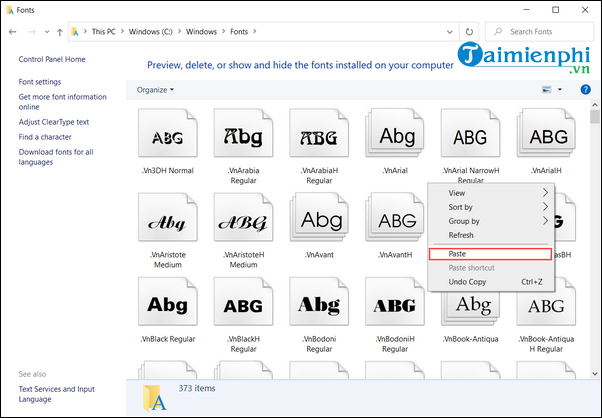
Then the computer will automatically install those fonts for you
Method 2: Directly Install the Font
You can directly install fonts by clicking on the fonts and then right-clicking and selecting Install .
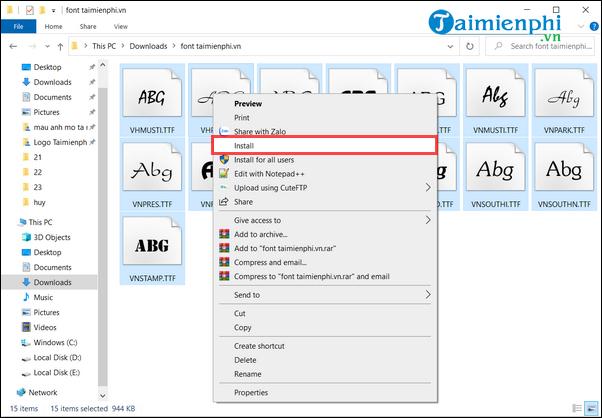
Method 3: Install Font in Control Panel
In this article, TipsMake guides directly on Windows 10. If you use Windows XP, 7, 8 or 8.1, you can use how to access Control Panel to follow.
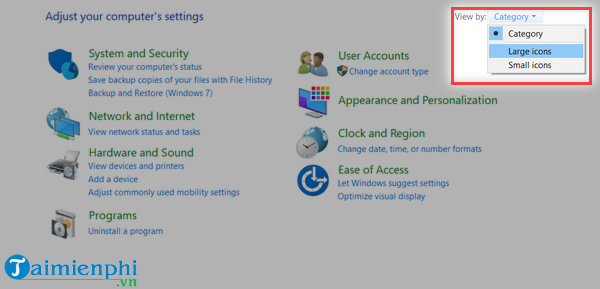
Step 1: To open Control Panel select the Windows + R Key combination and enter Control panel In the search tool bar.
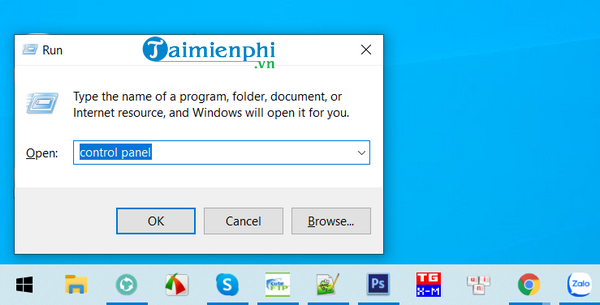
Step 2: If the Control panel does not display Fonts , select View And select Large iocns As shown in the picture.
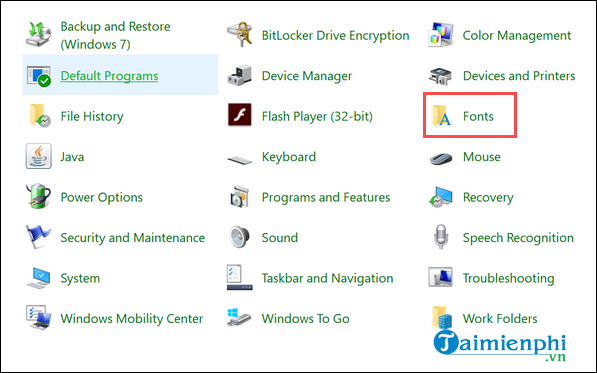
Step 3: Select the Fonts File to open the Fonts folder.
Step 4: Copy the selected font here.
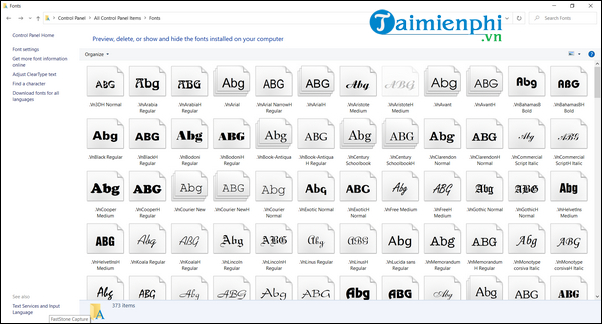
So the fonts have been completely installed. And you no longer have to worry about missing fonts and always encountering font errors.
The above article has introduced you how to install additional fonts for your computer in the most effective way with 3 common ways. Through this article, we hope that your font error will be fixed.
TipsMake. vn also has separate instructions for installing fonts on Windows 11. If you are using the version and want to install fonts, please review it.
If you are a Chinese learner and want to install Chinese Fonts on your computer, you can use how to install Chinese Fonts here.
FAQ
What is the main point of The Simplest Way to Install Additional Fonts for Computers?
After installing the operating system for the computer, the default fonts are quite few and limited, and also cause errors during use.
Why might the details change over time?
Software versions, prices, policies, services, and product availability can change. Check the official source before making a purchase or changing important settings.
How can I use this information safely?
Follow official instructions, verify downloads and claims, back up important data, and avoid sharing passwords or sensitive account information.
Related Articles
 How to Installing Font on Windows: Step-by-Step Guide3 minutes read
 How to Install and Remove Fonts on Mac: Install Fonts on Mac11 minutes read
 How to Install and Uninstall Fonts on Windows 11: Step-by-Step Guide5 minutes read
 How to Install and Remove Fonts on Linux: Install Fonts on Linux7 minutes read
 Steps to Install Fonts for Windows 116 minutes read
 How to Download Fonts on Dafont4 minutes read
Reader Comments 0
Sign in with email or Google to join the discussion.