How to increase gaming performance on Windows 10 April 2018
One of the remarkable new features on Windows 10 April 2018 Update that is to help users enhance the gaming experience. Specifically, Microsoft has improved the multi-GPU system (the dedicated processor receives the task of speeding up, processing graphics for the CPU central processor) to increase the processing speed for the Game or the application you want.
Now when you upgrade to the latest Windows update, you can completely increase performance when playing games, customize the graphics performance for each game and choose high performance or energy saving as you like.
- How to reduce lag, jerk game play on Windows 10?
- Does more RAM make a difference in gaming performance?
- 5 customizations on Windows 10 make the game "smoother"
Instructions for increasing gaming performance on Windows 10 April 2018
To increase the gaming experience on Windows 10 April 2018, first visit the following link: Go to Settings> System> Display> Click to select Graphics settings.

The next installation page will help you manage applications, software or games that prioritize processing speed on systems with one or more GPUs. Here, you are also provided with customizations to improve performance and save battery when using the software.

Now, you need to move to the root of the application or software you want to manage by clicking on the Browse item .

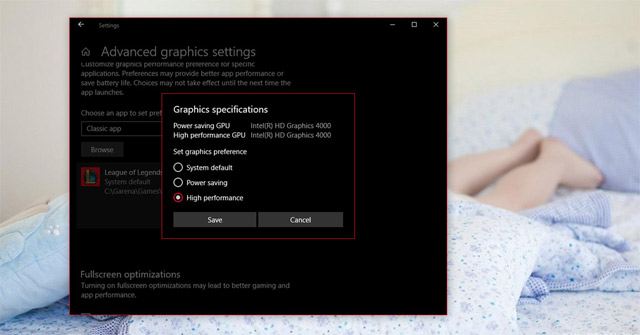
Next, select Option, there will appear 3 options as shown below:

Inside:
- System Default: The system will automatically determine the best graphics processor for the software (This is how Windows 10 works without this feature).
- Power Saving: Run the application with the lowest power graphics processor. Usually, this is an integrated GPU system (called an on-board card).
- High performance: Run the application with the most powerful graphics processor. Usually, this is a removable GPU (It can also be a removable card).
When you prioritize software and games for a particular GPU, the processing speed will be extremely fast. These settings will replace the options to increase performance in AMD and NVIDIA support tools on Windows 10.
You can choose to choose one of these options or if you do not want to install this feature for any software, simply select Remove.

See more:
- How to download Windows 10 April update 2018 Update 1803
- Experience fast Windows 10 April 2018 Update
- Fix some errors before and after upgrading Windows 10 April 2018 Update
- How to monitor and save Internet capacity on Windows 10 April 2018 Update
You should read it
- ★ Notable new features on the Windows 10 April update 2018 Update
- ★ 10 'tricks' improve gaming performance on laptops
- ★ How to monitor and save Internet capacity on Windows 10 April 2018 Update
- ★ Gamers be cautious with Windows 10 April 2019 Update (and now Windows 10 May 2019)!
- ★ Synthesize lag and lag tips, increase performance when playing games on Windows 10