How to fix error code 0x8007139f on Windows 10/11
Let's consider each situation and find a solution through the following article!
Windows Update error 0x8007139f
You may receive Windows Update error code 0x8007139f while trying to install updates on your device. This post provides the most suitable solutions to successfully solve this problem. You may experience this error for one or more of the following known causes:
- Corrupt system files File
- Windows Update is malfunctioning
- Interfering with 3rd party security software
If you are facing the 0x8007139f of this Windows Update error, you can try the suggested solutions in the order shown below to resolve the issue.
1. Run Windows Update Troubleshooter
As with most Windows update errors you may encounter on your Windows 10/11 device, you should first run the available Windows Update Troubleshooter tool and see if that helps resolve the 0x8007139f problem. of Windows Update or not.
2. Run a DISM . scan
Since this can be a case of file system corruption, you should use the DISM tool, native to the Windows operating system, to repair the corrupted files. Try the next solution if this doesn't work for you.
3. Disable/Uninstall 3rd party security software (if any)
Firewalls and anti-virus software are important to system safety, but sometimes these programs can interfere with the normal operation of a Windows PC.
This solution requires that you turn off your AV software and try running Windows Update again. If the error persists, you can remove third-party antivirus programs from your PC using a dedicated removal tool to remove all files associated with your antivirus.
If removing the antivirus fixed the error, you can now reinstall the antivirus, switch to an alternative AV software, or better yet, use the original Windows operating system AV program - Windows Defender.
4. Reset the Windows Update component
In this solution you can use Reset Windows Update Agent Tool and see if it helps you. You can reset Windows Update Client using a PowerShell script. Besides these two automatic tools, if you want, you can manually reset each Windows Update component to default.
5. Install updates manually
This solution requires you to download it manually from the Microsoft Update catalog, the update fails to install and thus causes the mentioned error. Then install the update on your Windows 10/11 PC.
Additionally, Windows updates can be installed through a number of other methods such as using the Update Assistant or the Media Creation Tool. For major updates like feature updates, you can update them manually using the two mentioned tools.
Error code 0x8007139f in Windows Mail app
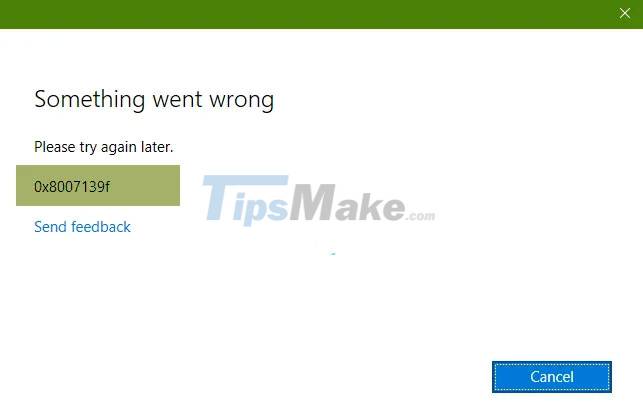
This section will help you to fix Windows Mail application error code 0x8007139f.
1. Check Mail and Calendar app privacy settings

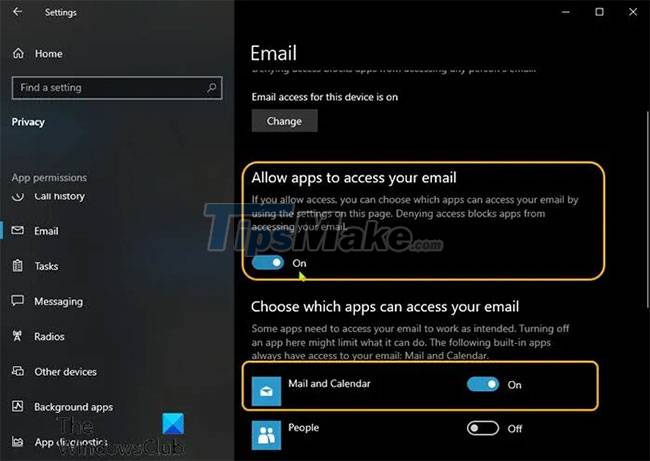
This solution requires you to check your Mail app permissions. Here's how to do it:
- Press Windows key + I to open Settings.
- Click Privacy.
- Navigate to the left panel and select the Email option .
- On the right pane, enable the Allow apps to access your email button .
- Still in the right pane, in the Choose which apps can access your email section , enable the Mail and Calendar button .
- You may also need to switch the People button to On.
- Exit the Settings app .
Now, try to add an email account and see if the Mail app error code 0x8007139f reappears. If so, try the next solution.
2. Reset Mail app
This solution requires you to reset the Mail app and see if that helps.
3. Uninstall and reinstall the Mail app
This solution requires you to uninstall the Mail app and then reinstall it, set up the app, and finally add an email account. Do the following:
- Press Windows key + X to open Power User Menu
- Press A on your keyboard to launch PowerShell with admin rights.
- In the PowerShell console, copy and paste the command below, and then press Enter to uninstall the Mail app.
Get-appxprovisionedpackage –online | where-object {$_.packagename –like '*windowscommunicationsapps*'} | remove-appxprovisionedpackage –onlineAfter the command executes successfully, you can reinstall the Mail and Calendar app from the Microsoft Store. Finally, set up and add your email account.
However, if the problem persists, try the next solution.
4. Sign in to Windows with a local account
This is more of a temporary workaround than a solution - it requires you to sign in to your Windows PC with a local account instead of a Microsoft account.
Error code 0x8007139f with Microsoft account

To fix this error code with Microsoft account on Windows PC:
Step 1. Sign out of your Windows account.
Step 2. Sign in with a local account.
Step 3. Sign back in with your Microsoft account to your PC.
This will fix the problem.
Error code 0x8007139f in Windows Defender
To fix error code 0x8007139f in Windows Defender, follow these suggestions:
Step 1. Restart Windows Defender Services.
Step 2. Reset Windows Defender to default settings.
Step 3. Run the System File Checker tool.
Step 4. Run DISM to repair the system image.
To check Windows Defender Services, open Windows Services Manager and find the following 4 services:
- Windows Defender Antivirus Service
- Windows Defender Antivirus Network Inspection Service
- Windows Defender Advanced Threat Protection Service
- Windows Defender Firewall
You can stop ( Stop ) and start ( Start ) them, or just use the Restart option , available in the context menu on right click.
Windows activation error code 0x8007139f
To fix Windows activation error code 0x8007139f:
- Run the Windows Activation Troubleshooter and see if it helps you.
- Advanced users can see more ways to troubleshoot Windows activation status.
Good luck with your troubleshooting!