10 ways to improve AirPods Pro sound quality
While Apple's AirPods Pro wireless headphones sound great out of the box, you can make them sound even better by adjusting a few settings. Read on to learn some tips to help you get the best sound quality from your AirPods Pro.
1. Update AirPods
The first way to improve the sound on your AirPods Pro is to make sure they are updated. Apple occasionally releases firmware updates for AirPods to adjust the equalizer and improve sound quality. You may have never noticed this because AirPods automatically update in the background.
However, you can also force your AirPods to check for and install these firmware updates. Here's how to update your AirPods Pro firmware:
- Make sure your AirPods Pro are in the charging case.
- Plug in the charger or wirelessly charge the charging case.
- Make sure your iPhone is connected to the Internet.
- Keep AirPods Pro within range or connected to your iPhone.
Your AirPods Pro will update automatically. Depending on the update, the sound of the headphones may be improved.
2. Toggle noise control settings
Surprisingly, one of the best ways to improve the sound quality of AirPods Pro may be to turn off the Active Noise Cancellation (ANC) feature. This doesn't necessarily mean you should turn on Transparency mode - you may want to turn off all processing for the best sound.
While this may sound counterintuitive because you'd think noise cancellation would improve the sound, that's not always the case. Active noise cancellation (ANC) can actually hinder sound quality due to the intense sound processing that takes place in the background.
For example, Apple's Adaptive EQ technology inside AirPods Pro automatically adjusts the EQ of these headphones 200 times per second to deliver the best noise cancellation experience. But these small changes can create a buzzing or vibrating effect with high-end sounds if you listen while moving around.
At other times, ANC seemed to improve the balance of the AirPods Pro by boosting the bass. Apple has a habit of changing this all the time with new AirPods Pro firmware updates, so the best thing you can do is experiment with the ANC, Transparency, and Off settings on your AirPods.
Here's how to toggle Noise Control settings on your AirPods Pro:
- Make sure your AirPods are connected to your iPhone.
- Open Control Center by swiping down from the top right corner of the screen. Or if your iPhone has a Home button, swipe up from the bottom.
- Press and hold the volume bar, it will display the AirPods Pro icon.
- Click Noise Control and choose one of the available options. If you own AirPods Pro 2, you will see an Adaptive option that you can also try.

If you're not sure which option gives the best sound, the safest bet is usually to turn off Noise Control to remove any unnecessary audio processing.
3. Perform the Ear Tip Fit Test
If your AirPods Pro still doesn't sound right, it might be because the included earphone tips don't seal your ears enough. Luckily, there's a quick way to determine which size (small, medium, or large) is best for you.
Apple offers a software-based Ear Tip Fit Test for your device. This tells you which headphone tip size best keeps sound out of or in your ears. To find the Ear Tip Fit Test:
- Connect AirPods Pro to your iPhone.
- Open Settings and select Bluetooth.
- Tap the info button (i) next to your AirPods Pro.
- Scroll down to tap Ear Tip Fit Test, then follow the onscreen steps.
- If the earphone tip doesn't seal well, switch to another size and try again. You may need to use a different size for each ear.
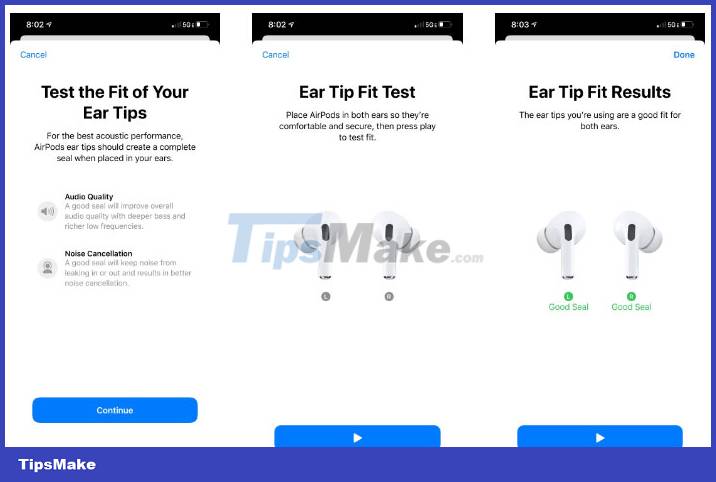
During the test, you will hear some music playing. As the article mentioned, this is just part of an experiment to see what produces the best sound. Hopefully now, you will know which headphone tip size suits you best.
4. Modify EQ for AirPods Pro
Everyone's ears, preferences, and hearing levels are different. So what seems great to someone else might be terrible to you. For this reason, Apple offers Headphone Accommodations that allow you to customize the equalizer (EQ) of your AirPods Pro.
These settings are especially useful for anyone with severe hearing loss, but they can also be great for anyone who wants to boost the bass, treble, or midrange of their AirPods Pro. You can even take a hearing test to determine the perfect AirPods Pro EQ for your hearing.
Here's how to edit AirPods EQ on iPhone:
- Go to Settings > Accessibility.
- Scroll down and tap Audio & Visual.
- Tap Headphone Accommodations and turn on the toggle at the top of the screen.
- Now you can choose between 3 preset options to optimize your sound for Balanced Tone, Vocal Range or Brightness.
- Additionally, tap Custom Audio Setup to complete a short hearing test and customize your AirPods Pro EQ based on the results. After completing the test, select Audiogram from the EQ options.
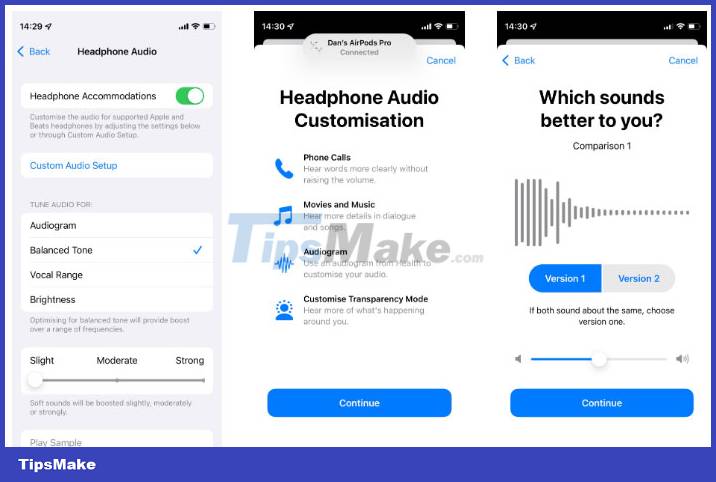
If you're having trouble getting results with Apple's hearing test, you can install Mimi Heist Test (Free) to run a more detailed hearing test. Then, link it to the Health app and select those Audiogram results from the Headphone Accommodation settings for perfectly customized EQ in your AirPods Pro.
5. Disable or edit Spatial Audio
Apple's Spatial Audio feature creates the effect of sound coming from everywhere around you: above, below, front and rear, as well as the classic left and right directions you get with stereo. Your AirPods use Dolby Atmos mixing in streaming apps to achieve this, but the Spatialize Stereo feature can create a similar 3D effect with stereo sources.
Unfortunately, however, not everything sounds better with Spatial Audio. Some songs feel more distant, lose their power, or become difficult to hear when played back in Spatial Audio.
What's more, Apple's Dynamic Head Tracking feature plays sounds when you turn your head, so it always sounds as if it's coming from your device's screen. This is great when you're watching a movie but terrible when listening to music - especially if your iPhone is in your pocket and you turn your head while walking around.
So you might want to experiment with turning off both of these features - Spatial Audio and Dynamic Head Tracking - to improve the sound of your AirPods Pro.
To turn off Spatial Audio, play a song and follow these steps:
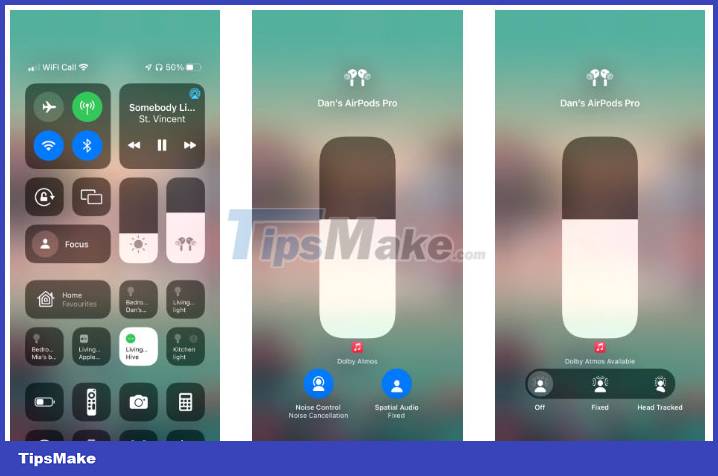
- Open Control Center on iPhone
- Press and hold the volume bar, it will display the AirPods Pro icon.
- Toggle the Spatial Audio or Spatialize Stereo button in the lower right corner.
- To keep Spatial Audio but turn off Dynamic Head Tracking, select the Fixed option.
6. Disable Conversation Awareness
If you own AirPods Pro 2, you'll have access to a handy feature called Conversation Awareness. This is one of the Adaptive Audio features that allows AirPods to continuously listen to voices in your surroundings and adjust your listening experience on the fly.
For example, when someone speaks in front of you, AirPods Pro will lower the volume and emphasize their voice more. This allows you to hear them better and hold conversations easily. When you're both done talking, your AirPods will return to the default Noise Control settings you set up.
While this is very convenient, it can negatively impact the sound quality of your AirPods Pro, especially when you're out listening to music in public. Luckily, you can disable it by following these steps:
- Go to Settings > Bluetooth on your iPhone.
- Tap the info button (i) next to your AirPods Pro.
- Scroll down and turn off Conversation Awareness in the Audio section.
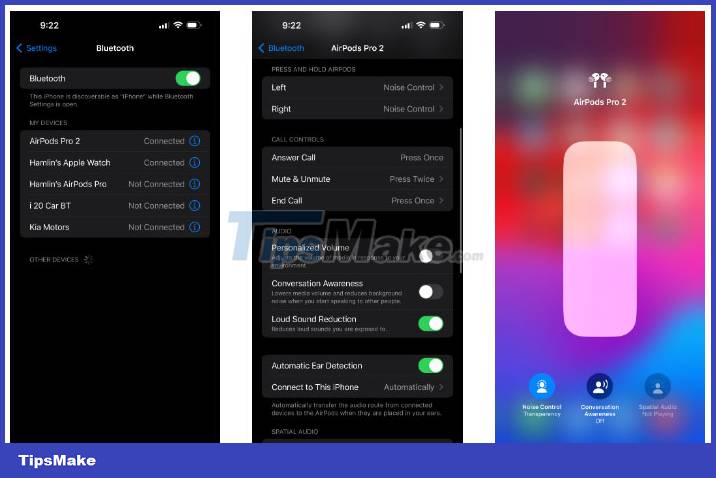
Alternatively, you can turn it off after pressing and holding the volume slider in iOS Control Center.
7. Modify the EQ for your music app
You can adjust the music app's equalizer settings to significantly improve the sound quality of your AirPods Pro. The exact steps depend on the music streaming service you use; Here's how to do it with the two most popular music streaming apps: Spotify and Apple Music.
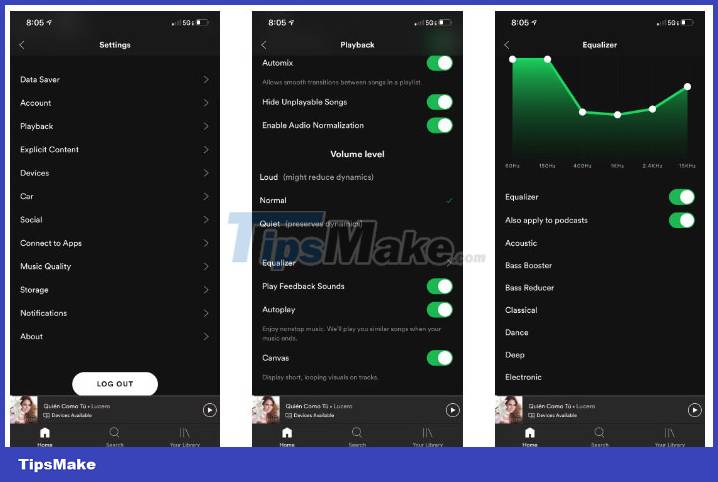
To modify equalizer in Spotify:
- Open Spotify.
- From the Home tab, click the Settings icon.
- Select Playback > Equalizer.
- Check out the preset settings to see which one works best for you. Most people recommend Bass Booster for AirPods Pro users.
- Additionally, you can manually adjust the EQ by dragging the slider at the top of the screen.
To modify EQ in Apple Music:
- Go to the Settings app on your phone.
- Scroll down to Music.
- Select EQ from the list.
- Choose the EQ setting you want. For example, select Increase Bass if you want to increase the bass in AirPods Pro.
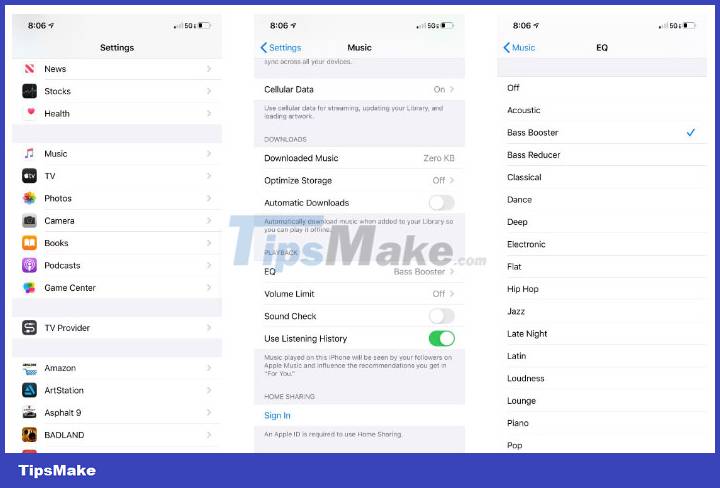
With this, you can increase the bass in your AirPods Pro or make any other changes you need to improve sound quality - after all, everyone's ears and preferences are different.
8. Adjust sound quality settings
You may not be getting the best possible music quality from your music streaming app. Thankfully, it's easy to change these settings, depending on the service you use.
For now, the article will only cover how to do this in Spotify and Apple Music as these are the most popular music streaming applications. However, keep in mind that other streaming services like Tidal and Amazon Music Unlimited offer super hi-fi music streaming for audiophiles.
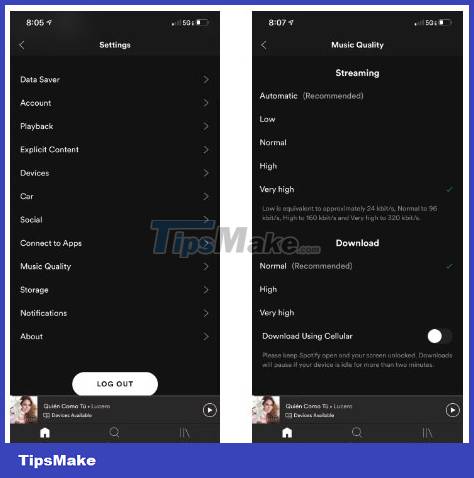
Here's how to improve sound quality in Spotify if you have a Spotify Premium subscription:
- Open Spotify and tap the Settings icon.
- Select Audio Quality.
- Select High or Very High for both streaming and downloading.
In Apple Music, choose the quality of your music by following these steps:
- Go to Settings > Music.
- Under Audio, click Audio Quality.
- From the Cellular Streaming options, select High Quality. Although you can enable Lossless Audio, this will not affect the sound quality as wireless headphones like AirPods Pro do not support this feature.
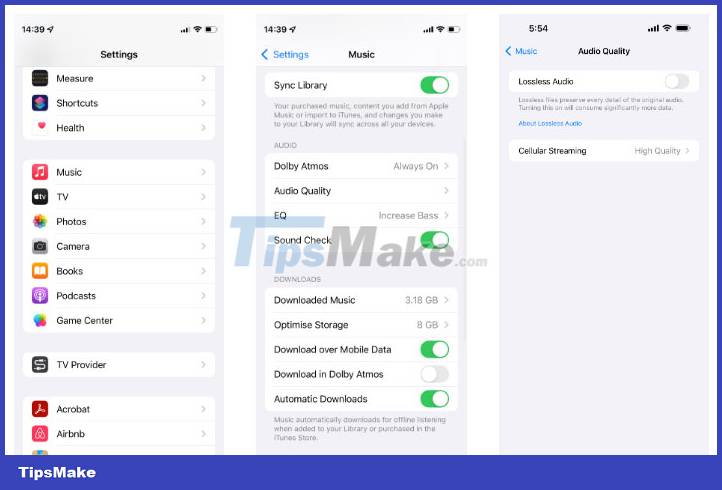
After changing this setting, your music will sound much clearer. However, you should note that this can significantly increase the amount of data used by Spotify or Apple Music. 160kbps (High Quality) or 320kbps (Very High Quality) is a big difference in data compared to 96kbps (Normal Quality). Consider changing this setting only when using WiFi if you need to save data.
9. Charge AirPods
Although this may seem obvious, we often forget that our headphones are running low on battery after listening for a long time. When any audio device runs low on battery, its sound quality tends to decrease. Make sure your AirPods Pro are charged if sound quality seems poor.
Speaking of which, here's a quick tip for wireless charging: Simply touch your AirPods Pro case with your finger to check the battery status. If it shows amber then it is still charging. If it shows green then it is fully charged.
To more easily monitor your AirPods Pro battery level in the future, you can add the Battery widget to your Home screen:
- Touch and hold an empty space on the Home screen.
- Click the Add (+) button in the upper left corner.
- Scroll through the available widgets and select Batteries.
- Choose the widget size you like, then press Add Widget and place it on the home screen.
- Whenever your AirPods Pro is turned on, look for that widget to check the battery level.

Now you can more easily monitor the battery on your AirPods to avoid low battery and maintain their sound. Low battery can also be the cause of the microphone not working on AirPods.
10. Buy Memory Foam headphone tips
Apple's silicone earplugs for AirPods Pro work well. But if you're looking for a better fit or improved bass response, Memory Foam headphone tips may be a better alternative.
Memory Foam, a material commonly used in mattresses, has a soft, smooth texture that adjusts to your ear and remembers its shape for maximum comfort. And although you can buy a lot of Memory Foam headphone tips for AirPods Pro, the article recommends using Memory Foam headphone tips from Foam Masters.
Hopefully, replacing the earphone tip with a new one will fix any remaining sound issues on your AirPods Pro.
The methods listed above will allow you to increase the bass or adjust the equalizer to improve the sound of your AirPods Pro. It's important to get the best sound from your headphones, especially if you've spent a lot of money on them.