What to do when the computer is inactive
One day, you turn on your computer and see it can't work. What is your solution? Take the machine for warranty or try to discover for yourself if it is done? But your problem is how to 'examine' it yourself? With this article, it is no longer a big problem, each step in the article will tell you what to do when the computer is not working and how to fix this phenomenon..
One day, you turn on your computer and see it can't work. What is your solution? Take the machine for warranty or try to discover for yourself if it is done? But your problem is how to 'examine' it yourself? With this article, it is no longer a big problem, each step in the article will tell you what to do when the computer is not working and how to fix this phenomenon.
The term 'computer does not work' here means that your computer is 'dead', meaning there is no signal on the screen. If in case you have seen something on the screen when the computer is turned on and that problem is not in this tutorial. In that case, you have another problem: the computer cannot load the operating system, meaning it won't boot. We will show you how to fix that situation in another article.
The main problem that users are facing in this situation is that they conduct some non-orderly activities and in the end they don't remember what they did. Worse, many people think that they understand how computers work, for example users think their motherboards are still good and try to boot because they 'seem' to hear the hard drive running. This is indeed a bad action because hard drives will spin right after the computer is powered on, even if they are not connected to the motherboard.
Because of this, you should follow the steps of this tutorial. Do not assume that one of the steps is quite simple - many people have to remove the entire computer to find a recently disabled USB drive installed on one of the USB ports that is banned when the computer is working, follow Our guide will detect the problem immediately.
If you've tried a few different things, forget what you have done and start over with this tutorial. Don't jump through the steps because you've seen what we just said.
Are you ready? Let's start the work to do!
Step 1: Examine carefully outside
The first thing you need to do is check your computer. You need to follow the steps below (No need to try turning on the computer)
• Check if the main power cord is plugged in with electricity.
• Check if the main power cord car is securely plugged in with the power supply of the computer (we recommend removing it and plugging it back in for sure).
• Check if the 110 / 220V switch is from the correct power supply.
• Check if the on / off switch on the power supply (located on the back of the computer) is in 'on' mode (if available).
• Check if the reset switch on the front of the case is stuck. You can check by pressing it; If you can't press it, it means it has been stuck and you need to press release it. Remove all the computer's external cables, including the keyboard, mouse, printer, digital camera, iPod, etc. and other external devices that you have attached to your computer such as a USB drive. Only keep each attached monitor cable. So after this step, only the power cord and video cable are attached to your computer.
• Check if the screen is turned on (it will have a flashing LED indicating that it is turned on). If this LED is not turned on or flashing, you can check if the monitor's power cord is plugged in to the power source and whether the plug with the monitor is tight.
• Check the settings for screen brightness and contrast and adjust correctly.
After doing all the steps above, turn on the computer. Does it work now? If the computer still does not have a static action, go to the next step.
Step 2: Look inside: The basics
Now that you have removed all the related problems outside the machine, you need to open the computer. This operation is really simple and you can easily remove this panel.
Now you need to remove everything that is not needed on the computer at startup. This is really an important step. To power on the computer, only the components below are required:
-
Power supply;
-
Motherboard;
-
CPU;
-
CPU cooler
-
A RAM
-
A video card
So everything else needs to be removed from the computer. These can be all add-on cards you have (such as sound cards), hard drives, optical drives, memory modules (leave only one), second video card, case fan , . If your motherboard has an on-board video and an installed video card add-on, remove the video card and install the monitor cable with the on-board video connector.
 Removing components need to be done gently and shorten the power supply because the power supply may damage these components of you. Since your computer is not turned on, it may be difficult to detect the problem. To ensure that there is no power supply for these components, you only need to remove the main power cord from the device. This is the best way to implement this procedure.
As you have seen from the list above, the computer does not need any hard drive to boot. Therefore, do not forget to remove them (you need to remove the cable connecting the hard drive to the motherboard and the power cable). You also need to disconnect the existing fan in the case.
After removing these unnecessary computer components, turn on the computer (do not forget to plug the power cord into an electrical outlet). Does it run? You have solved the problem and now need to reinstall all the parts in the right place, remember to be one by one (that is, turn off the computer and then reinstall the parts one by one, just turn on the part you turn on the device count back to see if it can boot. Do not forget that you can only install components when the computer is turned off, so it is necessary to turn off the device before installing the next part. If after reinstalling a part and your computer cannot work, it means that the newly installed part is problematic, you need to eliminate and replace it or it may be a problem of poor contact. For this part, we will show you how to do this in step 4. Do not reinstall all of the components simultaneously because doing so will not detect any components that have errors. That is why we recommend you to reinstall part by part and turn on the computer after each part is installed.
If your computer is still not running, it means that a component in the section listed above has an error or contact problem. Before continuing, let's see what happens when you turn on your computer, this time with the opened case only the parts listed above:
• Does your power supply have a power split? This problem can be checked by watching whether the LEDs on the motherboard and the LED on the front of the case are green when the machine is turned on (press the on / off switch). If it does not power, this means that the power supply has been damaged and must be replaced with another.
• Does the CPU fan spin? If it does not spin and then the source is not broken, it means that your CPU fan has been damaged and needs to be replaced. Some motherboards with protection circuitry will turn off the system if the CPU fan does not work.
• Does your computer seem to be working for a while then turned off immediately (ie the CPU fan rotates for a while then the computer turns off automatically)? This may be due to a few things but now you should try to reset the memory of CMOS (this procedure will be introduced below).
• Can you hear the beep from the speaker side mounted on the case? If this is the case, it means that the machine has contact problems on the video card and memory modules or it may be broken.
Step 3: Clear CMOS memory
The next step is to erase the CMOS memory, which is a small memory card mounted on the motherboard to handle computer configuration. This is done by changing the position of a jumper or shortening two pins on the motherboard with a flat screwdriver. The exact position of jumpers or pins depends on the motherboard and you must find its exact position on the board's instruction manual (usually they are written 'Clear CMOS', 'CCMOS' or ' CLRTC 'on the side). In the picture below, we give some examples.
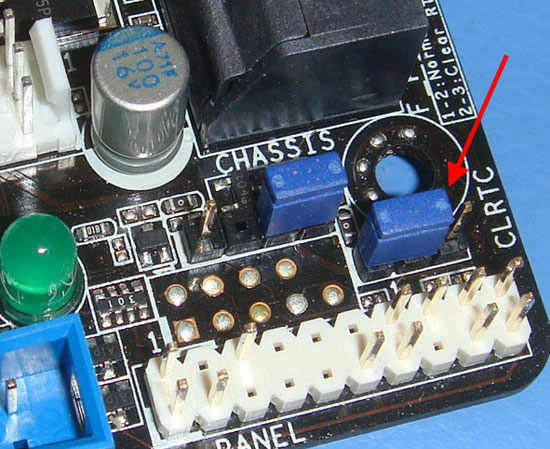
Figure 1: Clearing CMOS jumpers (you need to change its location)
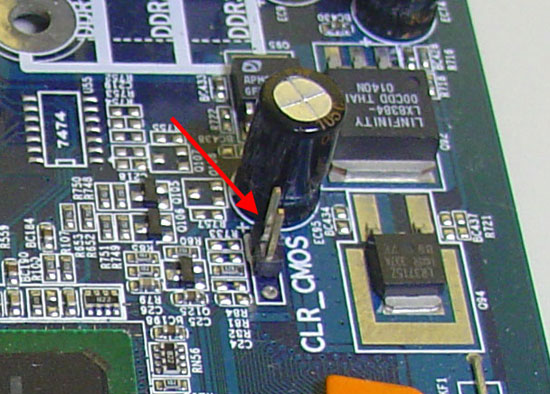
Figure 2: Removing CMOS pins (you need to short-circuit them with a flat screwdriver)
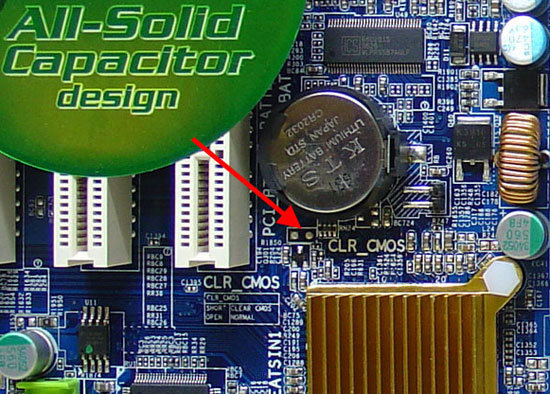
Figure 3: Clearing CMOS pads (you need to short circuit with a flat screwdriver)
The procedure is exactly the same: with the computer turned off (ie the power cord has been unplugged), you switch the position of the jumpers or short the two-legged circuit with a flat screwdriver and hold it for about 2s, after then switch the jumper back to the default position and turn on the computer again.
If this step does not solve your problem - that is, if the computer still does not boot, you need to take the next step. If clearing the CMOS memory solves the problem, you need to do two things. First, reinstall all the components of the computer to its correct position. The second is to install the motherboard to reconfigure it. Your computer will tell you that the CMOS memory has been erased, so press F1 to enter the installation and reconfigure it.
What to do when the computer is inactive (The last part)
Gabriel Torres