Transfer from Linux Mail Server to Exchange Server 2007 (Part 1)
Anderson Patricio
In Exchange Server 2003, we can use the Exchange Migration Wizard to switch from an IMAP4 running environment to Active Directory and Exchange Server 2003.
However, in this article we do not want to talk about Exchange Server 2003 but instead introduce Exchange Server 2007. We will introduce how to transfer directly from Linux Mail server running Postfix and POP3 to Exchange Server 2007 This scenario is also useful for small and medium-sized companies that still don't want to switch to 2003 through the Exchange Server Migration Wizard and then to Exchange Server 2007.
All the steps introduced in this series may be altered slightly to better suit your current scenario. Changing some steps in deployment is not very complicated, but the best way for this type of conversion is to understand how the current environment is operating (server and client) and create an experimental deployment. to validate.
Our topic is: create all users who are using Linux information to the new Active Directory / Exchange Server. In the last part we will transfer the user's current notification data to Exchange Server 2007 through Outlook 2007 deployment.
Current scenario
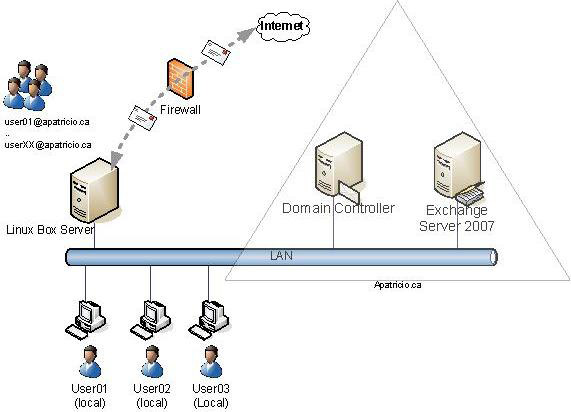
In this article, we have a peer network, all workstations in the network are in workgroup mode and have a local user on each computer, all users query their mailings. using Outlook Express from the Linux Box, see Figure 1.

Figure 1: Current scenario
In the current environment, all workstations are configured using srv-linux.apatricio.ca such as POP and SMTP Server (Figure 2), all users have at least 2 passwords, one use Local and one used to access mail in Linux Box.

Figure 2: Defined configuration in Vietnamese workstations (using pop3 and SMTP)
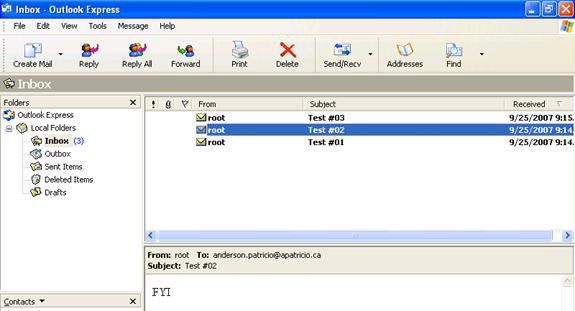
We can also see ordinary users accessing their mail via Outlook Express (Figure 3).

Figure 3: Use Outlook Express to send and receive notifications from Linux Box
We will use the current information in the Linux Box to create new users in Active Directory. This information is in the passwd file inside the Linux box and you can find it at / etc / passwd . In this File we have some valuable information, such as username, office and phone number. To validate which information a user has, finger can be used, see Figure 4. Since we have usernames and other information, additional information can be added in the documents. Active Active Directory account.

Figure 4: Gather information using finger
Note :
To change the current user's information in the Linux box we use chfn .
We need to create an Active Directory structure, create user name accounts already in the Linux box, install Exchange 2007 and transfer all workstations to a new domain and set them up so we can use it. Exchange 2007 and Outlook 2007. In this scenario, we want to transfer directly to Exchange Server 2007 and not transitions between mail systems. So our goal in this article is:
- Build Active Directory
- Build an Exchange Server 2007 environment to be able to work with existing clients, access mail.
- Configure Exchange Server to work with the current environment
- Transfer user and profile from workgroup environment to domain
- Improve the user experience by installing Outlook 2007 and using the MAPI protocol.
Create a new infrastructure
In preparation for the prerequisites required for the transfer between the two mail systems, we will deploy Active Directory and Exchange Server, however, the current environment will not be affected.
- Install a Windows Server 2003 + Service Pack branch and new hotfixes
- Create an Active Directory forest and the domain is called apatricio.local . The old DNS used by Linux box is apatricio.ca and it will be supported in the new environment.
The new Active Directory creation process will not be introduced in this article, readers can refer to how to create in Windows Server 2003.
Note :
We must use at least two Domain Controllers to be able to provide tolerance for authentication and some network services. - After we finish deploying Active Directory, we can log in with the new administrator credentials, open the DNS management interface. We must create a new zone with the same name that the current clients are using to analyze the services. In the scenario of this lesson, it is apatricio.ca
- Update this zone with all hosts included in the DNS Linux box because when we change the status of all current workstations they must also access the same services.
- Install DHCP Server in Active Directory. This step depends on how your current environment is defined. There are two options here:
- Workstations and servers using manual IP addresses: This is the best scenario, because we have to deploy the new DHCP server and note that the IP range for new clients will not conflict conflict with the current IP address. All servers need to be configured manually but new IP settings must be updated.
- Linux box has a DHCP Server: in this scenario we have to validate the current range that the Linux DHCP server is providing, disable the service and create a range that does not conflict with the current IP address.
In both scenarios, the new DHCP server needs to go through the correct settings to the workstations. These settings must be at least: DNS Server of Domain Controllers, DNS suffix of the new Active Directory domain (apatricio.local).
At this point, our workstations need to receive IP configuration data from the new DHCP Server and analyze the hosts through the new DNS Server. The next step is to install Exchange Server 2007:
Use the Exchange Server 2007 Setup wizard to install Exchange Server 2007
1. Install prerequisites (.Net Framework, PowerShell and MMC 3.0 if we do not use R2 operating system), these items will be available in the first installation screen.
2. After all prerequisites have been installed, click Step 4: Install Microsoft Exchange .
3. In the introduction window, simply click Next .
4. In the License Agreement, click on I accept . and click Next .
5. Error Reporting . Choose your option to send errors to Microsoft and click Next .
6. Installation Type . In this article we will use a separate server, then click the Custom Exchange Server Installation button, and if necessary change the location where Exchange Server will be installed. Click Next .
7. In the server role, select Mailbox, Hub Transport and Client Access roles and then click Next .
8. In the Exchange organization , define the Exchange organization name and click Next .
9. Client Settings . If you are going to use Public Folder or will install Outlook 2003, click Yes . After selecting, click Next .
10. Readiness Checks , validate whether everything is OK then you click Install .
11. Completion . Validate whether all roles are installed and click Finish (Figure 5).

Figure 5: Finish the Exchange Server 2007 installation
12. Install the latest service pack currently being provided
13. Install the latest Update Rollup (if available).
Suppose we have an Exchange Server and there are extensive steps to perform to properly configure the new Exchange Server 2007.
First, activate the new server to be able to send and receive mail from the Internet.
Note :
Do not change firewall settings - follow Exchange Server to send and receive mail from the Internet.
The second step is to enable Web Services and correct certificates in Exchange Server 2007.
Transformation - current status (Update # 01)
We have just deployed a new environment equivalent to the current environment. This environment has no effect on our clients. An overview of what we have done so far is shown in Figure 6.

Figure 6: The environment is changing slowly.We have Active Directory and Exchange 2007 already deployed
All clients need to receive IP configuration data from the Active Directory DHCP Server and analyze the names from the DNS server (these names are in Active Directory). The current regions in this new domain are apatricio.local, which holds Active Directory and apatricio.ca information that has been created to maintain the previous environment compatibility.
Conclude
In the first part of this series, we came up with a script and started creating an equivalent environment. The first goal is to migrate some network services to the new environment without interrupting existing clients. In the next part of this series, we will create new users with the existing information already in the Linux box.
 Transfer from Linux Mail Server to Exchange Server 2007 (Part 2)
 Transfer from Linux Mail Server to Exchange Server 2007 (Part 3)