Steps to create your own screensavers in Windows
Steps to create screensavers in Windows 10
Step 1. Arrange the desired screensaver images in a folder of your choice (or use the default My Pictures folder).
Step 2. Right-click anywhere on the desktop to access the Personalize applet. Select the Lock Screen tab and then go into Screen saver settings.
Step 3. In the window that opens, select Photos from the drop-down menu. To choose a source other than My Pictures, go to Settings > Browse and choose a different location before clicking Save.
Step 4. Configure the settings according to the given options, click OK or Apply and your first homemade screensaver is ready to go.
Steps to create screensavers in Windows Vista
The process of creating screensavers on Vista is similar. Follow these steps to find tools that turn your photos into screensavers.
Step 1. Right click and go to Personalize > Screen Saver > Settings.
Step 2. Select Photos from the Screen Saver menu.
Step 3. The Settings section of the screensaver will allow you to further customize:
You can have a lot of media content, but there are ways you can customize what you do and don't want to see with a few easy clicks.
- To show only photos with a specific tag, enter the tag in the With this tag box associated with the photo.
- To show only photos with a specific rating, click the star rating on the With this rating or higher list.
- To apply the slide show theme to the screensaver, select a theme from the Use this theme list.
- To play photos and videos in random order, check the Shuffle contents box.
Steps to create screensavers in PowerPoint
We all get high impact motivational PowerPoint attachments in our inbox from time to time. You can turn them into attractive screensavers quite easily with the help of PowerPoint 2021. Here's how to create screensavers from slideshows:

Step 1. Open the presentation that will become your screensaver in PowerPoint 2021.
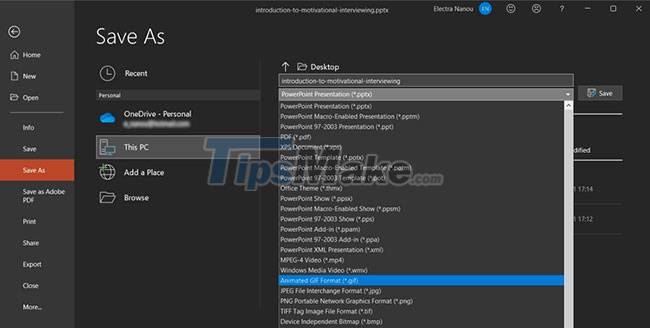
Step 2. Click File > Save As to open the Save As window.
Step 3. Through the Save As window, select an empty folder or create a new folder to hold the PowerPoint images.
Step 4. Enter any filename you want. In the Save As Type drop-down menu, scroll down to select any image format (GIF, JPG, TIFF, PNG, BMP). Click Save.
Step 5. PowerPoint provides an option to save all slides or just the current slide as an image. Select an option to end this part of the process.
Step 6. Then screensavers can be activated using the Personalization tab > Locks Screen > Screen saver settings as mentioned earlier. Remember that this method does not retain any of the animations, transitions, and embedded media that were present in the original PowerPoint slide.
Steps to create screensavers with Google Photos
Google Photos has replaced Picasa as one of the best free photo management apps out there, and it has a nifty feature that lets you create and download slideshows.

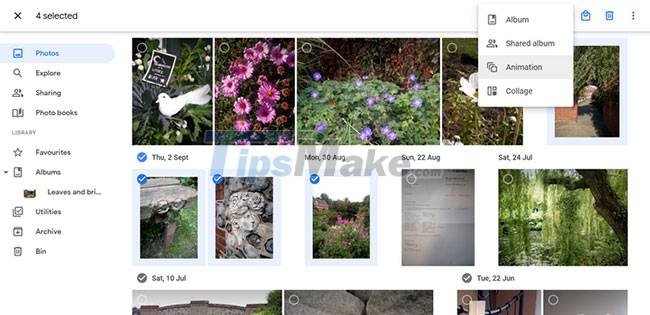
Step 1. Open Google Photos and click the Photos tab.
Step 2. In Photos, select the picture you want in the screensaver.
Step 3. Click the Add to or create new plus icon at the top, then click Animation.
Step 4. When Google Photos shows you the slideshow, go straight to More options > Download.
Step 5. Set the downloaded GIF file as a screensaver and you're done.
Steps to create screensavers with Finalhit
If you are wondering how to create screensavers with specialized software, check out what Finalhit has to offer.

It's an app you can download and use to design screensavers that are a bit more detailed than the standard Windows options. It comes with a free trial, so you can try it out before you decide to buy.
Here's how to create your own screensavers with Finalhit:
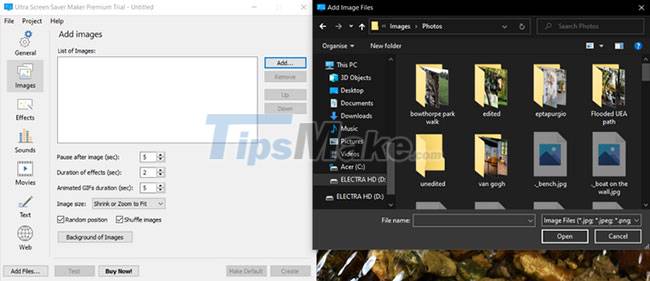
Step 1. Launch Finalhit and select desired image, video, audio or text.
Step 2. In all these tabs you will find the Add button. Use it to upload the files you want.
Step 3. Adjust the settings of each element, which may include pause options, duration, size, etc….
Step 4. Click the Effects tab and select any options you want.
Step 5. When ready, click the Create button and use the file as a screensaver.
Steps to create screensavers with Blumentals
Another downloadable app to consider is Screensaver Factory by Blumentals. It works like Finalhit, including a free trial, but with a clean interface and more tools, especially for professional users.

For example, in addition to photos, animations, and sounds, you can add shapes, background patterns, and promotional features to market your brand.
Here's how to put all of this into a cool new screensaver:
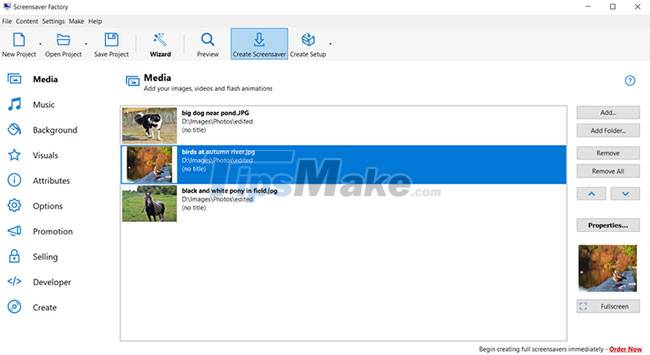
Step 1. Launch Blumentals and click the New Project button.
Step 2. Use the Add or Add folder buttons to bring in all the audiovisual elements you need.
Step 3. Customize everything via the Properties button, as well as the menu in Options.
Step 4. Click Create Screensaver to save the finished project on your computer.