Table of Contents
Learn how to create games in builda with clear steps, practical tips, and troubleshooting guidance for a reliable result.
Builda
I. Instructions for creating Builda games
Step 1: Open the Builda App and access the Creation Menu
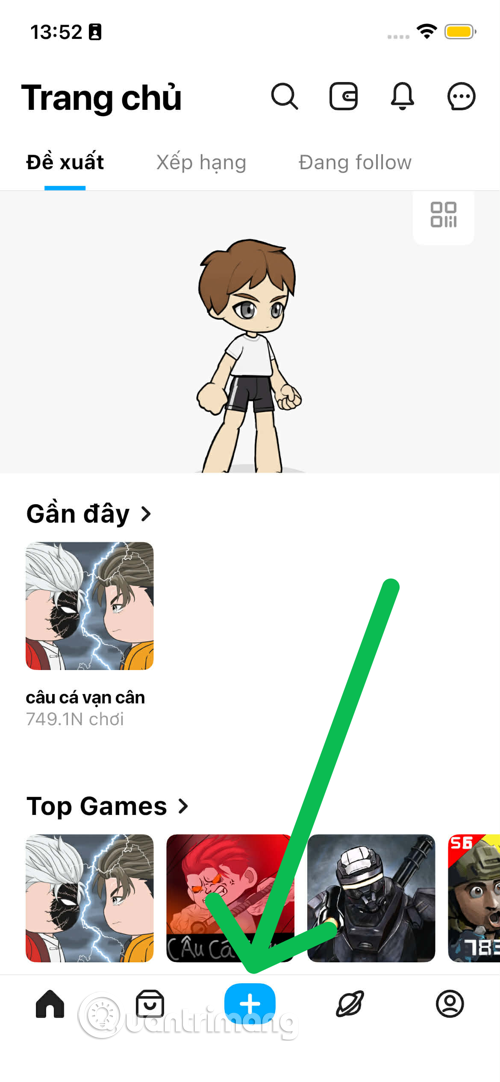
- Open the Builda app on your device (iOS/Android).
- Find and tap the "Create" icon or the large plus (+) icon in the bottom navigation bar. This is your gateway to all of Builda's creative tools.
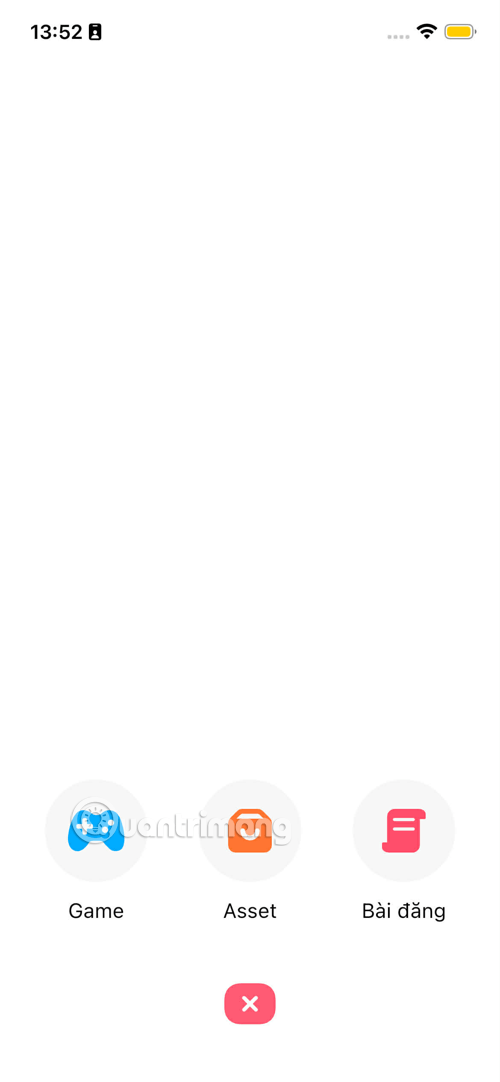
Step 2: Start a new project
- In the Game Creation Menu, select Start New Project.
- Choose a Template (Available Template) that suits the game genre you want. Including solo games, RPG games, tower defense games, online pvp games, hunter and play genres.

Explore the game creation menu
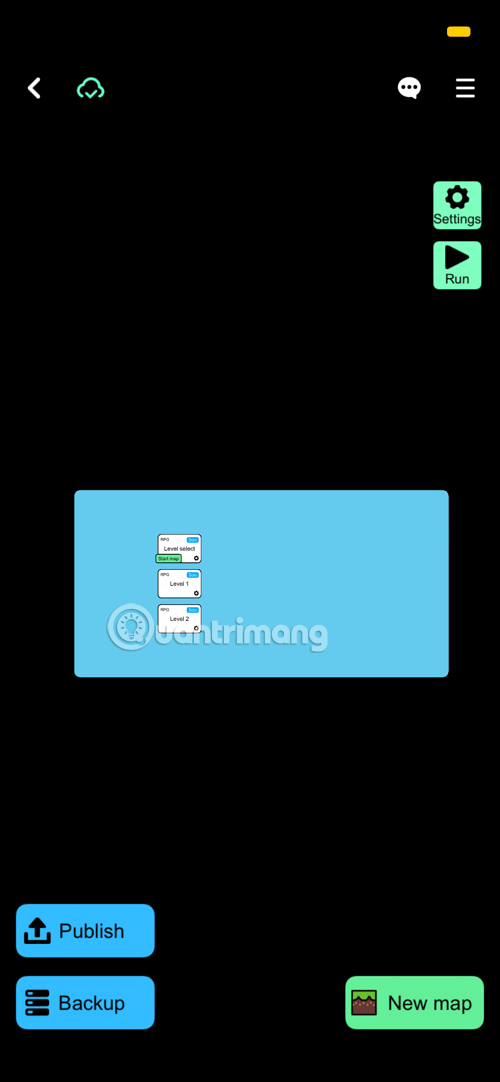
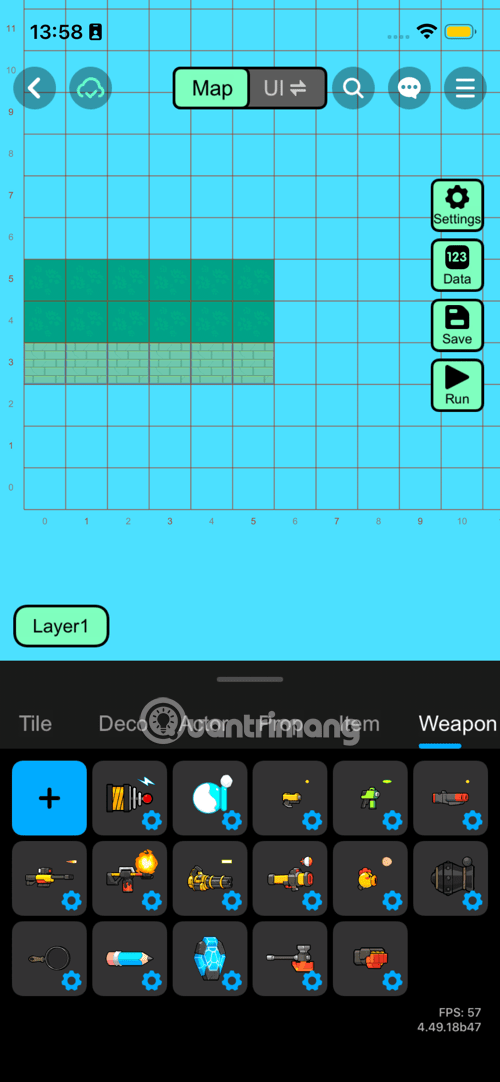
Once you have created your project, you will be taken to the main Studio interface. This interface is divided into sections, each with an essential function.
1. Project
This section manages your game as a whole, from structure to general settings.

Game Settings
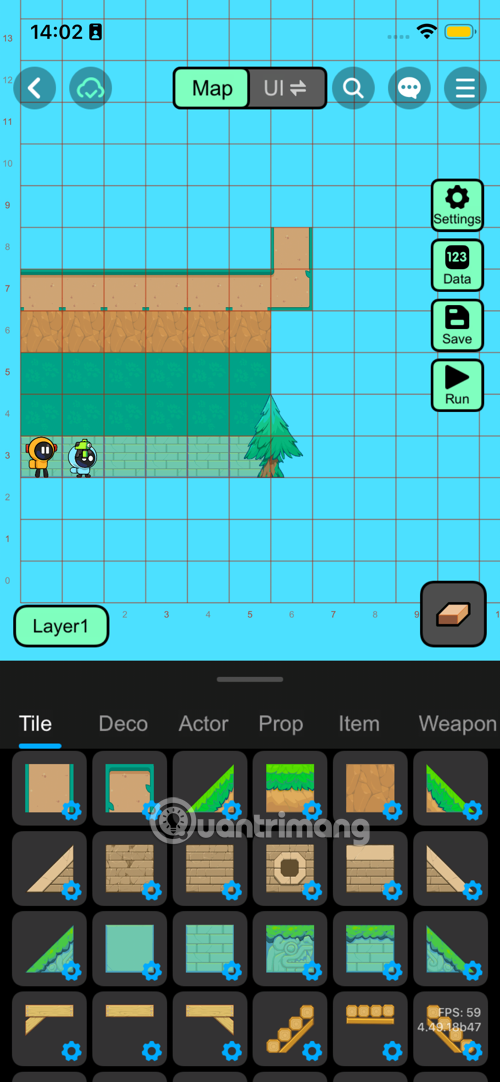
A. Top Bar
-
<(Back / Back):-
Effect: Returns to the previous screen, usually the project management interface (Project Menu) or the scene list (Scene List).
-
-
AI prompt: "Explain game settings for How to Create Games in Builda in clear US English, with practical examples and actionable steps."(Undo/Redo / Undo/Redo):-
Effect: Allows the user to undo the last action of placing or deleting an object, or redo the undone action.
-
-
Map(Map):-
Effect: Default mode for designing and building the terrain structure of the game screen by placing Tiles , Actors , Props , etc., on the grid.
-
-
UI ⇄(UI Switch / User Interface Switch):-
Effect: Switches to User Interface (UI) elements editing mode. This mode is used to add interactive elements such as buttons, health bars, score bars, or other informational overlays to the game screen.
-
-
AI prompt: "Explain game settings for How to Create Games in Builda in clear US English, with practical examples and actionable steps."(Search / Search):-
What it does: Open the search bar to quickly find assets in the app's large library or in the project's asset store.
-
-
AI prompt: "Explain game settings for How to Create Games in Builda in clear US English, with practical examples and actionable steps."(Chat / Conversation):-
Purpose: Could be a button to access community tools or discussion/suggestion features during game creation.
-
-
AI prompt: "Explain game settings for How to Create Games in Builda in clear US English, with practical examples and actionable steps."(Menu / Options Menu):-
Effect: Opens the additional options menu for the editor (e.g. mesh display options, scene import/export).
-
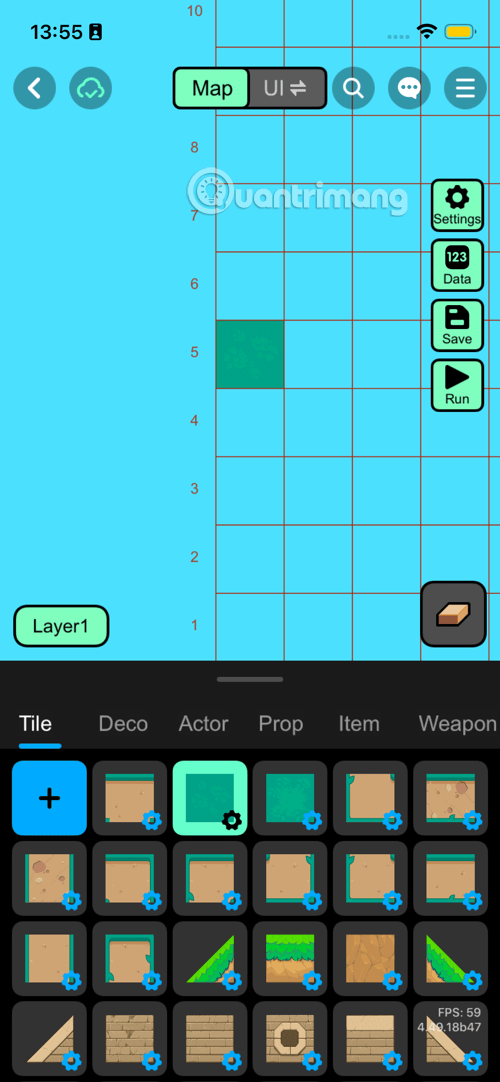
B. Side Panel
-
Settings(Gears / Settings):-
Effect: Opens the advanced settings for the Scene. You can adjust physics properties such as Gravity , Scene Size, BGM settings, and Background Color.
-
-
Data(123 / Data):-
Function: Manages and sets up game-related data, including Variables , character Spawn Point , and game Initial Values.
-
-
Save(Save):-
Effect: Saves all editing progress and changes you have made on the current level to the project.
-
-
Run(Test Run):-
Effect: Start the game immediately in the test environment (Test Environment) for users to quickly check interactions, command block logic and gameplay feel.
-
II. Main game design area (Grid Area)
-
Grid System:
-
Purpose: Provides a precise coordinate system (numbered on the X and Y axes) for aligning objects. The grid helps ensure tiles fit together perfectly and simplifies level design.
-
-
Layer1(Grade 1):-
Effect: Indicates the current layer being edited. The Layer system allows objects to be placed in order of depth (e.g. Layer 1 is the background, Layer 2 is the character, Layer 3 is the foreground item).
-
III. Object placement toolbar (Asset Palette / Bottom Bar)
This section contains asset categories and specific asset slots to drag and drop into the game.
A. Classification of structures in game creation interface
-
Tile(Brick/Background):-
Purpose: Used to build the static structure and terrain of the level. These are the base blocks (earth, walls, floors) that create the physical space for the character to move around.
-
-
Deco(Decoration / Decoration):-
Purpose: Objects that are purely aesthetic , non-collidable, and have no game logic. Used to beautify the environment (e.g., trees, lampposts, paintings).
-
-
Actor(Actor/Character):-
Actions: Objects that can move and are the subject of complex game logic. Includes the Main Character, Enemies, NPCs (Non-Playable Characters), and other dynamic objects.
-
-
Prop(Props):-
Actions: Physical objects can be interacted with but typically do not have artificial intelligence (AI). For example, boxes can be pushed, doors can be opened, traps have simple mechanisms.
-
-
Item(Item):-
Effects: Objects that the player can collect to gain benefits or points (e.g. coins, keys, power-up items).
-
-
Weapon(Weapon):-
Effect: Items that are specifically used for offense or defense (e.g., swords, guns, bullets, shields).
-
B. Asset Tiles
-
Plus Sign (
+/ Add New) Button:-
Effect: Opens the Asset Creator tool, allowing users to draw (Pixel Art) or design a new object or character to use in the game.
-
-
Tile Graphics:
-
Effect: Represents a specific asset that has been created or imported. The user selects one of these tiles and clicks on the grid to place it on the screen.
-
-
Small Blue Gear Icon (Logic/Property Setting):
-
Effect: Indicates that this object can be given specialized properties (e.g. setting a tile to be "ice material" to make it slippery) or have its own Command Block Logic attached to it.
-
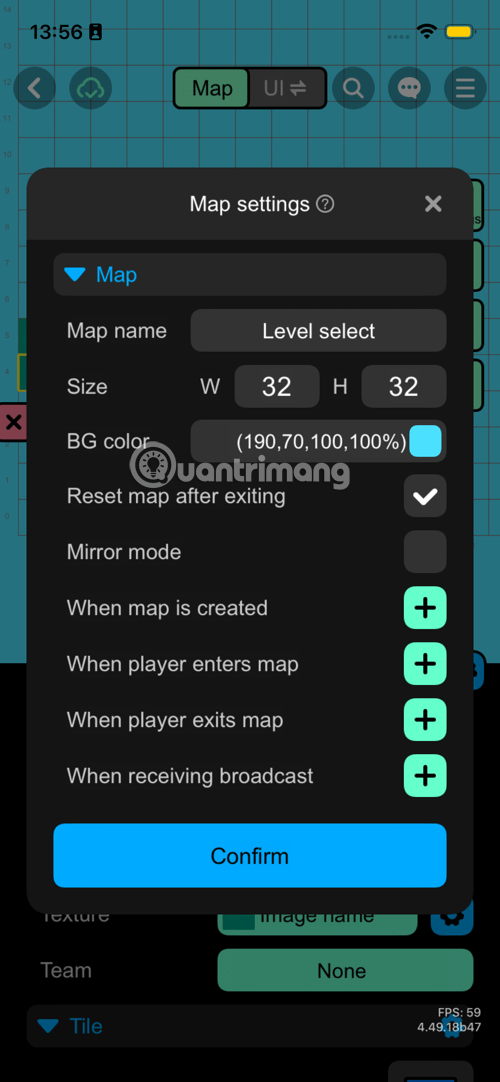
2. General Map Settings (Settings - Gear)
-
Map(Map):-
Purpose: The general title for these settings. Usually accompanied by a drop-down arrow, allowing switching between different types of settings (e.g. Map Settings and Physics Settings ).
-
-
Map name(Map Name):-
Purpose: Names the current level. For example, in the image it is "Level select". This name helps to manage easily in the Project Menu and helps players to recognize the level.
-
-
Size(Size):-
Values: W (Width) and H (Height), for example: 32x32.
-
Effect: Sets the overall size of the game screen in tiles. This size determines the player's movement range and the space for building terrain.
-
-
BG color(Background Color):-
Value: Color (eg: (190, 70, 100, 100%)) and a blue checkbox.
-
Effect: Sets the color displayed in the background behind objects (Tile and Actor). Adjusting the background color helps set the overall atmosphere of the game.
-
-
Reset map after exiting(Reset map after exit):-
Type: Checkbox.
-
Effect: If checked (checked), any changes to the object's state (e.g., Prop destroyed, Item collected) will be reset to its original state every time the player exits the stage and returns. If unchecked, the state will be preserved (e.g., a solved puzzle will not need to be solved again).
-
-
Mirror mode(Mirror/Symmetry Mode):-
Type: Checkbox.
-
Effect: If selected, any object placement on one side of the map will be reflected on the opposite side (often used for levels that require symmetry).
-
II. Set up logic in the map (Event Logic Settings)
This section defines the Script Blocks that will be triggered when a specific event occurs in the level. Each item has a plus (+) button to add logic.
-
When map is created(When the map is created):-
Purpose: Defines logic that will run ONLY ONCE when the level is first loaded into memory (before the player sees it). Often used to initialize variables, set the initial state of enemies, or run introductory animations.
-
-
When player enters map(When the player enters the map):-
Purpose: Defines logic that will run EVERY TIME the player moves from another map to this one. Usually used to display a welcome message, set the starting point, or check conditions (e.g. check if the player has a key). Transfers characters, items, sounds, notifications. to the new map, the resources will be created similarly to when you create a new map.
-
-
When player exits map(When the player exits the map):-
Purpose: Defines logic that will run EVERY TIME the player leaves this level to move to another level. Usually used to temporarily save data, set the destination for the next level, or display the results/score screen. Similar to joining a map, except this is exiting the map.
-
-
When receiving broadcast(When receiving broadcast signal):-
Purpose: Defines the logic that will run when a stage receives a broadcast signal from an Actor or another stage in the game. This is the core tool for different parts of the game to communicate with each other (e.g. An item broadcasts the "GAME_WIN" signal and the stage receives the signal to display the victory screen).
-
In addition to the above options, you also have the option to Zoom Map, follow camera or zoom freely below.
III. Operation Buttons
-
-
Confirm(Confirm):-
Effect: Apply and save all changes you have made in this Map Settings window.
-
-
X(Close):-
Effect: Closes the Map Settings window without saving the changes you just made (unless there is a separate Save button in this window).
-
-
3. Player Variable Card (123 icon - Data)
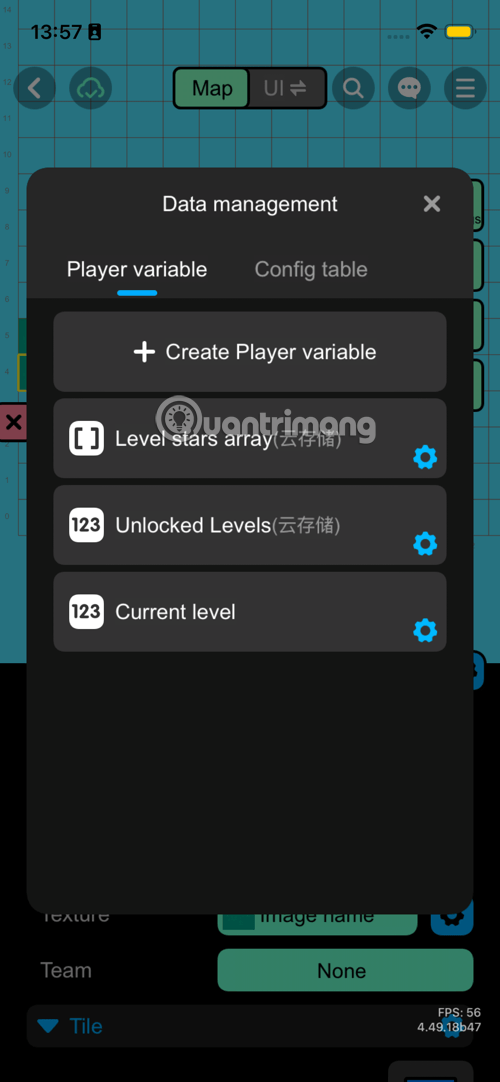
This section manages variables whose values change during the game and are usually saved for each player.
A. General Functions
-
Create Player variable(Create Player Variable):-
Purpose: Allows the user to create a new variable. These variables are used to store information such as Score, HP, Coins, Item Quantity, etc.
-
-
AI prompt: "Explain 3. player variable card (123 icon - data) for How to Create Games in Builda in clear US English, with practical examples and actionable steps."(Settings / Settings):-
Purpose: Allows editing of variable properties, such as variable name, initial value, variable type (number, text, boolean), and most importantly whether the variable is stored in the cloud (Cloud Storage) .
-
B. Examples of Default/Created Variables
-
Level stars array(Star Level Array - Cloud Storage):-
Variable type: Array – used to store multiple values at the same time.
-
Purpose: Usually used to store the number of stars (or completion points) the player has achieved for each level in the game (e.g. Level 1 is 3 stars, Level 2 is 2 stars). The symbol (云存储) indicates that this data is stored on the Builda server (Cloud Save).
-
-
Unlocked Levels(Unlocked Levels - Cloud Save):-
Variable type: Number or Array.
-
Purpose: Stores information about what level the player has unlocked . This is important data to maintain game progress.
-
-
Current level(Current Level):-
Variable type: Number.
-
Purpose: Stores the level number the player is currently playing. This variable helps the game know which level to load when the player returns to the game.
-
II. Config table tab
-
Purpose: This card is used to manage data that is fixed and does not change during the game. For example:
-
Enemy Attributes: Strength, Speed, Initial Health.
-
Item Price: Fixed selling/buying price of items in the store. Also set image, quantity, sound, UI.
-
Level Settings: Fixed parameters of each level (like max damage, time limit).
-
-
Benefits: Separating configuration data from game logic allows for quick editing and balancing without changing command blocks.
III. The Importance of Data Management
The Data Management interface is the brain of every game. By defining variables here, Builda users can:
- Save Progress: Ensures players do not lose data when exiting the game.
- Creating Complex Logic: Variables are the foundation for writing conditional (If/Else) blocks and calculating scores.
- Customize Your Experience: Easily adjust level and item values in the Config table to fine-tune the difficulty and player progression.
4. Edit UI (next to Map)
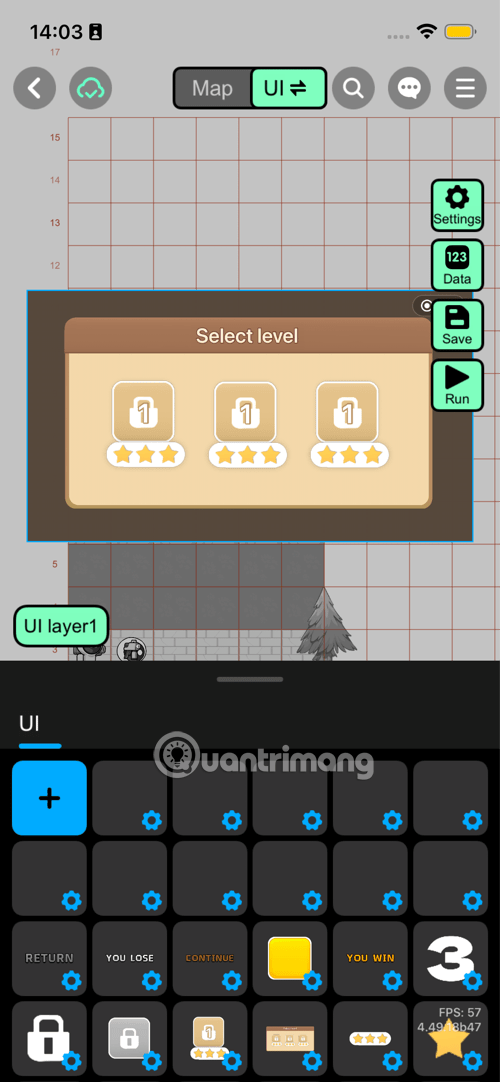
Interface structure
-
Grid Area: Still the main design area, but instead of placing game objects (Tile, Actor), you place UI components here.
-
UI layer1(UI Class 1):-
Effect: Similar to the map Layer system, but specifically for UI. Helps you manage the depth of windows, buttons (eg: Buttons are on top of Popup windows, Popup windows are on top of the game background).
-
II. UI Asset Palette / Bottom Bar
This section contains drag-and-drop components that make up the user interface.
-
Plus Button (
+/ Add New UI Element):-
Purpose: Allows users to create new basic or custom UI elements, such as:
-
Text: Add text (e.g. "Select level", "Score").
-
Image: Add an image or icon (e.g., currency symbol, background image).
-
Button: Add interactive button (can assign command block logic when pressed).
-
Slider/Bar: Add slider, HP Bar, or EXP Bar.
-
-
-
UI Asset Tiles:
-
Purpose: Represents UI templates that have been created or are available in the library. The user selects a template and places it on the screen.
-
Small Blue Gear Icon: Indicates that this UI element can have its properties edited (color, size, font) or has its own Command Block Logic attached to it (e.g. assigning a "Scene Transition" command to a button).
-
III. Typical UI Patterns in the Library
The UI patterns in the image are usually basic notification windows or buttons:
-
RETURN(Come back):-
Action: Usually a logical button, assigned to return to the previous screen, main menu, or close the current window.
-
-
YOU LOSE(You Lose):-
Effect: A window or image displaying a failure message, usually appearing when the main character runs out of health or runs out of time.
-
-
CONTINUE(Continue):-
Purpose: A button, often used in the Lose/Pause game screen, assigns a command that allows the player to continue playing (e.g., after watching an advertisement).
-
-
Yellow Box (Placeholder):
-
What it does: A blank box that can be used as a background for pop-up windows, or as a graphic element that can be recolored and resized to create different shapes.
-
-
YOU WIN(You Thang):-
Effect: A window or image displaying a victory message, usually appearing when the player completes a level objective.
-
-
3(Big Count/Clock):-
Purpose: A large number display, often used as a countdown at the start of a level or to display an important value (e.g. Number of lives remaining).
-
-
AI prompt: "Explain iii. typical ui patterns in the library for How to Create Games in Builda in clear US English, with practical examples and actionable steps."(Lock):-
Function: Icons that indicate the locked state of a level or feature, are used to overlay buttons. Game logic will control the icon to disappear when the level is unlocked.
-
-
AI prompt: "Explain iii. typical ui patterns in the library for How to Create Games in Builda in clear US English, with practical examples and actionable steps."(Level Rating/Select):-
Effect: The templates display level completion status (such as number of stars achieved) or boxes for the player to select a level.
-
5. Evaluate the ability to create games on Builda
Builda is not a traditional game development tool, but a Simplified Game Engine.
Advantage:
- No Code Required: Use drag-and-drop Visual Scripting instead of writing complex code.
- Community Integration: Easily share, playtest, and get feedback from the community right in the app.
- Custom Graphics: Supports simple pixel art and 3D drawing tools, allowing users to design their own game assets.
Limit:
- Best suited for simple game genres like 2D Platformers, Puzzle Games, Simulations, Story-Based Adventures, and Basic Card/RPGs.
- Difficulty creating games that require complex physics, AAA graphics, or intensive multiplayer mechanics.
Builda removes the technical barriers of programming, making game creation an accessible creative activity.
Although Builda can seem a bit complicated for those who have never been exposed to game creation, by mastering simple yet powerful tools like Art Assets and Scripting Blocks, anyone can create a unique game without needing too much IT expertise.
Final Thoughts
Use this guide as a practical checklist for how to create games in builda. Work through the steps in order, verify each result, and adjust the options to match your needs.
Frequently Asked Questions
What do you need before following this How to Create Games in Builda guide?
Review the required tools, accounts, settings, or materials mentioned in the article. Learn how to create games in builda with clear steps, practical tips, and troubleshooting guidance for a reliable result.
What are the main steps for how to create games in builda?
Follow the sections in order, especially I. Instructions for creating Builda games, Explore the game creation menu, 1. Project. Complete each step before continuing and verify the result as you go.
What should you do if the process does not work as expected?
Recheck the prerequisites, update the relevant app or service, review the settings, and repeat the step that caused the issue. Use any troubleshooting notes included in the guide.
Was this article helpful?
Your feedback helps us improve.
Related Articles
 Builda Fishing Guide8 minutes read
 How to Create Professional Review Games with Genially AI6 minutes read
 How to Download Fishing for Ten Thousand Pounds for PC8 minutes read
 Scratch: a Guide to Creating an Opening for a Project5 minutes read
 How to Create Games in PowerPoint with Animated Effects5 minutes read
 How to Create Mind Maps Using AI4 minutes read
Reader Comments 0
Sign in with email or Google to join the discussion.