How to Uninstall BearShare
Part 1 of 4:
-
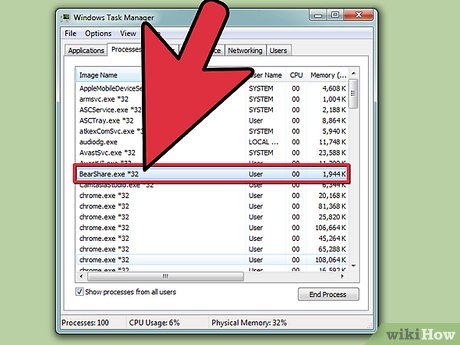
 Force-close the BearShare program. Before uninstalling, close all of your browser windows and press Ctrl+Alt+del to open the Task Manager. Click the Processes tab and look for the 'bearshare.exe' program. Highlight it and click the 'End Process' button.
 -
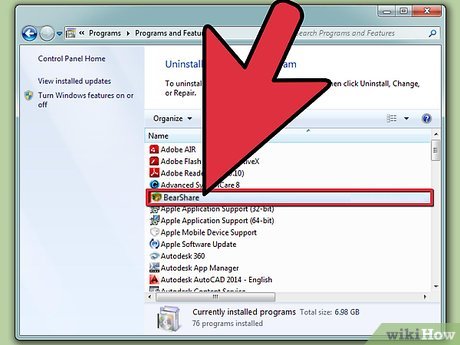
 Open the Programs and Features menu. This is also called the Add/Remove Programs menu. You can find it in the Control Panel, which can be accessed from the Start menu. Windows 8 users can press the Windows key + X and select Programs and Features from the menu that appears.
 -
 Look for the BearShare entry. Click on it then click the Uninstall/Remove button. This will open the BearShare uninstallation program.
 -
 Pick any of the uninstallation options. BearShare will ask you why you are uninstalling, but you can pick any of them as it doesn't affect the uninstallation process.
 -
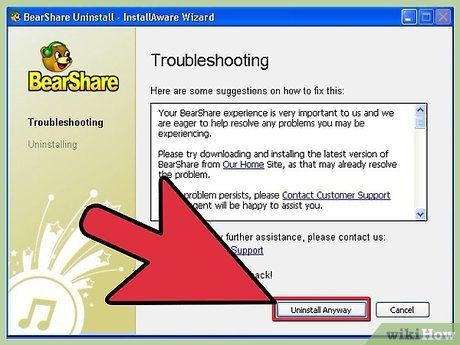
 Click the 'Uninstall Anyway' button. BearShare will attempt to convince you to keep the program. To proceed with the uninstallation, click the 'Uninstall Anyway' button. Wait for the uninstallation to complete.
Part 2 of 4:
Removing Related Programs
-
 Uninstall the Wincore MediaBar. This is a program that commonly comes packaged with BearShare. In the Add/Remove Programs or Programs and Features menu, look for the Wincore entry. Click on it then click the Uninstall/Remove button. This will open the Wincore uninstallation program.
 -
 Click Yes to begin the uninstallation process. You will see in the window as files are removed from your system. Once the uninstallation is complete, click the Close button.
 -
 Look for other suspicious programs. In your Add/Remove Programs or Programs and Features menu, look for programs that you don't recognize or remember installing. Check to see who the publisher is and if you recognize them (Microsoft, Adobe, Google, Apple, etc.).
- Remove any programs that look suspicious. Some legitimate programs will install things that you may not recognize, so double-check by doing a quick search online for the entry you want to delete.
Part 3 of 4:
Restoring Your Browser Settings
-
 Restore Chrome settings. Click the Customize icon. This is located in the upper-right corner of the Chrome window, and looks like three horizontal bars.
- Select Tools and then click Extensions. Look for the BearShare extension in the list, as well as any other suspicious extensions. Click the trashcan icon next to the BearShare extension to uninstall it.
- Click the Settings option in the left menu of the Tools page. Under 'On startup', select 'Open a specific page or set of pages'. Click 'Set pages' and delete the 'search.bearshare.net' entry. Replace it with a URL of your choosing.
- Return to the Settings menu. Scroll down until you find the 'Manage search engines' button in the 'Search' section. Hover over the 'search.bearshare.net' entry and click the X button to delete it. If it was set as your default search engine, you will need to set another search engine as your default first.
-
 Restore Firefox settings. Click the Firefox button in the upper-left corner of the Firefox window. Click the 'Add-ons' option in the menu.
- In the Extensions menu, look for the BearShare extension as well as any other suspicious extensions. Click the Remove button next to the entry to remove it.
- Click the Firefox Menu and then click Options. Select the General tab at the top of the new dialog box. In the Startup section, remove 'search.bearshare.net' and change the Home Page to a page that you prefer.
- Click the search engine icon in the search box at the top of the Firefox window. Select 'Manage Search Engines' and find the BearShare entry, as well as any other suspicious entries. Highlight them and click the Remove button to uninstall them. Set your default search engine to one your prefer.
-
 Restore Internet Explorer settings. Click the Tools button. In newer versions, it looks a gear icon in the upper-right corner of the window.
- Click 'Manage add-ons' in the Tools menu. This will open a new dialog box. Scroll through the list until you find BearShare and any other suspicious add-ons. Highlight the entry and click the Disable button.
- Click the 'Search Providers' section in the 'Manage Add-ons' window. This will open a list of installed search engines. Highlight the BearShare entry and then click the 'Remove' button.
- Click the Tools menu again and select 'Internet Options'. In the General tab, remove 'search.bearshare.net' from the 'Home page' field, and replace it with whatever home page you prefer.[1]
Part 4 of 4:
Removing Registry Entries
-
 Open the Windows Registry. To access the registry, press the Windows key + R to open the Run window, and enter 'regedit'. This will open the registry editor.
 -
 Search for the BearShare entries. Navigate through the registry tree using the left menu and delete the following entries.
 -
 Right click on them and select 'Delete.'[2]
 -
 Reboot your computer. Once you've finished cleaning your registry, reboot your computer to make sure the changes take effect. You should no longer see any traces of BearShare.
 -
 Use uninstaller programs. If you are still experiencing issues with removing BearShare, you can use specialized uninstallation programs to try to remove it. Malwarebytes is a free program that will scan your computer and attempt to remove malware like BearShare. CCleaner will scan your registry and remove any unwanted entries. Both are free programs.
Share by
Lesley Montoya
Update 05 March 2020


