How to turn off the message to restart the Windows 10 computer after the update
After updating the Windows 10 system, the computer will automatically show a reboot of the computer system, making users very uncomfortable. So how to turn off the message to restart the computer?
Table of Contents
Updating Windows 10 operating system can be done right on the system, with automatic updates or you can download the installation file and then proceed with the upgrade. And by default, after the Windows 10 computer has been upgraded to a new version, it will prompt to restart the computer.
This message will continue to be displayed on the screen until the computer is restarted. Of course, you don't always restart the computer immediately and need to work, but repeated notifications are annoying. So what is the way to turn off the restart message after the update?
- Instructions to delete Windows.old folder on Windows 7/8 / 8.1?
- Uninstall Windows 10 update in Windows 7 / 8.1
- Instructions to upgrade to Windows 8.1 with images
How to turn off restart notification of Win 10 computer after update
Step 1:
Click on the Settings icon on your computer, or press the Windows + I key combination to open the Windows Settings interface. Then click on Update & Security .

Step 2:
In the new interface click on Restart options option in the Update settings section.

Step 3:
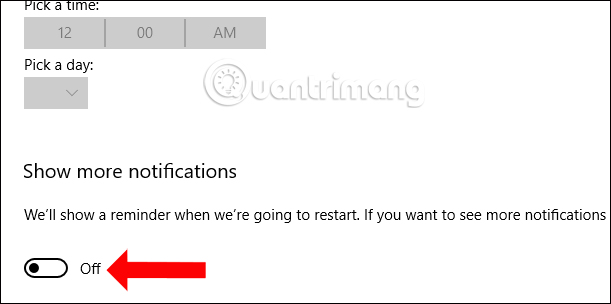
Switch to this new interface, users will see in the section Show more notifications by default turn on the notification after the computer has updated to the new version of Windows 10.
To turn off the message to restart the computer after updating, switch to Off state .
Thus, with simple customization on the system we can turn off the message to restart the Win 10 computer after upgrading the operating system. The message will not display continuously on the screen, affecting your work.
See more:
- How to download and upgrade Windows 10 Creators Update
- How to fix lost Bluetooth error on Windows 10 Settings settings
- How to fix error 0x8007045A ERROR_DLL_INIT_FAILED when using Windows Update
Hope this article is useful to you!
Was this article helpful?
Your feedback helps us improve.
Related Articles
 Windows Update Rolled Back? Here's How to Fix It4 minutes read
 How to set up receive notifications to restart Windows 11 PC after update2 minutes read
 6 ways to restart your Windows computer from simple to 'Pro'9 minutes read
 Turn off the computer when updating Windows? Is this good or not?7 minutes read
 Instructions on how to turn off Self-Update notifications when you shutdown on Windows 102 minutes read
 How to shut down or restart a Windows 10X computer2 minutes read
Reader Comments 0
Sign in with email or Google to join the discussion.