Table of Contents
This updated guide explains how to Sync Audio and Video through clear steps, practical examples, and important checks that help prevent common errors.
Method 1 of 4:
Fixing Out-of-Sync Audio in VLC Player (PC or Mac)
-
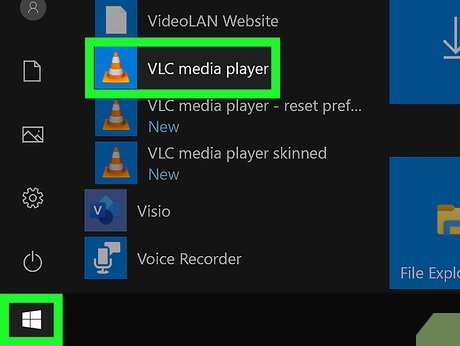 Open VLC Media Player on your computer. VLC is a free multi-platform media player that can correct out-of-sync audio and video on a single file. If you've already installed VLC, you'll find it in your Start menu (Windows) or in the Applications folder (macOS). If you haven't yet downloaded VLC, you can do so for free at https://www. videolan. org/vlc/index. html.
- Use this method if you're watching a video file on your computer that appears to have out-of-sync audio and video.
- If the video is streaming from a website like YouTube, the issue may be due to a slow internet connection or low RAM on your computer.
-
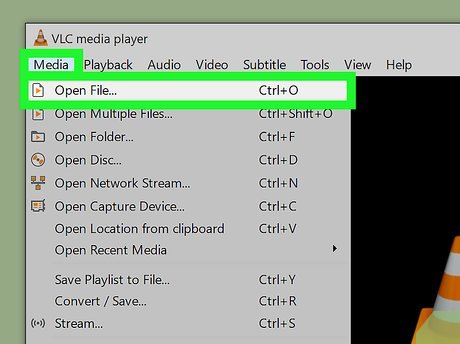 Open your audio file. You can do this by clicking the Media (PC) or File menu at the top-left corner and selecting Open File .
- If the video is streaming from YouTube, highlight the video's URL in your browser's address bar and press Ctrl+C (PC) or ⌘ Cmd+C (Mac) to copy it to the clipboard. Then, on the Media or File menu, click Open location from clipboard and click Play .
-
 Click Play to start the video. Start watching the video from the beginning to determine whether speeding up or slowing down the audio would properly sync the two elements.
 -
 Use keyboard shortcuts to speed up or slow down the audio. Pressing the necessary key will either speed up or slow down the audio track by 50 milliseconds.[1]XResearch source You can press each key multiple times until you've matched up the tracks.
- Windows:
- Press K to slow the audio down.
- Press J to speed the audio up.
- Mac:
- Press G to slow the audio down.
- Press F to speed the audio up.
- If you know already know the exact amount of milliseconds you need to offset the audio track from the video to correct the issue (in milliseconds), you can enter at this location: Tools > Track Synchronization next to "Audio track synchronization." Place a minus (-) sign before the number if you may need to slow down the track.
- Windows:
Method 2 of 4:
Fixing Out-of-Sync Audio in VLC Player (Phone or Tablet)
-
 Open VLC Media Player on your phone or tablet. VLC is a free multi-platform media player that can correct out-of-sync audio and video on a single file. If you've already installed VLC, you'll find its orange and white icon on the home screen (iPhone/iPad) or in the app drawer (Android).
- Use this method if a video file that's saved to your phone appears to have out-of-sync audio and video.
- If the video is streaming from a website like YouTube, the issue may be due to a slow internet connection or having too many apps open. Try connecting to a different Wi-Fi network, restarting your phone or tablet, and restarting the video.
-
 Tap the video you may need to fix. You may have to browse to a different folder to find it.
 -
 Tap the screen to display the controls. The controls will then appear at the bottom of the video.[2]XResearch source
 -
 Open the Audio Delay controls. The steps are different depending on your operating system:
- Android: Tap the second icon at the bottom (the one that looks like a chat bubble) and select Audio delay .[3]XResearch source
- iPhone/iPad: Tap the clock icon at the bottom-left corner of the video. The "Audio delay" slider will appear at the top of the menu.
-
 Use the slider or +/- buttons to increase or decrease the delay. You can adjust these options until you're getting the behavior you want.
- Android: Tap the + symbol to delay the start of the audio track by 50 milliseconds, or - reduce the delay by 50 milliseconds. For example, if the audio starts too soon to sync properly with the video, tap + to delay the audio's start time by 50 milliseconds.
- iPhone/iPad: Drag the slider left to decrease the audio delay, and right to increase it. For example, if the audio starts playing before the video, drag the slider to the left to decrease the delay.
-
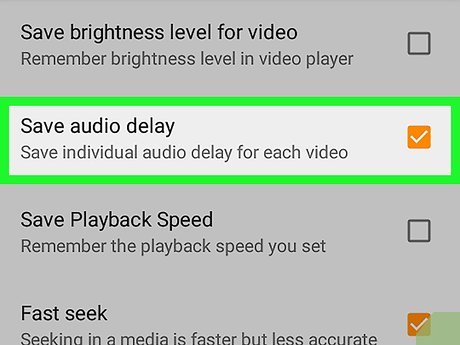 Save the delay settings for this video. If you're using an iPhone or iPad, the delay settings will automatically be applied to this video any time you open it. If you're using an Android, follow these steps to remember the delay settings next time you open this file:
- Tap the three-line menu at the top.
- Tap Settings .
- Tap Video under "Extra Settings."
- Check the box next to "Save audio delay."
Method 3 of 4:
Syncing Tracks with Adobe Premiere
-
 Open Adobe Premiere Pro on your computer. If you use Adobe Premiere to edit video, you can easily sync a video with an audio track using the Merge Clips feature. Begin by opening the app, which you'll find in the Start menu (PC) or in the Applications folder (Mac).
- Adobe Premiere Pro is paid software, but you can get a free trial by clicking Free Trial at https://www. adobe. com/products/premiere. html.
-
 Select the audio and video clips on the Project panel. You'll need to select both files, which can be done by holding down ⌘ Cmd (Mac) or Ctrl (PC) as you click.[4]XResearch source
 -
 Right-click the selected clips. A dialog menu will appear.
 -
 Click Merge Clips on the menu. This opens the Merge Clips dialog window.
 -
 Select a starting point. You can sync the two files based on any of these criteria:
- Based on the In point syncs based on the In point you specify.
- Based on the Out point syncs based on the Out point you specify.
- Based on matching timecode syncs based on common timecode between the two files.
- Based on clip markers syncs based on numbered clip markers in the center of a shot. You'll only see this option if both files have at least one numbered marker.
-
 Click OK to sync. Premiere will now sync your audio and video, which may take a while depending on the size of both files.
Method 4 of 4:
Syncing Tracks with Final Cut Pro X (Mac Only)
-
Open Final Cut Pro X on your Mac. If you're using Final Cut Pro to create your movie, you can use its built-in tools to automatically sync audio and video files in a project.[5]XResearch source You'll find the app in the Applications folder or on the Launchpad.
- Final Cut Pro X is not free software, but you can get a 30-day full-featured trial by signing up here: https://www. apple. com/final-cut-pro/trial
-
Select the audio and video clips you may need to sync. You can sync both clips at once by pressing ⌘ Cmd as you click their thumbnails in the Browser.[6]XResearch source
-
Click the Clip menu. It's at the top of the screen.
-
Click Synchronize Clips on the menu. A dialog window will appear.
-
Enter your preferences.
- Type a name for the synced video into the "Synchronized Clip Name" field.
- Select an event from the "In Event" drop-down menu to choose an event in which to make the new clip.
- Syncing will begin at the earliest point in the audio track. If you may need to specify a different timecode, enter it into the "Starting Timecode" field.
- Check the box next to "Use audio for synchronization" to sync based on audio waveforms. This is common, but if the sync processing time is ridiculously long, cancel the sync and try unchecking this option.
- Click Use Custom Settings to view and edit additional settings if desired.
-
Click OK to start syncing. Final Cut Pro X will now sync your audio and video, which may take a while depending on the size of both files.
FAQ
What is the easiest way to Sync Audio and Video?
Start with the requirements in this guide, then follow each step in order. Check the result after every major change so problems are easier to identify.
Can beginners follow these instructions?
Yes. The process is organized into practical steps, and you can repeat any step before moving forward.
What should I check if the method does not work?
Confirm your software or device version, permissions, settings, file format, and internet connection when the task depends on online services.
Related Articles
 Steps to Fix Audio and Video Out of Sync Error in Windows 108 minutes read
 How to Separate Audio, Separate Audio from Videos in VLC and YouTube7 minutes read
 How to Extract Audio from Video on iOS4 minutes read
 5 Easy Ways to Extract Audio from Video5 minutes read
 6 Tools to Convert Audio to Video Online7 minutes read
 How to Create Lip Sync Videos Using DreamFace3 minutes read
Reader Comments 0
Sign in with email or Google to join the discussion.