How to set up Microsoft 365 Business Basic
When you purchase Microsoft 365 Business Basic, you have the option to use a domain you already own or purchase a new domain during the registration process..
Add an existing domain to your Microsoft 365 Business Basic subscription.
When you purchase Microsoft 365 Business Basic, you have the option to use a domain you already own or purchase a new domain during the registration process.
If you purchased a new domain when you registered, your domain is already set up and you can proceed to the Add Users and Authorization step.
- Access the Microsoft 365 admin center at https://admin.cloud.microsoft.
- Select "Go to guided setup" to begin the wizard.
- In the Add domain step , enter the domain name you want to use (for example, contoso.com).
Important note : If you purchased a domain during the registration process, you will not see the "Add a domain" step here. Instead, proceed to the "Add users" step .
- Follow the steps in the wizard to add DNS records to connect your domain; this process will verify you are the domain owner. If you know your domain's hosting provider, learn how to add your domain to Microsoft 365.
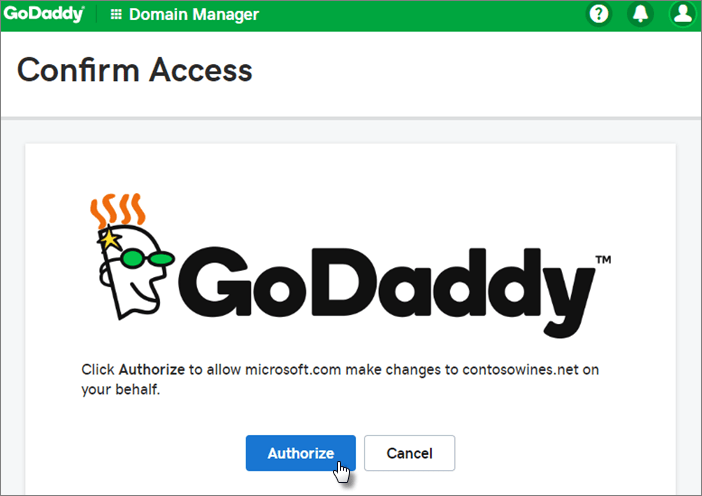
If your hosting provider is GoDaddy or another provider that supports domain linking, the process is very easy and you will automatically be prompted to log in and allow Microsoft to authenticate on your behalf.
Add users and grant permissions.
You can add users in the wizard, but you can also add users later in the admin center.
Any users you add in the wizard will automatically be granted a Microsoft 365 Business Basic license.
- If your Microsoft 365 Business Basic subscription already has existing users (for example, if you're using Microsoft Entra Connect), you'll have the option to license them now. Go ahead and add their licenses.
- After adding users, you'll also have the option to share login information with the new users you've added. You can choose to print it out, email it to them, or download it.
Domain connection
Note : If you chose to use a .onmicrosoft domain or used Microsoft Entra Connect to set up users, you will not see this step.
To set up the service, you need to update some records at your DNS server or domain registrar.
- The setup wizard usually automatically detects your registrar and provides you with a link to step-by-step instructions for updating your NS records on the registrar's website. Otherwise, select Change nameservers to set up Microsoft 365 with any domain registrar.
- If you have existing DNS records, for example, an existing website, but your DNS server has domain connectivity enabled, select Add records for me . On the Choose your online services page , accept all default options, select Next , and select Authorize on your DNS host's page.
- If you have existing DNS records with other DNS hosts (that don't have domain connectivity enabled), you need to manage your own DNS records to ensure that existing services remain connected.
- Follow the steps in the tutorial, and emails and other services will be automatically set up for you. Once registration is complete, you will be redirected to the admin center, where you can add users and grant permissions. After completing the initial setup, you can use the Setup page in the admin center to further configure the services included with your subscription.
Steps to set up business email with a new domain
- From the "How you'll sign in" page when signing up for Microsoft 365 Business Standard, select " Create a new business email account (advanced)" .
- Follow the steps to purchase a new domain and enter the domain you want to use (for example, contoso.com). After completing the domain purchase, you can add users and licenses, as well as install Microsoft 365 productivity apps in the admin center.
Setup complete.
Follow the steps below to set up your Outlook, Teams, OneDrive, and website.
Setting up Outlook for email
- On the Windows Start menu, search for Outlook and select it.
- If you're using a Mac, open Outlook from the taskbar or find it using Finder.
- If you have just installed Outlook, on the Welcome page, select Next .
- Select File > Info > Add Account .
- Enter your Microsoft email address and select Connect .
Enter email
If you're using Outlook with a different email account, you can import your old emails, calendars, and contacts into your new Microsoft account.
- Export old emails
- In Outlook, select File > Open & Export > Import/Export .
- Select Export to a File and then follow the steps to export the Outlook Data File (.pst) and any subfolders.
- Enter your old email
- In Outlook, select File > Open & Export > Import/Export again.
- This time, select Import from another program or file and follow the steps to import the backup file you created when exporting old emails.
You can also use the Exchange admin center to import everyone's email addresses.
Setting up Microsoft Teams and OneDrive
Select the OneDrive cloud icon from the taskbar and follow the steps to move your files to the new OneDrive folder. Select Next to set up Microsoft Teams.
Open Microsoft Teams, select your profile icon, then select Add work or school account . Follow the steps to add your new account to Teams.
Use a public website.
Microsoft 365 does not include a public website for your business. If you want to set up a website, consider using a Microsoft partner, such as GoDaddy or WIX.
- From the admin center, go to Resources , then select Public website .
- Select "Learn more" from one of the options, then register with the website partner and use their tools to set up and design your website.
Invite users to subscribe to your organization's plan.
Once you've set up your organization, you can invite other users to join your Microsoft 365 business subscription. They will have access to all the features of the subscription.
- Invite users to subscribe to your plan.
- Let your users know that they can follow the steps below to join your organization and subscribe to your plan.
- Accept the email invitation.
- Accept the email invitation using your Outlook, Yahoo, Gmail, or other (user) account.