Configure Auto-Login for Windows 7 Domain or Workgroup PC
In previous versions of Windows, you needed to remove the password associated with your account if you wanted to log in to Windows without being prompted for a password.
Table of Contents
But with Windows 7 operating system it is different. Do you want to automatically log in to your Windows 7 without having to enter a password? What's different here?
In Windows 7, you can configure your account to be able to log in automatically (Auto-Login) even if the account has a password set. This is a real utility for users when their computer is kept in a safe location, or there is no security problem.
In the following article we will show you how to set up your home computer and let it join a domain. If you are on a domain, you need to "hack" the registry a bit to make it work.
Set up Auto-Login for Windows 7 Workgroup PC
Step 1: Press Windows + R, enter the netplwiz command and press Enter: (can use control userpasswords2 command instead)

This will open the advanced properties dialog of the user account.
Step 2: At the dialog box that opens, uncheck the box 'Users must enter a user name and password to use this computer.'
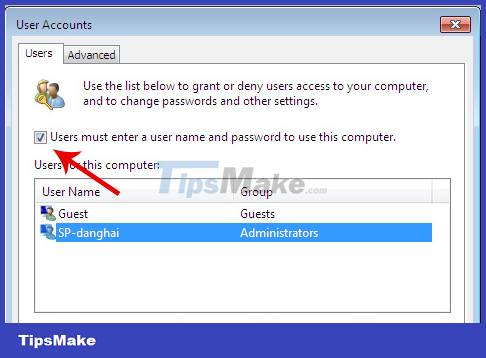
Step 3: When unchecking this item and clicking OK, you will be asked to enter the current password of the account you are using.
Step 4: Restart the computer. You will no longer have to enter a password or click on one of the user icons. Windows 7 will be automatically logged in.
Set up Auto-Login for Windows 7 Domain PC
If you've already joined a domain, you'll see that the Member of option is gone. To show this option again, do the following:
Open the registry editor (go to Start, type regedit > Enter) and find the following key:
HKEY_LOCAL_MACHINE/SOFTWARE/Microsoft/Windows NT/CurrentVersion/Winlogon/AutoAdminLogon
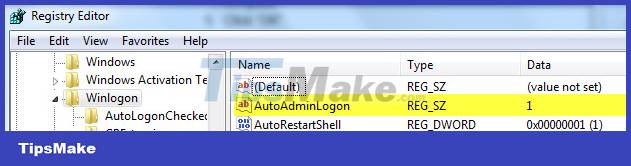
As you can see, the value here is 1. If set to 0, the checkbox will not appear. So change the value back to 1 and restart the computer.
You can, however, uncheck the options checkbox, so you check that and click OK, then go back and uncheck it again. At this point it will ask you to enter your login credentials.
Tip: If you follow the above method but automatically logging into Windows 7 does not work, you can try again by another way, which is to tweak many other values at the above registry location.
If you don't see these keys, you can add them yourself:
DefaultDomainName (String) DefaultUserName (String) DefaultPassword (String)
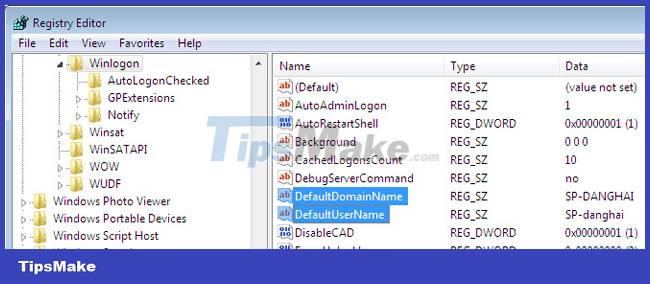
Then set the value for each key to suit your computer and restart the machine. Although this is a solution for Windows XP, it still works for Windows 7. Good luck!
Was this article helpful?
Your feedback helps us improve.
Related Articles
 How to configure auto-login and lock mode after reboot in Windows 106 minutes read
 3 How to change workgroup on Windows 105 minutes read
 How to Configure CAWE in a Windows Server 2012 R2 Domain7 minutes read
 How to Create a Windows Server 2012 R2 Domain10 minutes read
 Use PIN to login Windows 104 minutes read
 KMS activation deployment for Windows 10, Windows 8.1, Windows Server 2012 R2, Windows Server 201621 minutes read
Reader Comments 0
Sign in with email or Google to join the discussion.