Table of Contents
Understanding How to rotate Excel paper size requires more than a headline. The overview below breaks down the key facts, changes, and user impact.
How to Rotate Excel Paper Size Overview
By default when importing content on Excel, the paper size is left vertically. However, the document content will not always fit in the horizontal, or vertical orientation of the page. Normally, before printing the data or before entering the content, we will have to adjust the size of Excel paper again.
Users can change the use to paper size vertically, or horizontally depending on the layout and required Excel content. The following article will guide you how to rotate paper size in Excel.
- These are the most basic functions in Excel that you need to understand
- How to combine 2 columns Full name in Excel does not lose content
Method 1:
In the Excel text interface that users need to rotate the paper size, click on the Page Layout tab and then select Orientation.
You will immediately see two different types of paper sizes: Portrait in vertical paper format (default) and Landscape in horizontal paper size. Existing Excel files are being placed vertically.
To rotate the document horizontally, click on Landscape to change it.

Soon we will see that the paper size is changed to horizontal with the separator LINE as shown below.

Method 2:
This can be applied to direct printing and to rotate the paper size in Excel.
Step 1:
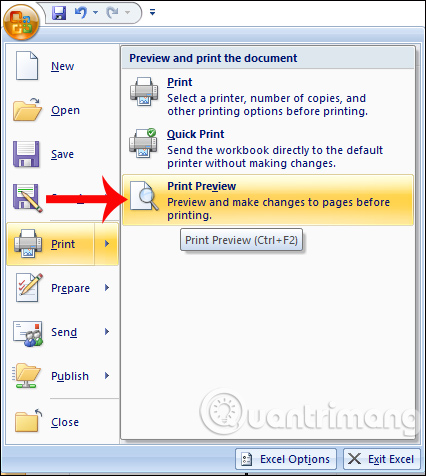
At the interface in Excel press Ctrl + P key or you can click on the Office icon and select Print select Next Print Preview.
Step 2:
Next, click the Page Setup item to appear a custom interface for the Excel document. Here in the Orationation section, we also choose one of two paper size modes: Portrait vertical paper or Landscape for horizontal paper size.
Select one of the two modes and click OK to use.
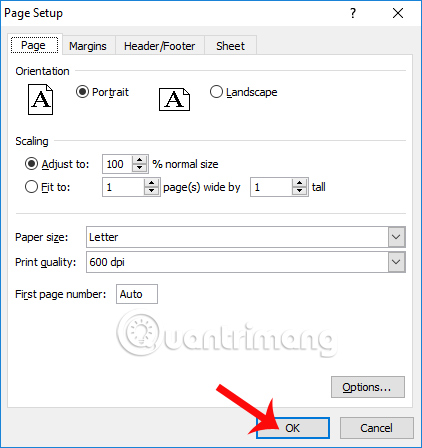
Immediately paper size will be converted to horizontal paper mode, because here I choose Landscape paper mode.

Above is how to change the paper size in Excel, convert to portrait or landscape format, with the right way in the Excel settings interface or adjust before printing the Excel document. Depending on the content of the document as well as the layout of the lesson we choose to use the vertical or horizontal paper size on Excel as appropriate.
I wish you all success!
FAQ
How does How to rotate Excel paper size work?
Understanding How to rotate Excel paper size requires more than a headline.
What should you prepare before using this method?
The overview below breaks down the key facts, changes, and user impact.
What should you do if the process does not work as expected?
How to Rotate Excel Paper Size Overview By default when importing content on Excel, the paper size is left vertically.
Related Articles
 How to Rotate Any 1 Page Size Paper in Word3 minutes read
![Excel Doesn't Have A3 Size, What to Do? [Super Fast Fix]](/data8/thumbs_200x120/excel-doesnt-have-a3-size-what-to-do-[super-fast-fix]_thumbs_200x120_IgyqjCH12.jpg) Excel Doesn't Have A3 Size, What to Do? [Super Fast Fix]6 minutes read
Excel Doesn't Have A3 Size, What to Do? [Super Fast Fix]6 minutes read Size of Paper Size A0, A1, A2, A3, A4. How Many Mm, Inch?4 minutes read
 What Is the Size of A5 Paper? How to Select and Print A56 minutes read
 What Is the A0 Paper Size? How to Select, Print A0 in7 minutes read
 How to Convert A4 Size Prints to A3 Size in Word3 minutes read
Reader Comments 0
Sign in with email or Google to join the discussion.