Table of Contents
Follow the instructions below to remove the b612 logo in the image efficiently and safely. Each section focuses on the actions, settings, and troubleshooting details that matter most.
Camera B612 is one of the selfile photography applications that many users love and use. With B612 you can create real 'quality' photos that are not inferior to professional cameras. However, one thing that most users dislike when using B612 is that after each image is created, a B612 logo appears below the right corner.
Although we all know the logo is the symbol of the app publisher, but having the B612 logo in the image is sometimes unnecessary, in many cases it also makes 'work' of You deteriorate a lot. So if you are trying to delete the B612 logo but do not know how, please follow the article later, Network Administrator will guide you to remove the logo on the image quickly with just a few simple steps.
- Simple way to delete online photo backdrops
- How to delete an image object using the Snapseed application
- How to delete text in photos with Paint
Instructions for deleting the B612 logo in photos
Note: How to delete the word B612 on the image below is done on Android phones, you are using iOS devices can also do the same to set this up.
Step 1:
You start the B612 application that has been downloaded and installed earlier, if not, download the app according to the link below.
- Download B612 for Android
- Download B612 for iOS
- Download B612 for Windows Phone
Step 2:
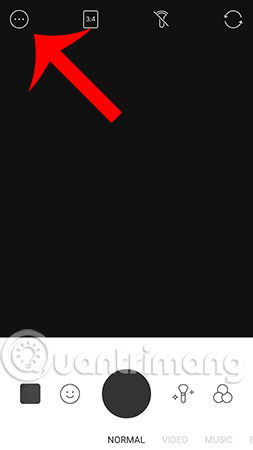
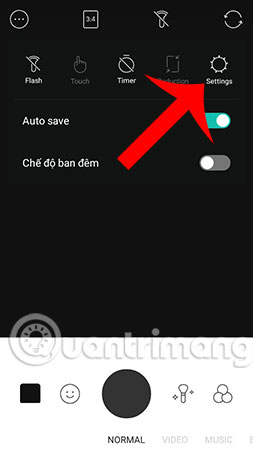
At the Camera interface of the app, you select The 3 dots icon As shown. Then, select the Settings Item (the gear icon).
Step 3:
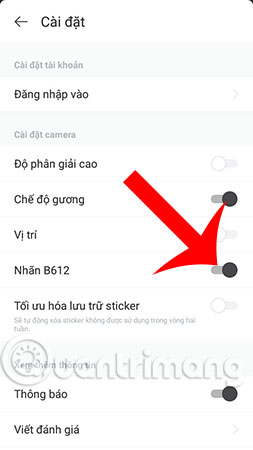
Here, you will see the B612 Label Section - this is the option to add the B612 logo in the image. Now that it's in ON mode, you can switch the switch bar to the left to turn it off.
Step 4:
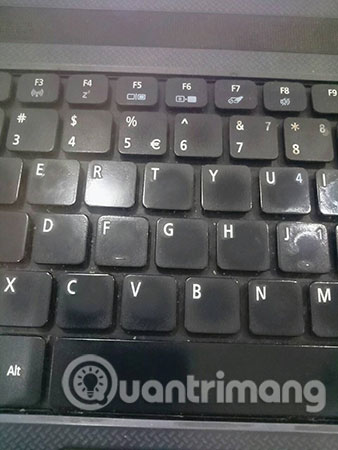
After you have successfully turned it off, test it by taking a new photo with the B612 application. As in this example, the Network Administrator has tested it and found that there is no B612 logo appearing in the image like at the beginning, that's done.
We have done a quick delete of the B612 logo in the photo so that the picture becomes completely unique right? Hope you will also work successfully on your device. In addition, using B612 to take photos regularly, you definitely need to know some good tips when using this application such as creating music videos with B612, creating a sky effect for photos with B612,. You can see Detailed instructions in the previous posts that Network Administrator has shared!
Good luck!
- How to use Photoshop CS5 - Part 16: Delete any object from the image
- Instructions to add watermark, rotate, flip photos with Picasa
- How to make 360-degree logos on Camtasia Studio
FAQ
What should I prepare before I remove the b612 logo in the image?
Review the requirements in the guide, confirm that your device or software is compatible, and save important work before changing settings related to remove the b612 logo in the image.
Why might remove the b612 logo in the image not work as expected?
The most common causes are incompatible versions, missing permissions, incorrect settings, or an interrupted internet connection. Recheck each step and restart the app or device when appropriate.
Can beginners follow these remove the b612 logo in the image steps?
Yes. Follow the steps in order, avoid skipping confirmation screens, and compare your interface with the screenshots because labels may differ slightly between versions.
Related Articles
 How to Remove the Wutacam Logo in Photos6 minutes read
 How to Take High-quality Photos of B6126 minutes read
 Steps to Remove Watermark in Photoshop So That You Have the4 minutes read
 How to Create Sky Effect for Photos with B6125 minutes read
 Instructions for Creating Music Videos with B6126 minutes read
 How to Insert Logo into Images Online2 minutes read
Reader Comments 0
Sign in with email or Google to join the discussion.