How to Record Your Screen in Windows 10
This wikiHow teaches you how to record your Windows 10 screen using the built-in Xbox Game Bar or a free app called FlashBack Express Recorder. Open the Game Bar app. You can do so by clicking Xbox Game Bar in the Start menu, or by typing....
Method 1 of 2:
Using the Xbox Game Bar
-
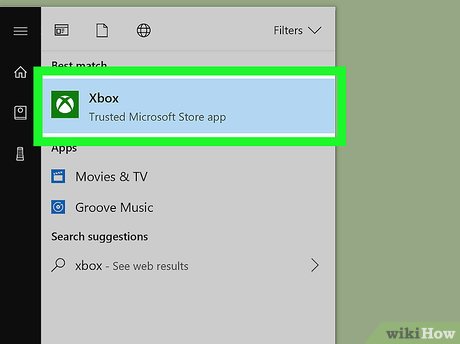 Open the Game Bar app. You can do so by clicking Xbox Game Bar in the Start menu, or by typing game bar into the Windows search bar.[1]
- If you're not signed in, follow the on-screen instructions to sign in (or create an account) now.
- Game Bar comes pre-installed on Windows 10. If you've removed the app, you can re-install it from the Microsoft Store.
- This method works on all Windows 10 computers as long as your video card supports one of these encoders: Intel Quick Sync H.260, Nvidia NVENC, or AMD VCE.
-
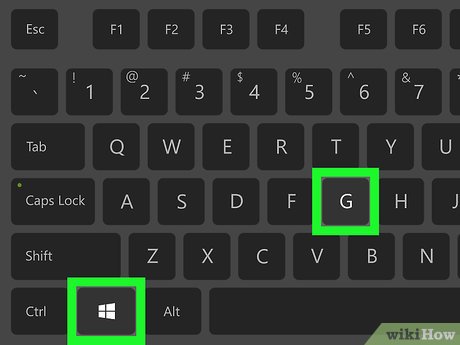 Press ⊞ Win+G. This will open the game bar screen.
 -
 Adjust your screen recording preferences (optional). If you'd like to fine-tune your screen recording option, you can do so in your Windows Settings. Here's how:
- Open the Start menu and click Settings.
- Click Gaming.
- Click Game Bar in the left column.
- Scroll down on the right panel to adjust your audio and video preferences.
- Close the Settings window when you're finished and return to the Xbox Game Bar.
-
 Press ⊞ Win+Alt+R to start recording the screen. A bar displaying your progress will appear at the top-right of the screen.
- Click the microphone icon on the bar to toggle sound recording on or off.
-
 Click the square when you're finished recording. It's on an indicator that displays your progress. Your screen recording is now saved to a folder called Captures, which is inside your Videos folder.
Method 2 of 2:
Using FlashBack Express Recorder
-
 Install FlashBack Express from the FlashBack website. There are a variety of free apps that can record your screen if the Xbox Game Bar doesn't work on your computer. FlashBack Express is one of them. To download the app:[2]
- Click CONTINUE TO EXPRESS below the purple button near the center of the page.
- Click GET EXPRESS – FREE.
- Save the installer to your computer.
- Double-click the installer and follow the on-screen instructions to complete the installation.
-
 Open FlashBack Express Recorder. You'll find it in the Start menu inside a folder called Blueberry Software.
 -
 Click Record Your Screen. This opens a panel with customization options.
 -
 Choose what you want to record.
- To record the whole screen, select Full screen from the ″Record″ drop-down menu.
- Select Window if you just want to record use of a single app.
- Select Region if you'd like to select an area of the screen to record.
- To record your webcam, check the box at the bottom of the window that says ″Record Webcam.″
-
 Select which sound to record.
- If you don't want to record sound, remove the check mark from the ″Record Sound″ box.
- To record sounds using your computer's microphone, leave the ″Microphone″ option checked. If you don't want your recording to pick up your own voice (or sounds within your space), remove the check mark next to this option.
- To record sounds coming from your computer (such as in-app sounds), check the ″Default PC Speakers″ box (or select your speakers).
-
 Click Record when you're ready to start recording.
- If you're recording the full screen, a countdown will appear. When the countdown is complete, everything on the screen will be recorded.
- If you're recording one window, you'll be prompted to click the window you want to record, and then click Record. The recording will begin once the countdown is complete and a progress bar will be displayed.
- If you're recording a region of the screen, follow the on-screen instructions to select which part of the screen to capture, and then click Record. The recording will begin once the countdown is complete and a progress bar will be displayed.
-
 Click the red square when you're finished recording. It's on the progress bar. A pop-up window will appear, asking what you want to do.
 -
 Click Save to save the recording. You'll be prompted to save the recorded video to a folder called FlashBack Movies in the Documents folder, but you can select a different location in the left panel. Click Save after selecting a folder.