Table of Contents
This updated guide examines How to Create a Sound Recording on Windows 8 and organizes the essential facts, background, and practical takeaways in clear American English.
Method 1of 3:
Accessing the Sound Recording
 Press the "Start" button. You can find it in the task bar, on the bottom left corner of your screen. You can also find it on the bottom-left of your keyboard. It looks like a white window.
- If your device has a touchscreen, position your finger on the far right side of the screen and swipe left quickly. Click on the "Start" icon. It is towards the middle of the list and looks like a blue window. It has the word "Start" just beneath it.
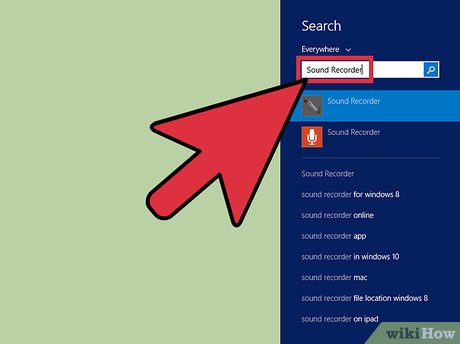 Search for "Sound Recorder." You can simply start typing the words. This will bring up a list of applications and programs that match the query.
- You can also right-click on a blank area on your screen, select "All Apps" and scroll towards the end of the list until you find "Sound Recorder."[1]
- If you use Windows 8.1, you can also move your pointer towards the bottom of the screen and click on the icon that looks like an arrow inside a circle. Scroll towards the end of the list until you find "Sound Recorder."[2]
 Select the application you want to use. You may notice two different sound recorder applications, especially if you are using Windows 8.1: one that has a grey icon and one that has an orange icon.
- The orange icon is the app. To learn how to use it, click here.
- The grey icon is the program. To learn how to use it, click here.
Method 2of 3:
Using the Sound Recorder App
 Select the orange Sound Recorder icon. This will bring up an application. It looks like a solid-colored screen, with a circle in the middle of it. Inside the circle is a picture of a microphone. Under the circle is a bunch of 0's.
 Allow microphone access, if necessary. If this is your first time using the app, the app may ask you for permission to access your mic. Click "yes" or "okay."
- If this is not your first time, and you see a notice saying that the app doesn't have access to your mic, you will need to change that. Swipe from the right to the left side of your screen, and select "Settings" from the menu. Select "Permissions" from the side menu that pops up. Turn the microphone option on; the bar should turn blue.[3]
 Tap the circle to start recording. You can start talking, singing, playing music, or doing whatever else you need to make noise for the recording.
 Tap the pause button to pause the recording. You can continue the recording by clicking the button again.
 Click "Stop" to end and save the recording. If you have made recordings before, you will also see a list of your other recordings. Keep in mind that the recordings made in this app are saved directly in the app. If you get rid of the app, you will lose those recordings as well.
Method 3of 3:
Using the Sound Recorder Program
 Select the grey Sound Recorder Icon. This will take you back to your desktop screen. You will see a narrow rectangle pop-up on your screen, with a flashing green bar, and a red dot that says "Start Recording."
 Click on the red dot to start recording. As you begin recording, you may notice the slider changing colors from green to yellow to red. These indicate the volume of your recording. Green is a good volume and yellow means that your recording might be too loud and you should speak softer. Red means that you are speaking too loudly. You'd want to stay in the green or yellow area.
- Recordings that are too loud may sound staticky.
 Click "Stop Recording" when you are done. This will not only stop the recording, but give you a chance to save it.
 Save the file. When you hit "Stop Recording," you will get a pop-up that asks you to select a location in which to save the file. You will also get to name your recording. Name your file first, then select the folder in which you want to save your file. Click "Save."
FAQ
What is How to Create a Sound Recording on Windows 8 about?
It provides a structured overview of recording, explains the main context, and highlights practical takeaways for readers.
Why does this topic matter?
Understanding the main concepts helps readers evaluate the issue, avoid common mistakes, and make better-informed decisions.
How should readers use this information?
Use the guidance as a practical starting point, confirm details that may have changed, and follow current product, safety, or security recommendations.
Related Articles
 How to Use Any Sound Recorder to Record on Windows 104 minutes read
 Microsoft Launches New Recording Application for Windows 114 minutes read
 Instructions for Recording Using the Sound Recorder Software Are Available3 minutes read
 Tips to Increase Sound Quality When Recording Videos with8 minutes read
 Top 10 Best Computer Screen Recording Software with Sound8 minutes read
 Audio Recording on Your Computer, the Best Computer4 minutes read
Reader Comments 0
Sign in with email or Google to join the discussion.