Table of Contents
This practical guide walks through how to hide the 'recents' folder on a Mac, explains the main requirements, and highlights common issues that may appear along the way.
What is the "Recents" folder on the Mac?
First, you need to know that the "Recents" folder on macOS is not in fact a separate folder. Instead, it's a smart directory that contains Spotlight search queries that automatically refer to your most recently used files.
In other words, the files you see listed in the 'Recents' folder may actually reside in a variety of different folders on your Mac. It is simply an area that lists the files that you have accessed recently.
You can't completely remove the 'Recents' folder from macOS, but you can take the necessary steps to hide it from view or disable how it works.
How to hide the "Recents" folder in Finder
While it's impossible to completely delete the 'Recents' folder, most people can still be satisfied by hiding it from their regular view when using Finder.
To do so, first click the Finder icon in the toolbar. This will bring Finder to the foreground and make it the active app.

Next, open Finder preferences by clicking ' Finder ' on the menu bar, then ' Preferences '. Or you can press Command + ' , ' (comma) on your keyboard.

Once the Finder Preferences opens, click on the 'General' tab, then click on the menu titled 'New Finder windows show'.

When the menu opens, choose the new folder location you want to see every time you open a new Finder window. You can choose any placement other than 'Recents', depending on your personal preference. In this example, the selected directory is named 'redwolf'.
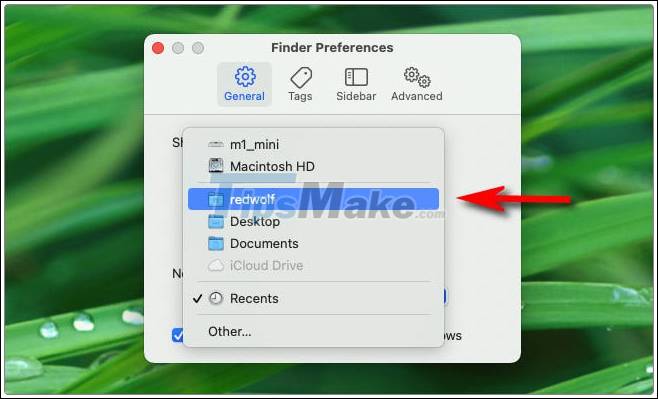
Then, close Finder Preferences.
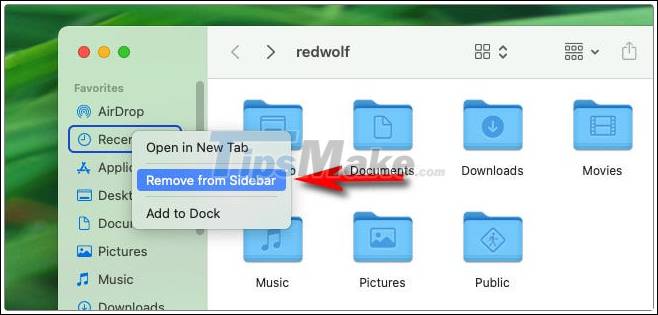
Next, you'll have to delete the " Recents " shortcut located in the Finder sidebar by default. Open a new Finder window and right-click on 'Recents' in the sidebar. In the menu that appears, tap on the option 'Remove from Sidebar'.
After doing these two steps, you should no longer see the "Recents" folder appear on your Mac. However, you can still access it through the Finder 'Go' menu in the toolbar at the top of the screen.
Key Takeaways
Use the information above as a practical reference for how to hide the 'recents' folder on a Mac. Review each step carefully, confirm any requirements, and choose the option that best fits your situation.
FAQ
What does this guide explain about Hide the 'Recents' Folder on a Mac?
It explains the main concepts, practical considerations, and useful steps related to hide the 'recents' folder on a Mac without requiring advanced knowledge.
Who can benefit from learning about Hide the 'Recents' Folder on a Mac?
This information is useful for readers who want a clear overview, practical guidance, and reliable steps related to hide the 'recents' folder on a Mac.
What should I check before applying this information?
Review the requirements, confirm that your device, software, or situation matches the instructions, and back up important data before making major changes.
Related Articles
 How to Completely Hide a Folder with a Single Command on Windows5 minutes read
 How to Hide 6 Folders in This PC on Windows 106 minutes read
 How to Set a Default Folder Opening in Finder on Mac3 minutes read
 Hide the Windows Folder in a Professional Way3 minutes read
 Free Hide Folder: Hide and Protect Folders on Windows4 minutes read
 How to Hide, Display Files and Folders on macOS5 minutes read
Reader Comments 0
Sign in with email or Google to join the discussion.