Table of Contents
Learning how to hide photos on iPhone without application is easier when the steps are completed in the correct order. Use this guide to prepare, make the changes, and verify the result.
Previously to hide or hide some secret image on iPhone / iPad, we often have to use support application. However, on iOS 10 onwards has provided an option to Hide images for users. You can hide any image from the Moments, Collections and Years section on the device. From there, limit the prying eyes of others, when they borrow your phone.
In the following article, we will show you how to hide and hide images on iPhone / iPad without using support application.
1. Hide pictures on iPhone
This image hide feature is available on iOS 10 onwards, hiding images in Moments, Collections, Years but will still appear in the Album.
Step 1
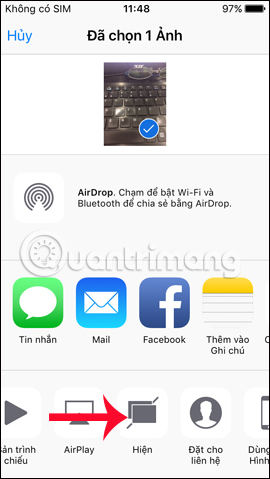
Start by click The Photo app On the device and find the image you want to hide. After clicking on the image, click The arrow icon In the lower left corner of the screen as shown below. Then in the list of options below, click Hide.
We will be asked if we want to hide the picture, click Hide image To confirm.


Step 2
To Display the Hidden Image again , access the Album on the device again and access The Hidden album . click the image then click The arrow icon . Finally click Show to show this image again.


2. Hide pictures on iPhone
The above feature only temporarily hides images in some albums, but does not completely hide the photos. So others can still access the hidden album to view the image.
If so, we can also immediately use an application available on the device, to hide photos with a secure password and back up on iCloud by entering the Notes section. The password generation feature for Notes applies on iOS 9 versions onwards.
Step 1
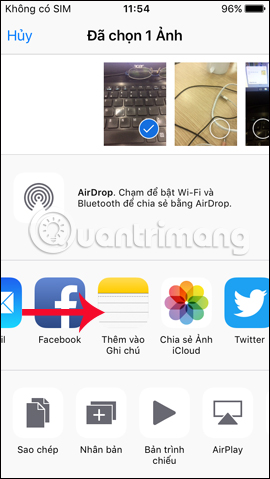
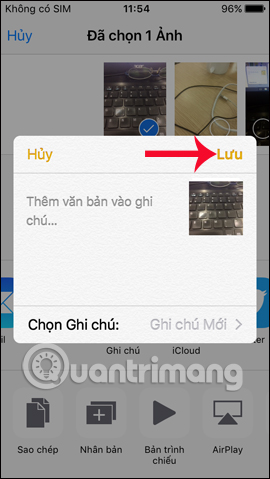
We also click the image we want to hide, then click The arrow icon . Next click Add to note . users will then click Save To create a new note for the image. You can add multiple images to the note.
Step 2
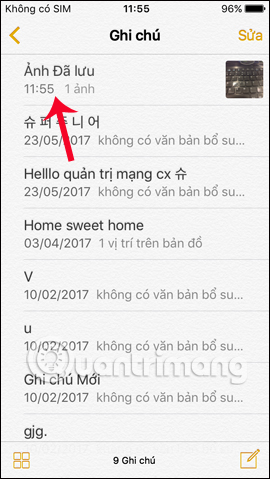
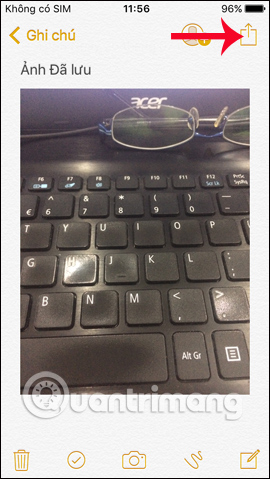
We then open the Notes application on the device. In the list of created notes, click the note with the name Saved image . In the image interface, click The arrow icon As shown below.
Step 3
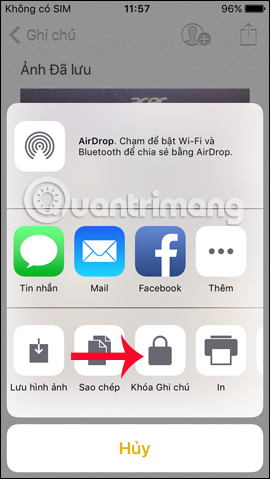
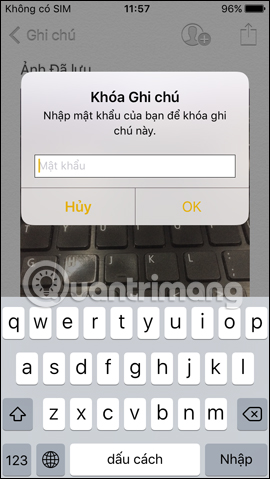
Appearance options. Here, you will click the Lock notes section . Enter the Security password of the Notes application You created earlier for this note and Click OK To save.
How to create a password for the first time for notes of the Notes app on iOS, we follow the article Instructions on how to set Notes notes password on iOS 9.3.
Step 4
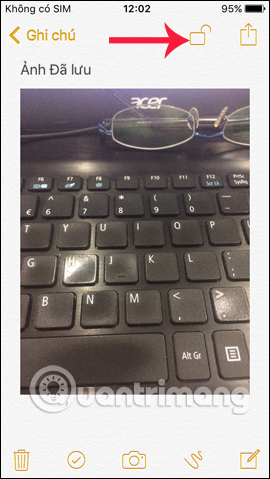
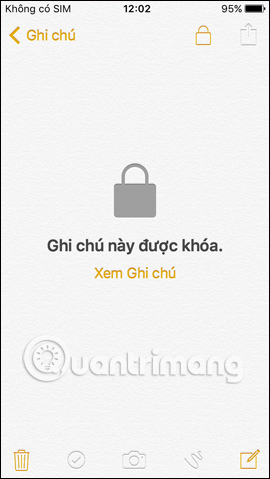
To lock the note, click The Open Lock icon Above the interface. When the interface appears This note is locked , meaning you have locked the image successfully. You return to the album on the device and delete the image, after saving it in Notes.
So no one will be able to see your image, when we have hidden it in the Notes app and delete it in the album.
Step 5
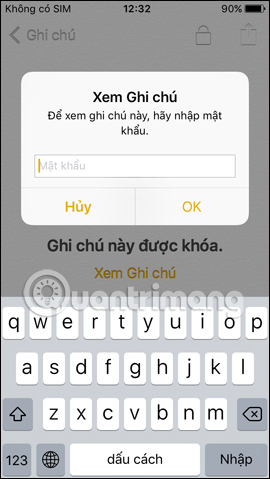
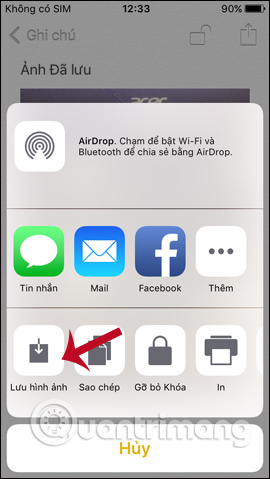
To Save the image to Album , we need To unlock Notes By entering the correct password previously set. Then, click The arrow icon Above, then click Next to Save image . Thus, the image will be saved back to the Album on the device.
So, here you have 2 ways to hide private and secret images, especially how to hide images in Notes application and then set security key. With this way you can delete the image in the gallery so no one will see it. when needed to save it in Album, it is very simple.
I wish you all success!
FAQ
What should I prepare before I hide photos on iPhone without application?
Review the requirements in the guide, confirm that your device or software is compatible, and save important work before changing settings related to hide photos on iPhone without application.
Why might hide photos on iPhone without application not work as expected?
The most common causes are incompatible versions, missing permissions, incorrect settings, or an interrupted internet connection. Recheck each step and restart the app or device when appropriate.
Can beginners follow these hide photos on iPhone without application steps?
Yes. Follow the steps in order, avoid skipping confirmation screens, and compare your interface with the screenshots because labels may differ slightly between versions.
Related Articles
 How to Hide Photos and Videos on iPhone Using Safevault8 minutes read
 How to Use Xfiles to Hide Photos and Contacts on Iphone8 minutes read
 Complete on Photos Apps on iPhone and iPad - Part 13 minutes read
 How to Hide Photos, Videos, Personal Data on iPhone / iPad?6 minutes read
 How to Use Safe Pixel to Hide Images on Iphone5 minutes read
 How to Hide Apps on iPhone Does Not Need Support Application7 minutes read
Reader Comments 0
Sign in with email or Google to join the discussion.