How to enable/disable touchpad gestures on Windows 11
The touchpad is an indispensable component on any laptop. The touchpad supports many useful multi-touch gestures that you can use to easily manipulate your PC. For example, slide 2 fingers on the touchpad to scroll the page, or pinch to zoom the screen and many other gestures.
However, if you have a habit of using a mouse instead of a touchpad, you can consider completely disabling touchpad gestures to avoid unwanted accidental activation situations. This article will guide you on how to enable/disable touchpad gestures on Windows 11 depending on your needs.
How to enable/disable tap gestures on Windows 11
Tap gestures are usually enabled by default on Windows computers, especially when a precision touchpad is installed. However, if in some cases these gestures do not work properly or you want to disable them, follow the instructions below:
1. Press and hold Win + I keys to open the Settings section of your Windows 11 computer. Alternatively, you can launch it from the Start menu.
2. Then, click the Bluetooth & devices tab on the left panel of the Settings window.
3. Next, click on the Touchpad option from the list.
4. From the Touchpad page , click Taps to display all gestures. Here you can find different tap gestures.

5. Next, click the individual checkboxes to enable or disable this action.

6. You also have the option to adjust the touchpad sensitivity in this setting. To do so, click the drop-down menu under the Touchpad sensitivity tab and select your preferred sensitivity.
Note : In some cases, the Most Sensitive option misinterprets accidental palm touches as taps. If this is happening to you, switching to the High Sensitive option may help.
How to enable/disable scroll and zoom gestures in Windows 11
By default, these gestures are enabled but cannot be programmed. However, Windows 11 allows you to disable these gestures and set your preferred scroll direction. Here's how:
1. Launch Settings by clicking its icon on the Start menu or pressing and holding the Windows key + I .
2. Click the Bluetooth & Device tab on the sidebar of the Settings window.
3. Then, click on the Touchpad option.
4. In Touchpad settings , click Scroll & zoom to display the options.

5. Here you can enable/disable Pinch to zoom and Drag two fingers to scroll options by clicking on the checkbox next to the options.

6. You can also click the drop-down menu on the Scrolling direction box to select your preferred scrolling direction.

Note : If you choose to turn off the Drag two fingers to scroll option , you will need to use the scroll bars available on the specific windows you want to scroll or your keyboard.
How to enable/disable three-finger gestures in Windows 11
Compared to the previous two gestures, the three-finger gesture is customizable, allowing you to create swipes and taps to perform specific actions on your computer. Follow the steps below to enable/disable this type of gesture:
1. Press Win + I to open the Settings section of your Windows 11 computer. Alternatively, you can launch it from the Start menu.
2. Then, click the Bluetooth & devices tab on the left panel of the Settings window.
3. Next, click on the Touchpad option from the list.
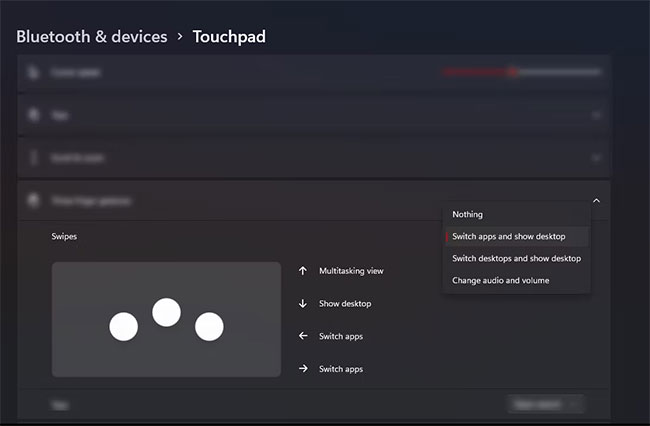
4. Scroll down and tap Three-finger gestures from the options. This gesture type has two types: Swipe and Tap.

5. For the Swipe category , Windows has a number of existing templates that you can use:
- Switch apps and show desktop (Default): This built-in gesture lets you switch between apps with a three-finger horizontal swipe. You can also open the Multitasking view with a three-finger swipe up and a swipe down.
- Switch desktops and show desktop : Instead of switching apps, this preset lets you switch desktops with a three-finger horizontal swipe gesture. The two three-finger gestures perform the same function as the previous template.
- Change audio and volume : This gesture template is ideal for those who frequently listen to music, podcasts, or edit videos on their Windows devices. With this gesture, you can increase or decrease the volume with a three-finger swipe up and down. Additionally, a three-finger swipe to the side lets you skip to the previous and next song in the queue.
6. To choose from the available Swipe gestures , click the drop-down menu in the Swipe section and select your preferred option. If you select Nothing , this gesture will be disabled on your Windows 11 PC.

7. Windows also has preset options for the three-finger tap gesture. To choose these options, click the drop-down menu on the Taps section and select your preferred action. You can also enable this gesture by selecting Nothing from the drop-down option.

See also: