Get familiar with CorelDRAW 12 - Lesson 1: Set up the drawing page
Since today, we began to introduce you to a popular graphics software, CorelDRAW. The basic guidelines for readers to learn and practice with this software will be posted weekly in the section Getting familiar with CorelDRAW 12.
 Since today, we began to introduce you to a popular graphics software, CorelDRAW. The basic guidelines for readers to learn and practice with this software will be posted weekly in the section Getting familiar with CorelDRAW 12.
When opening a new file, CorelDRAW 12 working screen appears a rectangle on the screen that is Corel's drawing page.
To view the properties and set the rendering of the drawing page, select File - Document Setup - Page Setup , the Options dialog box opens.
Page section with 3 options (Figure 1, 2):

- Show page border: mark this option to display the page frame

- Show printable area: mark this option to inform the printer print range and print page size
- Show bleed area: the area helps to avoid errors due to details spilling out of the edge of the finished product
Item Size (Figure 3):

- Portrait and Landscape icons allow you to choose the orientation of a vertical or horizontal page
- Paper: the size of the drawing page
- Width and Height : indicates the length and width of the drawing page, corresponding to the paper size selection of the drawing page
Section Layout : there are 6 types of page layout, depending on the purpose of use, we choose the corresponding layout.
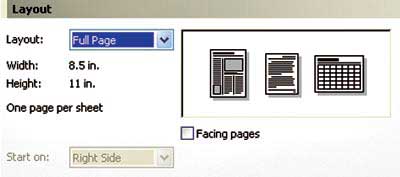
- Full Page: default page layout (Figure 4)
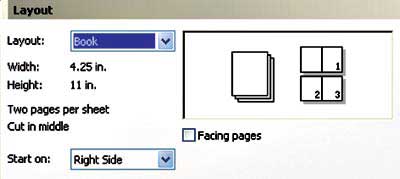
- Book: divide the page into two equal parts vertically. Each section is a separate page printed in two pages (Figure 5).
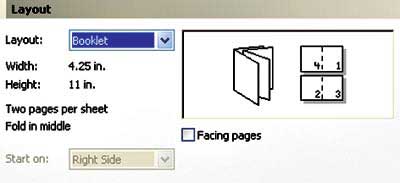
- Booklet: similar to Book style but when printing the grafted pages together to be able to close into a book (Figure 6)
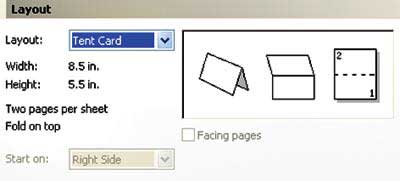
- Tent Card: divided into equal halves (Figure 7)
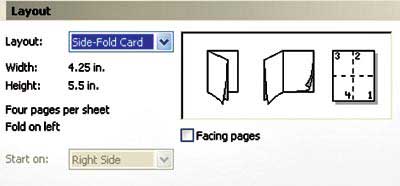
- Side Fold Card: divide the page into four sections horizontally and vertically. After printing, it will be folded horizontally first and vertically (Figure 8)
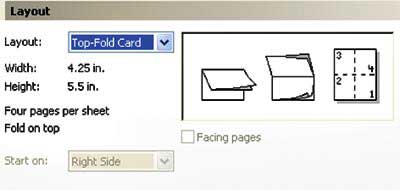
- Top Fold Card: same as Side Fold Card but folds vertically first and then horizontally (Figure 9)
Background items : there are 3 options
- No Background : does not display the background color
- Solid Background : Displays the background color as the uniform color for the drawing page
- Bitmap : use Bitmap image as background for drawing page
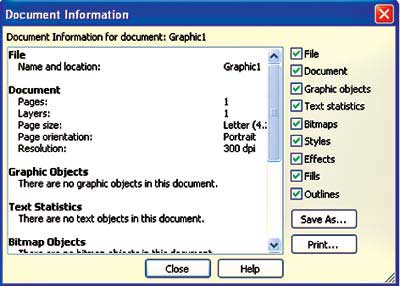
View drawing information: Select File - Documents Info .
The effect information, fill color, typeface . applied in the drawing are shown in this dialog box. You can view one or more information about File , Documents , graphics Objects . by selecting it. Select Save As to save this information as text (Figure 10).
Lam Khe
Was this article helpful?
Your feedback helps us improve.
Related Articles
 Coreldraw - Lesson 9: Road drawing tools3 minutes read
 Coreldraw - Lesson 9: Road drawing tools (continued)4 minutes read
 Getting familiar with the Pick Tool in CorelDraw4 minutes read
 Coreldraw 12 - Lesson 8: Spiral drawing tool2 minutes read
 Coreldraw - Lesson 7: Charting tool2 minutes read
 Technique using the Pick tool and the Transformations command group in CorelDRAW X86 minutes read
Reader Comments 0
Sign in with email or Google to join the discussion.