Table of Contents
This updated guide examines Click: How to Print Autocad Drawings on PC or Mac and organizes the essential facts, background, and practical takeaways in clear American English.
Part 1of 3:
Creating a Custom Page Setup on Windows
 Open an AutoCAD drawing. You must have AutoCAD installed on your computer to open an AutoCAD file. You can open an AutoCAD file by double-clicking a.dwg or.dxf file, or use the following steps to open an AutoCAD file within AutoCAD.
- Open AutoCAD.
- Click File .
- Click Open .
- Browse and click a.dwg or.dxf file.
- Click Open .
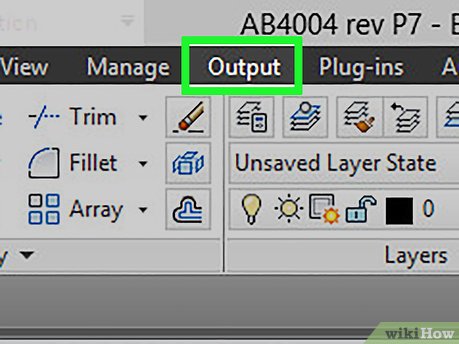 ClickOutput. It's one of the tabs in the tab bar at the top of the screen. This displays print options below the tab bar at the top of the screen.
 ClickPage Setup Manager. It's in the Output options at the top of the screen when you click the "Output" tab.
 ClickNew. It's to the right of the box that lists page setups. There is always a default "Model" page setup in the window. Click New to create a new page setup.
 Type a name for the page setup and clickOk. Use the box labeled "New page setup name:" to type a name for your page setup. You can name it after the project you are working on, or your own name, or anything you want. Click Ok at the bottom of the dialogue box when you are finished.
 Select a plotter. To select a plotter, click the drop-down menu next to "Name:" below "Printer/plotter". This displays all the plotters and virtual plotters installed on your computer. If you have a plotter installed on your computer that you wish to use, select it from the drop-down menu. If you're not sure which plotter to select, click DWF to PDF.pc3 . This will output your AutoCAD drawing to PDF format.
 Select paper size. Use the drop-down menu below "Paper size" to select the page size you will be printing on. Standard paper size is 8.5 x 11 inches (215.9 x 279.4 mm). If you are using a different or custom page size, select it form the drop-down menu.
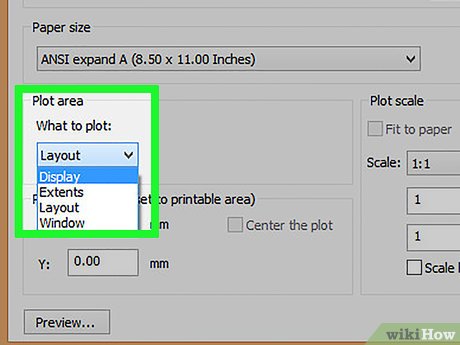 Select the area to plot. To select what to plot, click the drop-down menu below "What to plot" in the "Plot Area" box. There are four area types you can plot.
- Display plots what is in the drawing area on your screen.
- Extents plots everything in the drawing. This includes unused space in the drawing area.
- Limits plots what is within the limits of the drawing, if you set limits.
- Window displays another button that says "Window" next to the drop-down menu. Click this button and then drag a square over the drawing to select a specific area of the drawing you want to plot.
 Click the checkbox
 next to "Center the plot" (optional). To ensure the plot is centered on the page, click the checkbox next to "Center the plot" in the "Plot Offset" area.
 Set a plot scale. If you have units assigned to your drawing, you can select how many units per millimeter or inches on your page will be printed on the page. If you don't know what to set, click the checkbox next to "Fit to paper" to ensure the entire plot area displays on the page.
- Making the plot scale too big may result in the drawing not fitting on a single page. Click Preview at the bottom of the Page Setup Manager to see a preview of the printed drawing at any time.
 Select a plot style. Use the drop-down menu below "Plot style table" to select a plot style. Selecting "None" will print the drawing in full color, just as it appears on screen. To save ink, you can select one of the screening options. This will use less ink, but result in a fainter drawing. You can also select "Greyscale" to print a black and white drawing.
 Select a shading style. If you are working with a 3D drawing, use the drop-down menu next to "Shade plot" to select how the 3D elements are shaded in the printed drawing. You can select wireframe, realistic, shaded, shades of grey, x-ray, ect.
 Select plot options. Click the checkboxes in "Plot Options" to pick the plot options. You can select whether or not you want to plot lineweights, transparencies, and plot styles.
 Select paper orientation. In the box labeled "Drawing Orientation", select whether you want to print the drawing horizontally (Landscape), or vertically (portrait).
- You can also select "Plot upside down" to reverse the direction of the drawing on the printed page.
 ClickOk. This saves your page setup and adds it to the Page Setup Manager.
 ClickClose. This closes the Page Setup Manger.[1]
Part 2of 3:
Printing an AutoCAD Drawing on Windows
 Click theApplicationbutton. It's the red "A" button in the upper-left corner of AutoCAD.
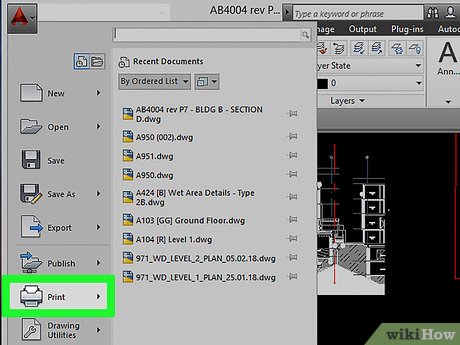 ClickPrint. It's next to the icon that resembles a printer.
 ClickPlot. It's the first option in the "Print" sub-menu. This displays the "Plot" dialogue box.
- You can also click the printer icon at the top of AutoCAD to display the Plot dialogue box.
 Select your customer page setup. Use the drop-down menu next to "Name" to select the custom page setup you just created. This applies all the custom settings to the PDF.
 ClickOk. This opens a browser window.
 Select where you want to save the file and clickSave. User the browser window to select where you want to save the PDF file. Click Save at the bottom of the screen when you are finished. This saves the drawing as a PDF and opens it in your default PDF viewing program.
- If you AutoCAD drawing has multiple layers, you can select which layers you want to print on the side of the PDF.
 Click the Printer icon. The icon that resembles a printer is the button that prints the PDF.
 Select a Printer and clickPrint. If you are satisfied with how the drawing looks, select the printer you want to print from using the drop-down menu. Then click Print to print the drawing.
Part 3of 3:
On Mac
 Open the AutoCAD drawing you want to print. You must have AutoCAD installed on your computer to open an AutoCAD file. You can open an AutoCAD file by double-clicking a.dwg or.dxf file, or use the following steps to open an AutoCAD file within AutoCAD.
- Open AutoCAD .
- Click File .
- Click Open .
- Browse and select your AutoCAD file.
- Click Open .
 ClickFile. It's in the menu bar at the top of the screen. This opens a drop-down menu.
 ClickPrint. It's near the bottom of the File menu. This opens the "Plot - Model" page with additional options.
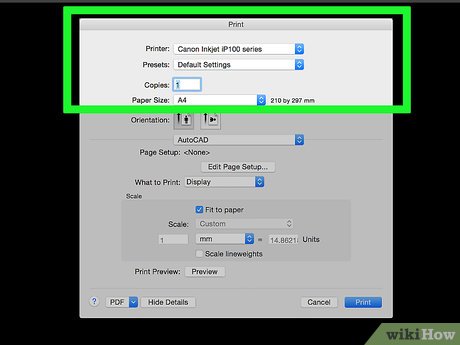 Click theNamedrop-down menu in the "Printer/Plotter" section. This opens a drop-down menu.
 Select your printer from the list. Select your printer from the list of Plotters.
 Adjust the print settings if needed. In the box labeled "Plot Settings," make sure the correct paper size, orientation, and what to print are matching the settings for the printer you selected.
 ClickPlot. It's a blue button at the bottom-right corner of the "Plot - Model" window. This will plot your drawing and send the print job to the printer. Your printer will start printing the AutoCAD drawing you selected.
FAQ
What is Click: How to Print Autocad Drawings on PC or Mac about?
It provides a structured overview of click, explains the main context, and highlights practical takeaways for readers.
Why does this topic matter?
Understanding the main concepts helps readers evaluate the issue, avoid common mistakes, and make better-informed decisions.
How should readers use this information?
Use the guidance as a practical starting point, confirm details that may have changed, and follow current product, safety, or security recommendations.
Related Articles
 How to Print Cad Drawings Properly4 minutes read
 Before AutoCAD, the Drawings Created Were Complex and Elaborate Like This3 minutes read
 How to Save AutoCAD Drawing Files, Export AutoCAD Drawings to PDF, JPG, PNG2 minutes read
 Steps to Delete Layers in Autocad4 minutes read
 How to Recover AutoCAD Files and Retrieve Drawings4 minutes read
 Steps to Draw Dashed Lines in Autocad4 minutes read
Reader Comments 0
Sign in with email or Google to join the discussion.