Table of Contents
This guide provides a clearer, better-organized overview of Create UEFI Standard USB Boot with DLC Boot. It focuses on the essential facts, practical steps, and common questions readers are most likely to have.
Rescue USB or USB boot is a very necessary tool for many people. It contains a mini Windows operating system and many other software to help install Windows or troubleshoot computer problems.
In the most recent article TipsMake has shown you how to Create a UEF I standard Windows 10 installation USB , this is the current standard with many improvements compared to the old generation Legacy. Although it cannot be replaced completely and creating a UEFI standard USB boot still causes many difficulties, the advantages that UEFI brings are undeniable. Creating a UEFI standard Windows 10 installation USB will help your computer boot faster, support larger hard drives as well as better troubleshooting capabilities.
Of course, Windows 10 is just a matter of creating a UEFI standard USB boot that can be done, Several other features that can help you when using the UEFI standard. But you need to note that UEFI does not support 32-bit operating systems .
Instructions for creating UEFI standard USB boot with DLC Boot
Conditions for Creating UEFI Standard USB Boot
- 1 USB with a minimum capacity of 4 GB, preferably 8 to 16 GB. - DLC Boot Software latest version at TipsMake.
Create UEFI Standard USB Boot
Step 1 : Plug the USB into the computer and open the DLC Boot 2019 package. Remember To unzip DLC Boot Before using, because the software is in compressed format.

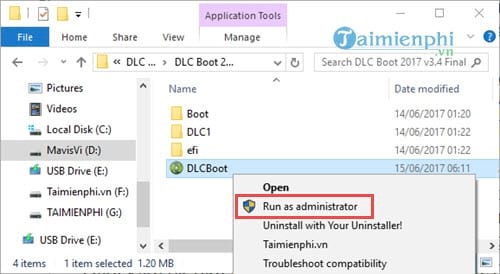
Step 2 : Open the DLC Boot 2019 folder and open this software in Administrator mode .

Step 3 : If you do not run Administrator mode, you will not be able to run DLC Boot 2019. Administrator mode is Run as Administrator when You right-select.
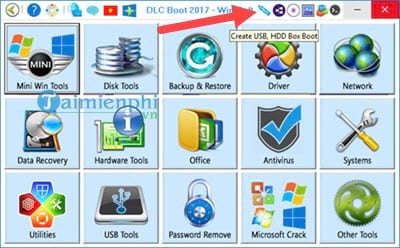
Step 4 : As soon as the DLC Boot 2019 interface appears, select The USB icon At the top.
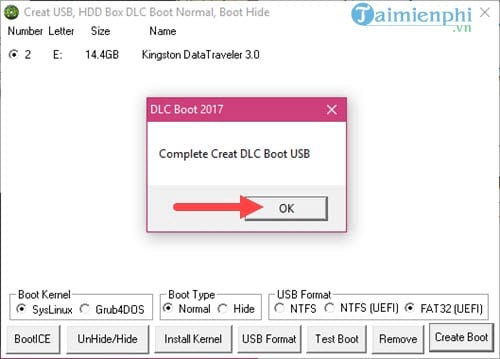
Step 5 : Now the boot interface of DLC Boot 2019 appears, select Normal Boot mode and FAT32 UEFI Then choose Create Boot To start creating a standard UEFI USB boot.

The system will ask you again if you want To format the USB Or not, select Yes To continue.

The copying process will take quite a long time, you should not use anything heavy that will affect the copy speed.

And when the message Complete Create DLC Boot USB Appears, it means you have finished creating a standard UEFI USB boot, now restart the computer and try the USB in UEFI mode to see how it goes.
Above are instructions on how to Create a UEFI standard USB boot with DLC Boot , a newer version of professional Boot creation software. If you need a multifunctional rescue USB with UEFI standard, this is the most standard and simple way. The simplest way to create a UEFI standard USB boot with DLC Boot. During the process of creating a UEFI standard USB boot, if you have any errors or questions that need to be answered, please contact us immediately to receive the answer as soon as possible.
At the same time, about creating UEFI standard USB boot and about creating normal Boot using different tools sometimes errors occur. We have many articles on how to fix errors related to create USB Boot that you may not know about. In addition, to create USB boot, you can use the Hirent Boot tool to help create USB boot to fix Windows errors. Hiren Boot can create USB or boot disk depending on your needs.
Remove USB Boot
I don't know why you don't use DLC Boot anymore but want to remove it. Very simply, connect the created USB Boot DLC to the computer => Launch DLCBoot. exe with Admin rights.
Select the USB item as created => select the USB name in the list and select Remove . So everything related to DLC Boot in your USB will be removed and your USB will return to normal.
FAQ
What is the main point of Create UEFI Standard USB Boot with DLC Boot?
Rescue USB or USB boot is a very necessary tool for many people.
Why might the details change over time?
Software versions, prices, policies, services, and product availability can change. Check the official source before making a purchase or changing important settings.
How can I use this information safely?
Follow official instructions, verify downloads and claims, back up important data, and avoid sharing passwords or sensitive account information.
Related Articles
 How to Create USB BOOT Standard UEFI - GPT Standard5 minutes read
 How to Create UEFI Standard USB BOOT - GPT Containing the11 minutes read
 Instructions for Creating UEFI Standard USB Boot Using Rufus4 minutes read
 How to Create and Extract Ghost in UEFI Standard and Standard GPT Hard6 minutes read
 How to Create Windows 10 Installation USB Using Rufus, Boot3 minutes read
 What Is Uefi: Concept of Uefi Standard in Computers5 minutes read
Reader Comments 0
Sign in with email or Google to join the discussion.