How to create and extract Ghost in UEFI standard and standard GPT hard drive
For newer computers, high configuration using Windows 64 bit, we must use the Windows installation, ghost supports UEFI - GPT standard. If you do not know how to extract the standard UEFI - GPT ghost, you should follow the instructions below.
Table of Contents
1. Create ghost file with UEFI - GPT standard
To create and extract the standard UEFI - GPT ghost, you need to have:
- A USB Boot HirenBoot or DLC Boot . You can review the instructions for creating USB Boot
Step 1: In the article I use USB Boot HirenBoot CD and I will proceed to boot mini Windows 10 PE from USB boot.
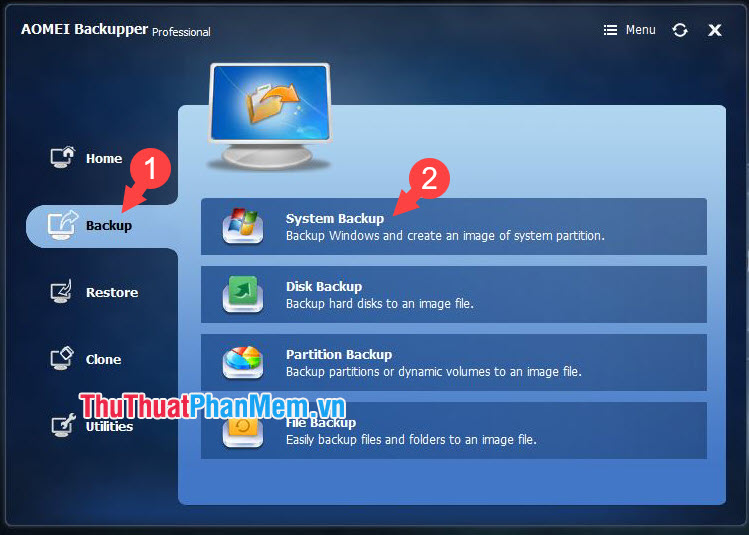
On the main screen, click the Ultities folder (1) => access Hard Disk ToolsImaging (2) => AOMEI Backupper (3) .

Step 2: In the Home screen interface (1) , click Create New Backup (2) .

Step 3: Choose Backup (1) => System Backup (2) .
Step 4: Select the drive to backup (1) and click OK (2) .

Step 5: You name the Ghost file of the operating system (1) and click on Step 2 (2) to the path to save the ghost file.

You continue to select the folder to save the file on the computer (1) and click Open (2) to select that folder.

Step 6: Click Start Backup to start the ghost file creation process.

After the software runs to 100% is successful, click Finish to confirm completion.

Note: The ghost file created by AOMEI Backupper software has the .ADI format and we should use the AOMEI Backupper program to re-ghost the device.
2. Extract UEFI ghost file with the most standard GPT hard drive.
To extract the standard UEFI ghost file and the most standard GPT hard drive, we need to prepare:
- USB Boot HirenBoot CD or DLC Boot (recommended HirenBoot CD).
- UEFI standard ghost file.
In my article, I use ghost file with .ADI format created by AOMEI Backupper software in the instructions above. To extract the ghost file, we must first delete the partition containing the operating system (usually the C: drive) and convert that drive to the GPT standard and then perform the ghost file extract. Detailed instructions on how to extract ghost standard UEFI - GPT are as follows.
2.1. Delete the partition to install the operating system and format the standard GPT drive.
To install ghost on a GPT disk, of course we need a GPT drive. Proceed as follows:
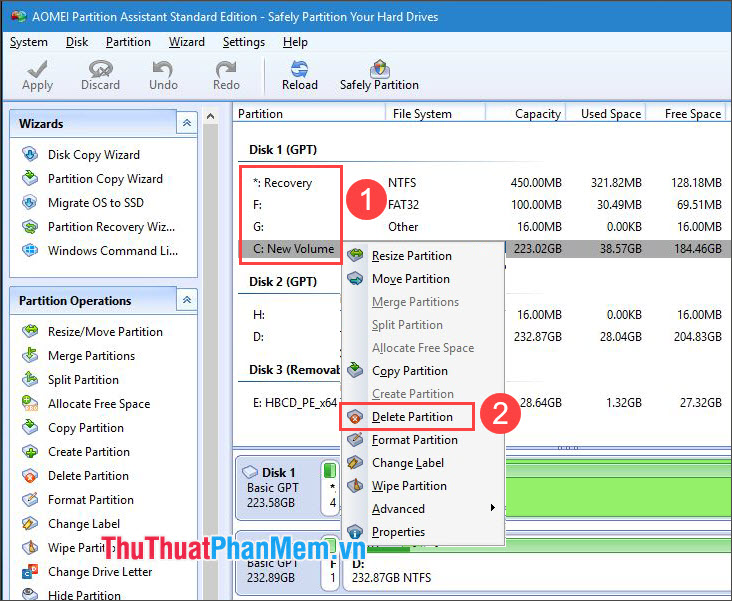
Step 1: You start the computer with the HirenBoot CD. On the start screen, click the Utilities folder (1) and access the path Hard Disk Tools => Partition Tools => Open AOMEI Partition Assistant (2) .

Step 2: Right-click the drives containing the operating system (1) => select Delete Partition (2) to delete the partition.
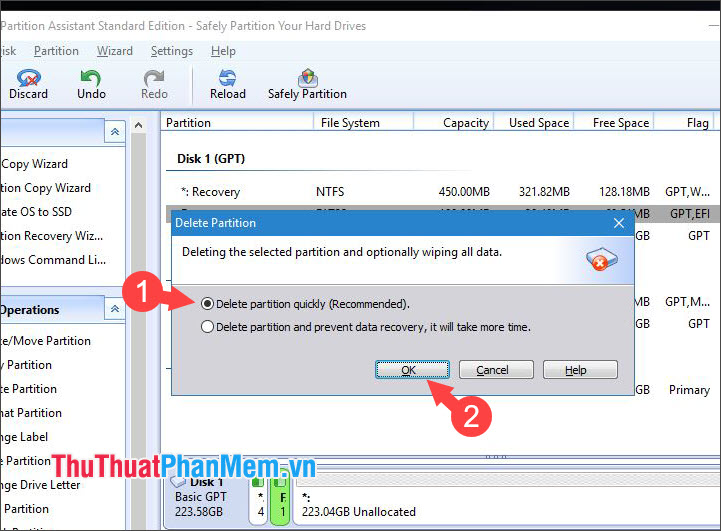
Step 3: The notification panel appears, choose the first option (1) => OK (2) .
Step 4: This step is quite important and you should note.
If your drive is GPT by default, we will skip Step 4 and Step 5 . To convert MBR to GPT, please click on the drive (1) => Convert to GPT (2) . If you see the Convert to MBR option, your hard drive is already a GPT standard, not converted.

Step 5: Choose OK to confirm.

Step 6: Click the Apply button to save the settings.

Step 7: Continue to click Process to repartition the hard drive takes place.

And after the notice Congratulation! is success. Click OK and exit the software.

2. Bung standard UEFI - GPT ghost
Step 1: You boot the computer with HirenBoot CD. Next, open the Utilities folder (1) => Hard Disk Tools (2) => Imaging (3) => open AOMEI Backupper (4) .

Step 2: On the interface of the software, select Restore (1) => Path (2) to open the saved ghost file.

You continue to select the ghost file created with .ADI format (1) and click Open (2) to open.

Step 3: A notice will appear, click Yes to continue.

Step 4: Click the saved ghost (1) => Next (2) to continue.

Step 5: You choose an empty partition with GPT (1) created in the above instructions => click Next (2) to continue.

Step 6: Before continuing, please tick the two options in section (1) .
- Enable Universal Restore: This feature allows you to install any ghost without the original driver from the system.
- Align partition to optimize for SSD: For machines with SSD, you should tick this line because this option will optimize the ghosting speed on SSD.
Click Start Restore (2) to begin the recovery process.

After the software runs to 100% is complete, click Finish to finish and restart the computer.

With instructions for creating and extracting a standard UEFI ghost and GPT hard drive, we can use the computer and the ghost to achieve the best performance with less errors when using the multi-configuration and non-standard ghosts. Good luck!
Was this article helpful?
Your feedback helps us improve.
Related Articles
 How ghost hard drive Win 7 easy and safe with AOMEI Backupper5 minutes read
 How ghost hard drive in Windows 10 with EaseUS4 minutes read
 Instructions to use Onekey Ghost to create and extract Ghost files quickly3 minutes read
 How to create USB BOOT standard UEFI - GPT standard4 minutes read
 Create UEFI standard USB boot with DLC Boot5 minutes read
 What is a TIB file? How to ghost a computer with a standard .tib file UEFI - GPT5 minutes read
Reader Comments 0
Sign in with email or Google to join the discussion.