Table of Contents
This step-by-step guide explains how to create network drive with airdisk in os x. It covers the required setup, the main actions, and the checks that help prevent common problems.
 Network administration - There are many ways to make using a network drive at home extremely useful. Whether you want to backup, share files or stream media from multiple computers, . Quickly and easily, network drives are a convenient and easy way to do that if set up properly. So in this article we will show you how to create a network drive with Airport Extreme Base Station (AEBS) on a Mac computer.
The first thing you need is an external hard drive or a USB drive. One thing to keep in mind is that if you plan to access AirDisk from Windows computers as well as OS X computers, you need to have a formatted drive before starting this process, and fixing it. Its format must be FAT32.
After formatting the hard drive, you need to plug it into your Airport Extreme Base Station and open Airport Utility on the Mac. When you open Airport Utility, select Manual Setup , Disks , and your hard drive appears. Select the File Sharing Tab to set up sharing for computers connected to the network.
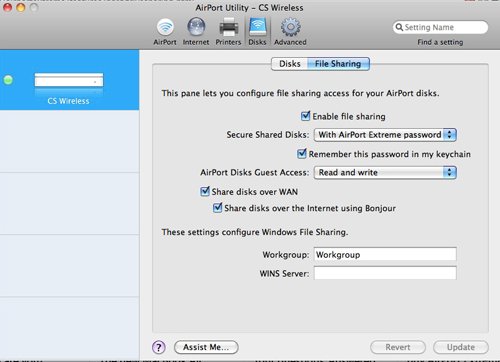
Start by selecting Enable file sharing . A simple and secure security option is to secure shared drives with Airport Extreme Password, which also allows you to remember multiple passwords. If sharing with multiple Windows computers, you also need to enter their Workgroup name in the Workgroup dialog box near the bottom of the window. Continuing to select Update When you have completed these steps, enabling Airport Extreme Base Station to restart, then you can access AirDisk by going to the Finder And clicking AEBS In the sidebar. Once you've selected it, select Connect As , enter your password and select Connect . Now just double select your hard drive and it will be mounted just like any other hard drive in your computer.

To access that disk from a Windows computer, you only need to perform some actions.
Open My Computer On PC. In the left sidebar, select My Network Places . In the next window, in the left sidebar, select Add Network Place . Select ' Choose another network location ' and select Next . In the next window, enter '' and then the router's IP address, the address can be found on the first screen when you open Airport Utility on the Mac.

When you enter this IP and select Next , a Network Folder will be added to the 'My Network Places' screen, from which you can easily access AirDisk from your PC.

FAQ
What should I check before following these steps?
Confirm device and software compatibility, save important data, and make sure you have the required permissions, files, and account access.
Why might the process not work?
Common causes include outdated software, missing permissions, incompatible hardware, an unstable connection, or completing a step in the wrong order.
Can I undo the changes if necessary?
That depends on the tool or setting. Use built-in restore options when available, keep a backup, and record the original configuration first.
Related Articles
 How to Use Google Drive Like Free Ftp Server or Network Drive6 minutes read
 How to Set Up a Network Drive: Step-by-Step Guide9 minutes read
 How to Map Network Drives in Windows 116 minutes read
 4 Tools to Create USB Boot Install Windows 105 minutes read
 How to Transfer Files Between Two iOS Devices with Airdisk Pro5 minutes read
 How to Set Up a Network Drive: Step-by-Step Guide8 minutes read
Reader Comments 0
Sign in with email or Google to join the discussion.