How to Map a Network Drive
This wikiHow teaches you how to turn a folder on your computer network into a shared drive. In order to do this, your computer must be on the same network as the computer on which the drive folder resides. You can map a network drive on....
Method 1 of 2:
On Windows
-
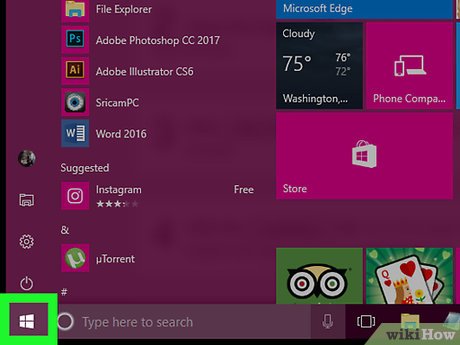 Open Start. Click the Windows logo in the bottom-left corner of the screen.
-
 Open File Explorer. Click the folder-shaped icon in the lower-left side of the Start window.
-
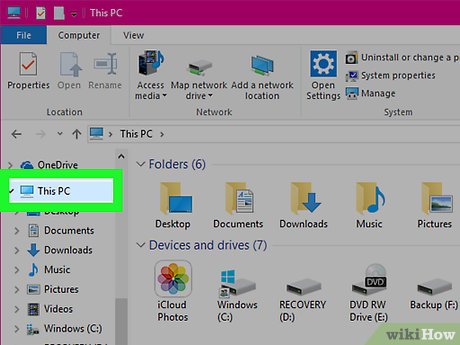 Click This PC. This folder is in the left-hand column of options in the File Explorer window.
 -
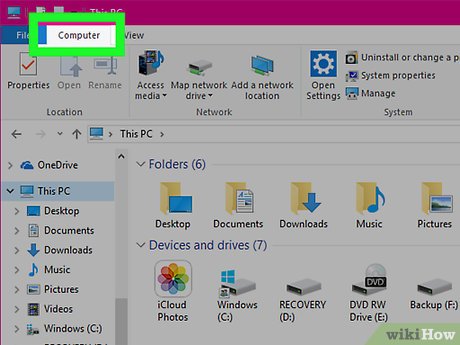 Click the Computer tab. It's in the upper-left side of the This PC window. A toolbar will appear below the Computer tab.
 -
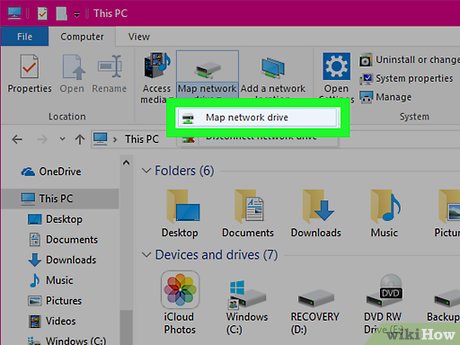 Click the Map network drive icon. This option is in the "Network" section of the toolbar; it resembles a grey drive with a green bar below it. Clicking this prompts a pop-up window to appear.
 -
 Select a drive letter. Click the "Drive" drop-down box, then click the letter that you want to use for the folder.
- Hard drives all have letters assigned to them (the hard drive on your computer is most likely labeled "C", for example).
- Consider picking a letter like X or Z in order to avoid conflicting with any of the A through F drive letters that you will most likely use on your computer at some point.
-
 Click Browse…. It's in the middle-right side of the window. Another window will open.
 -
 Select the folder that you want to use as the drive. Click on the name of the computer you want to use, then navigate to the folder that you want to select as the drive and click on it once to select it.
- If you aren't connected to at least one other computer on your network, you won't be able to select a folder.
-
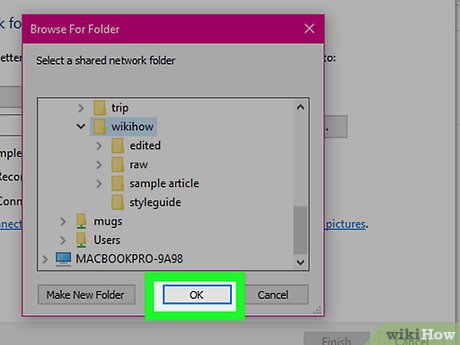 Click OK. It's at the bottom of the window. Doing so saves your selected folder as the drive destination.
- Make sure that the owner of the folder's computer doesn't move the folder after this point.
-
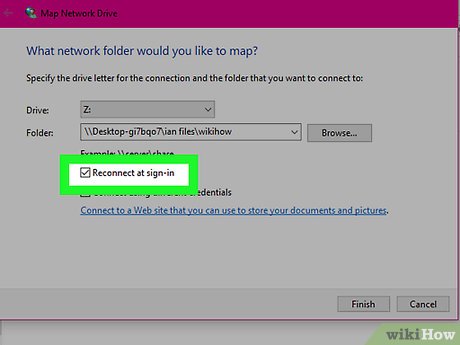 Make sure that the "Reconnect at sign-up" box is checked. Click the checkbox to the left of this option if the box isn't checked. This will ensure that you always have access to the folder.
- If you are connecting to a shared folder on a network that is not on your computer, you may also need to provide login information. If so, check the box labeled "Connect using different credentials" and enter your login information.
-
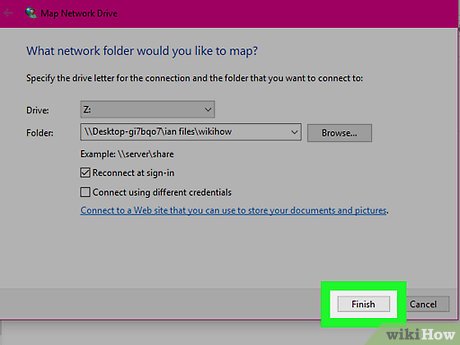 Click Finish. It's at the bottom of the window. This will complete the setup process and link your computer to the selected folder. You should now be able to use the specific folder as a drive.
- The folder in question will appear in the This PC window below the "Devices and drives" heading. It will have the letter you selected as its name.
Method 2 of 2:
On Mac
-
 Open Finder. Click the blue, face-shaped icon in your Mac's Dock.
 -
 Click Go. This tab is in the menu bar at the top of the screen. A drop-down menu will appear.
 -
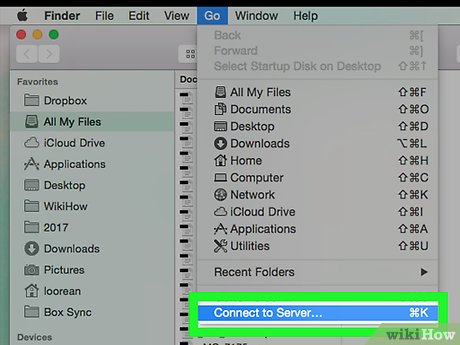 Click Connect to Server. You'll find this option near the bottom of the drop-down menu. A new window will open.
 -
 Enter the address for the folder that you want to use. For example, if the folder is named Pickles and it is inside of the Documents folder on a computer named Hal, you would type Hal/Documents/Pickles/ on the right side of the smb:// tag.
- Depending on your network type, you may see ftp:// or something similar here instead of smb://.
-
 Click +. It's to the right of the address bar. This will add the folder's address to your Mac.
 -
 Click Connect. This blue button is at the bottom of the window.
 -
 Enter your credentials when prompted. The login and password you need to enter here will vary depending on your network, so check with your system administrator if you don't know how to log in.
- Once you log in, you should see the folder's drive icon appear on your desktop.