6 ways to change the name displayed on your computer
During use, you may want to change the computer display name to a new name, perhaps for the reason of transferring the right to use the computer or you do not like the old name given to you by the person who installed the computer for you. But the problem is you don't know how to change? Follow this article, TipsMake will show you some quick and simple ways to rename your computer.
Why should you change your PC name?
Unless otherwise specified, computers and laptops are named with letters and numbers that are automatically generated when the operating system is installed. The PC name, also known as the device name or hostname, identifies your PC within a computer network. Random computer names (e.g. 'LAPTOP-QO1XB2') are essentially meaningless and are only used to identify individual computers.
Individuals who do not want to connect their PC to a work computer network rarely know how to change the PC name. In personal use, this name usually does not play any important role. However, if you use your computer as part of a computer group or if you use other PCs outside of your home network, the randomly generated PC name is not very meaningful and does not provide any information. any information about the PC's role in the network or about the users.
In these cases, it can be helpful to learn how to change a computer's name and rename it.
Note:
Before you decide to change your computer name, it's best to learn how to locate your computer name in Windows 7, 8, and 10 as well as Mac.
How to find computer name
Find computer name in Windows
As a Windows 10 user, you have many options to find out your computer's name.
Through the search function
1. In the Windows search bar at the bottom left, type 'PC '.
2. Right click on 'This PC'.
3. Select the 'Preferences' menu item.
4. The computer name will be displayed in 'Full computer name' .
Through the key combination Windows + Pause
1. Press the Windows key and Pause key at the same time.
2. In 'Computer name, domain, and workgroup settings' , you will find the full computer name.
Through Settings
1. Press the Windows and I keys at the same time to access Windows 10 Settings.
2. Click 'System'.
3. In the side menu, select the "Info" entry .
4. You can find the computer name in the 'Device Specifications' section under 'Device Name'.
Via the hostname command
1. Use the Windows + R key combination to open the Run window .
2. Type 'cmd' and press the Enter key.
3. Enter 'hostname' in the field and then press Enter again.
4. The computer name will appear.
Find computer name via IP address
In cases where security software in your network detects a vulnerability on a specific computer but only knows the IP address, you can find the computer name by using the Run dialog box and the appropriate CMD command.
To do this, open the Run dialog window ( Windows key + R ), type 'cmd' and press Enter. Now enter the CMD command 'nbtstat' followed by a space and the corresponding IP address and press Enter again.
nbtstat IP-AddressYou will now be able to see the computer name, computer group, and MAC address of the computer.
Find computer name in Mac
As a Mac user, you can also easily find out your computer's name. The following options are available:
Through the Apple menu
1. Click the Apple icon at the bottom or top left.
2. Select 'System Preferences' from the drop-down menu.
3. Open the folder titled 'Sharing'.
4. The computer name will be displayed at the top.
Find local hostname
1. Click the Apple icon at the bottom or top left.
2. Select 'System Preferences' from the drop-down menu.
3. Open the folder titled 'Sharing'.
4. Local hostname will be displayed immediately below the computer name.
How to change computer name?
Method 1: Rename the computer using Windows Settings
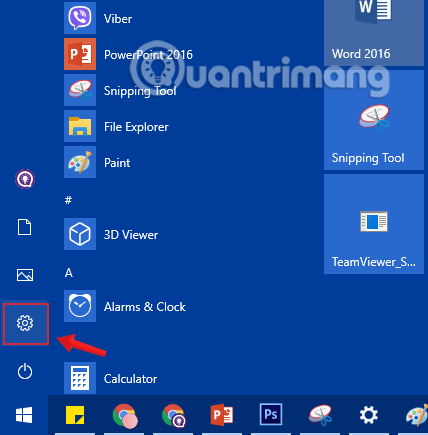
Step 1: First of all, we will open the Windows Settings window interface by clicking Start menu and then clicking the cog icon .
Or you can use the Windows+ key combination Ito open Settings.
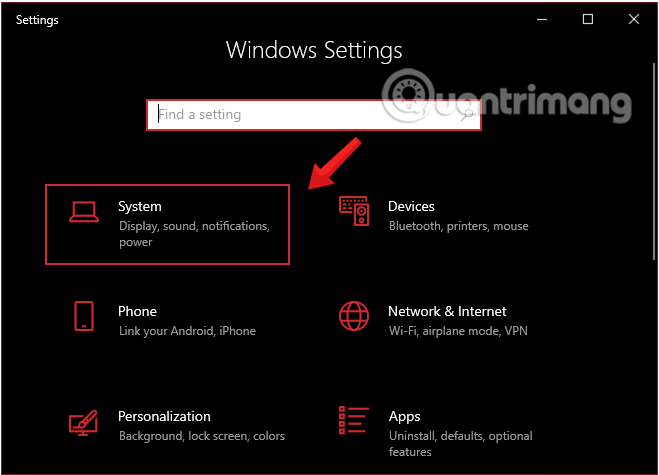
Step 2: In the Windows Settings interface , continue clicking System to make changes.
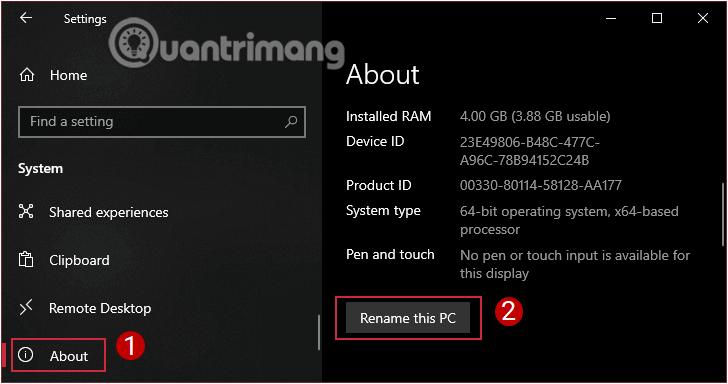
Step 3: Under System section , click About from the left window.
To rename your computer, scroll down, find the Rename this PC option and click on it.
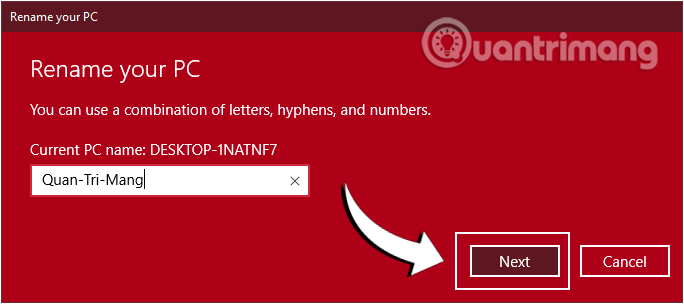
Step 4: The new window that appears will display the device's current name and a box for you to enter a new name. Enter the computer name you want to change and click Next.
Step 5: Restart the computer. The changes will take place when you restart your computer. You can choose Restart now to restart immediately, or Restart later to restart later.

Method 2: Rename PC using Control Panel
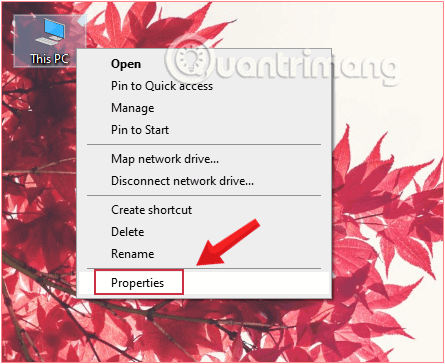
Step 1 : From the Desktop screen , right-click Computer and select Properties.
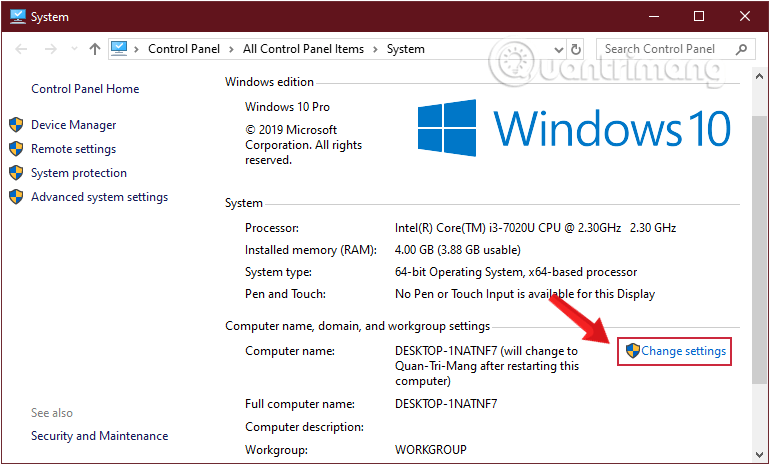
Step 2 : In the new interface, click Change Settings
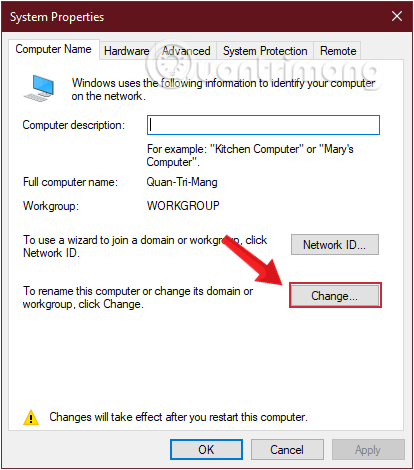
Step 3 : When the new window opens, click on Change.
Step 4 : Put a new name in the blank box and click OK.
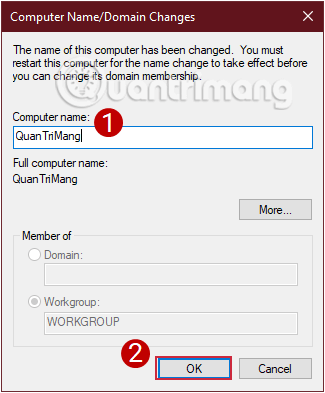
After that, the computer will restart automatically and start using the new name.
Method 3: Rename on the computer using Registry Editor
Step 1: Open Registry Editor on Windows.
Step 2: Navigate to the following path:
- HKEY_LOCAL_MACHINE/SOFTWARE/Microsoft/Windows NT/CurrentVersion
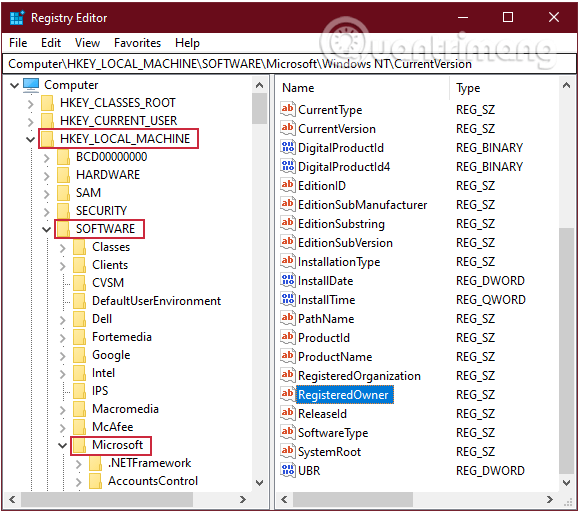
Step 3: In CurrentVersion, find the keywords Registered Owner and Registered Organization.
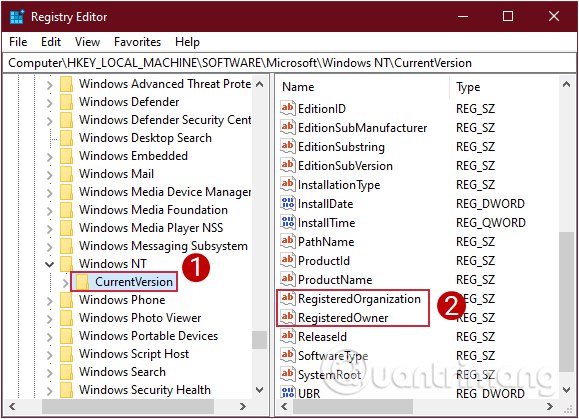
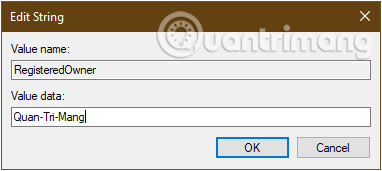
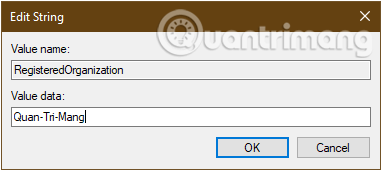
Step 4 : Double click on each keyword Registered Owner , Registered Organization and rename your computer here then click OK.
Step 5: Finally, restart your computer to save the changes and you're done.
Method 4: Rename the computer using Command Prompt
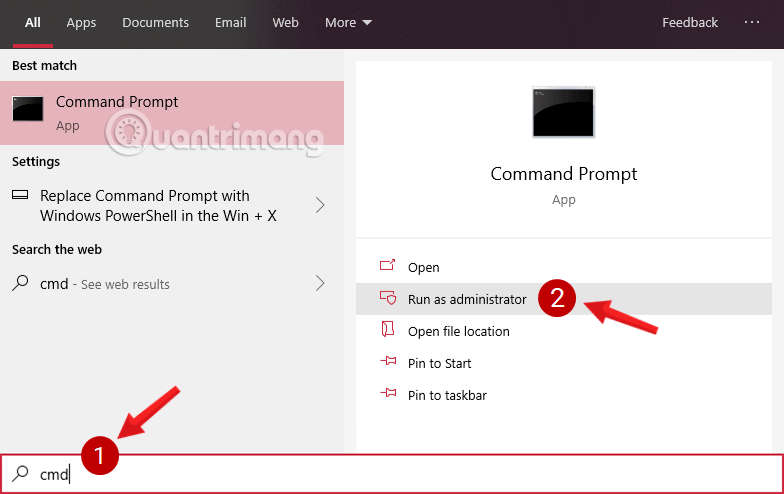
Step 1: Open Command Prompt, run as admin with Run as administrator.
If you use Windows 10 with the latest versions, the Run as administrator button will appear as soon as you search for Command Prompt.
Step 2: Now an Administrator: Command Prompt window appears on the screen . Enter the following command into the Administrator: Command Prompt window to enable the computer name editing feature:
WMIC computersystem where caption='TENHIENTAI' rename TENMOIReplace the current name of the computer and the new name you want to change accordingly.
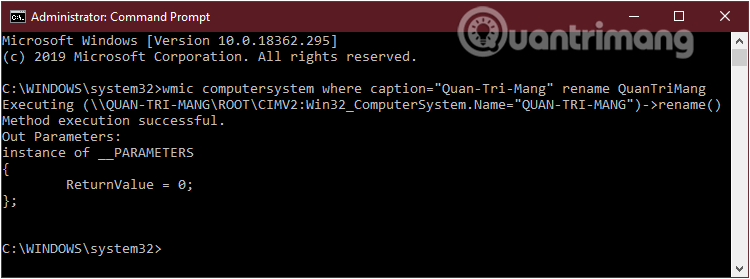
Step 5: Finally, restart your computer to save the changes.
Method 5: Rename the computer using PowerShell
To change your Windows 10 PC name using PowerShell, follow these steps:
Step 1: Open Start.
Step 2: Search for PowerShell , right-click on the top result and select the Run as administrator option to open PowerShell with admin rights.
Step 3: Enter the following command to display the current PC name and press Enter:
Rename-Computer -NewName "NEW-PC-NAME" 
Step 4: Enter the following command to reboot the device and press Enter:
Restart-ComputerAfter you complete the steps, your computer will restart to apply the changes.
Note: The method to rename your desktop, laptop, or tablet using the Settings app only works on Windows 10, but you can use System Properties and Command Prompt , and even PowerShell to change it. the name of a device for all major operating system releases, including Windows 10, Windows 8.1, Windows 7, and others.
Method 6: Change the remote computer name using Windows PowerShell
Users with admin rights on the network or domain can also change the name of other computers on the same network or domain. This is especially useful if you are an IT administrator and you won't need to leave your seat every time you want to change the name of a computer on the network.
Follow the steps below to change the remote computer name:
Step 1 : Launch Windows PowerShell with admin rights.
Step 2 : Enter the following command:
Rename-Computer -ComputerName "ExistingRemoteName" -NewName "NewRemoteName" -DomainCredential DomainUsername -ForceReplace ExistingRemoteName with the current computer name of the remote PC, NewRemoteName with the new name of the remote PC you want to set, and DomainUsername with the domain user account with admin rights, as in the example below:

Step 3 : Now, enter the login information for the domain user and then click OK .
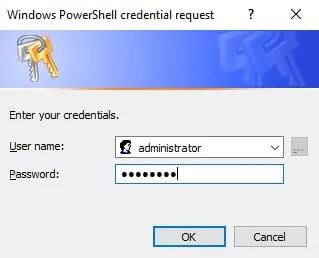
Step 4 : You will then be prompted to restart the remote computer for the changes to take effect. Enter the command below to restart the remote computer:
Restart-Computer -ComputerName ExistingRemoteName -Credential DomainUsername -ForceReplace ExistingRemoteName with the old name of the computer and DomainUsername with a domain user account with admin rights, as in the example below:

Step 5 : Now, re-enter your domain user account login information and click OK . The remote computer will restart.
After the remote computer restarts, its new name will be updated as you specified.
Above are some ways for you to rename your computer as you wish. Let's try it.
Having fun!