Table of Contents
This practical guide walks through steps to fix dead spots on the screen, explains the main requirements, and highlights common issues that may appear along the way.
How to fix dead/stuck pixels on the screen
Unfortunately, you cannot fix a dead pixel. However, you can fix a stuck pixel. As the article explained above, it is difficult to distinguish the two. Either way, here are the methods you can try:
Step 1. First, identify dead or stuck pixels by viewing your monitor in different color palettes.
Step 2. To fix a stuck or dead pixel, use a third-party tool to flash the pixel with multiple colors. The article recommends UDPixel (Windows) or LCD (online).
Step 3. Finally, you can try a manual method that involves rubbing the stuck pixel with a damp cloth or a pointed but soft object, like a rubber/eraser on the tip of a pencil.
Let's look at these methods and tools in detail.
1. JScreenFix (Web)
JScreenFix won't help you find a stuck pixel, but it can help you fix it. Just click the Launch JScreenFix button at the bottom of the page.

The tool will load a black browser window with a square of blinking pixels. Tap the green button at the bottom right to go full screen. Drag the flashing square to where you found the stuck pixel and leave it there for at least 10 minutes.

2. UDPixel (Windows)
Download UDPixel Link here
UDPixel, also known as UndeadPixel, is a Windows tool. It can help you identify and correct pixels with a single tool. The program requires Microsoft .NET Framework. If you don't use Windows or don't want to install any software, scroll down to see the online tools below.
With the Dead pixel locator tool on the left, you can easily spot any anomalies on the screen that have escaped your view so far.
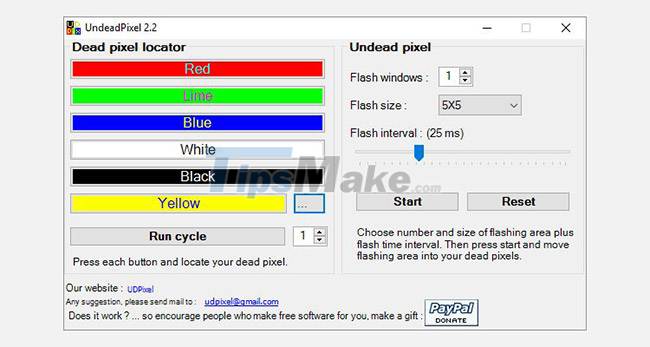
If you detect a suspicious pixel, switch to the Undead pixel side , create a sufficient number of flash windows (one window for each stuck pixel) and press Start . You can drag the little blinking windows to where you find the weird pixels.
Let them run for a while and finally change the Flash interval.
3. PixelHealer (Windows)
Aureltec built this Windows application as a companion to the InjuredPixels tool to detect dead, stuck or hot pixels.
PixelHealer allows you to flash a combination of black, white, all primary colors, and custom colors in a draggable window with a custom size. You can even change the flash interval and set a timer to automatically close the app.
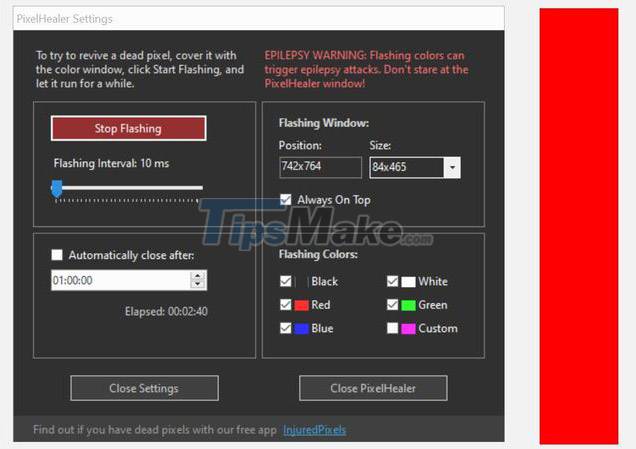
To close the app, click the Close PixelHealer button at the bottom right.
4. Dead Pixel Test and Fix (Android)
This Android tool can both check and fix dead or stuck pixels on your Android device. Download Dead Pixels Test and Fix here

Let it run through all the colors in Auto mode to detect if you have any weird pixels on the screen. If so, start fixing it, which will quickly flash the entire screen with black, white, and primary color pixels.
5. Manually fix stuck pixels
If none of these tools solve your stuck or dead pixel problem, this is a last chance. You can combine any of the tools listed above and the magic power of your own hands.
Try the steps below:
Step 1. Turn off the screen.
Step 2. Take a damp cloth so as not to scratch the screen.
Step 3. Press firmly on the area where the pixel is stuck. Try not to apply pressure anywhere else, as this can create more stuck pixels.
Step 4. While pressing hard, turn on the computer and monitor.
Step 5. Stop pressing and the stuck pixel will disappear.
This works because, in a stuck pixel, the fluid in one or more of its subpixels does not spread equally. When the screen's backlight is on, different amounts of liquid pass through the pixel to produce different colors. When you apply pressure, you are squeezing the fluid out, and when you stop pressing, the liquid will most likely push in, spreading around in a uniform manner as usual.
Key Takeaways
Use the information above as a practical reference for steps to fix dead spots on the screen. Review each step carefully, confirm any requirements, and choose the option that best fits your situation.
FAQ
What does this guide explain about Steps to Fix Dead Spots on the Screen?
It explains the main concepts, practical considerations, and useful steps related to steps to fix dead spots on the screen without requiring advanced knowledge.
Who can benefit from learning about Steps to Fix Dead Spots on the Screen?
This information is useful for readers who want a clear overview, practical guidance, and reliable steps related to steps to fix dead spots on the screen.
What should I check before applying this information?
Review the requirements, confirm that your device, software, or situation matches the instructions, and back up important data before making major changes.
Related Articles
 How to Detect Dead Spots on the Desktop Screen6 minutes read
 Dead Spots on the Laptop Screen4 minutes read
 Handle Scratches and Dead Spots on Laptop Screen8 minutes read
 How to Check and Detect Dead Spots on Desktop3 minutes read
 How to Replace a Broken Laptop Screen5 minutes read
 Dead: Liquid Crystal Computer Screen Protection4 minutes read
Reader Comments 0
Sign in with email or Google to join the discussion.