Table of Contents
This guide provides a clear, practical overview of steps to disable or uninstall onedrive on Windows 11, with useful context, important details, and straightforward takeaways for everyday readers.
However, for some reason you do not want to use this hosting service, because you may already have more suitable options. For example Google Drive or Dropbox …. such as.
But as you know, since the Windows 10 operating system so far, Microsoft has integrated the Onedrive service deep into the system already, which means it becomes part of the Windows operating system.
So is there a way to remove OneDrive on Windows 11 or temporarily disable OneDrive on Windows 11?
Yes, I wrote this article, I'm sure there will be instructions for you. So if you are intending to remove or disable OneDrive on Windows 11, Review it.
1. How to remove OneDrive on Windows 11 (applies to Windows 11 Home)
Step 1: You open Windows Settings, you can use the Windows + I key combination to open it faster.
Step 2: Next, go to Apps => and select Apps & features.
At this time, applications will appear in the right column, scroll down and find the Microsoft OneDrive application => select the 3 dots next to it => and select Uninstall

Yes, now Windows 11 will remove OneDrive, and the OneDrive icon on the Taskbar will disappear shortly after.
NOTE: So in case you want to reinstall OneDrive on Windows 11, how to do it?
It's also straightforward, you access the path C: WindowsSysWOW64 => and double click on the OneDriveSetup.exe executable file to proceed with the installation.
2. How to Disable OneDrive on Windows 11 [PRO or Enterprise Edition ]
For Windows 11 Pro and Enterprise versions, we can use the Windows Local Group Policy Editor tool to disable and hide OneDrive easily.
Step 1: You open the Run dialog box (Windows + R) => then enter the command gpedit.msc => and press Enter to open the Group Policy Editor.
![2. How to Disable OneDrive on Windows 11 [PRO or Enterprise Edition ] — Steps to Disable or Uninstall Onedrive on Windows 11](../data3/images/steps-to-disable-or-uninstall-onedrive-on-windows-11-picture-2-1W63bWXWm.png)
Step 2: Now go to the link below:
Computer Configuration > Administrative Templates > Windows Components > OneDrive
=> Then find and double click on Prevent the usage of OneDrive for file storage => then switch the Enable bar => click OK to set.
![2. How to Disable OneDrive on Windows 11 [PRO or Enterprise Edition ] — Steps to Disable or Uninstall Onedrive on Windows 11](../data3/images/steps-to-disable-or-uninstall-onedrive-on-windows-11-picture-3-pGQMNwQ0M.png)
With this approach, it not only disables OneDrive on Windows 11, but it also deletes the OneDrive folder from File Explorer.
3. Turn off OneDrive on Windows 11 through settings
If you do not want to disable or remove OneDrive, there is still another way for you.
This way only deactivates the service, which means it will unlink OneDrive with your computer to not allow automatic backup, sync your data to Microsoft's cloud storage.
Perform:
Step 1: Right-click on the OneDrive icon on the Taskbar => then select Settings
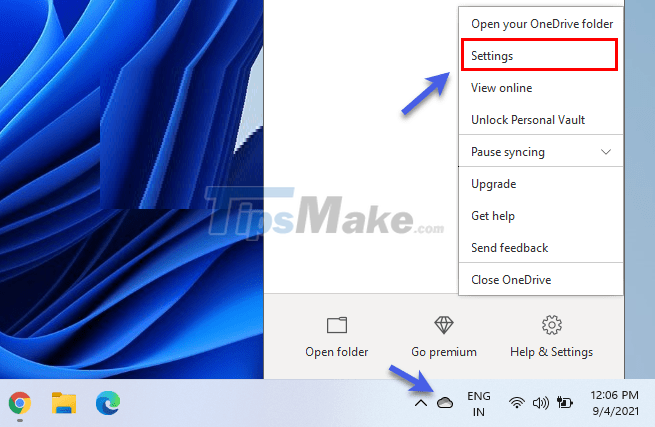
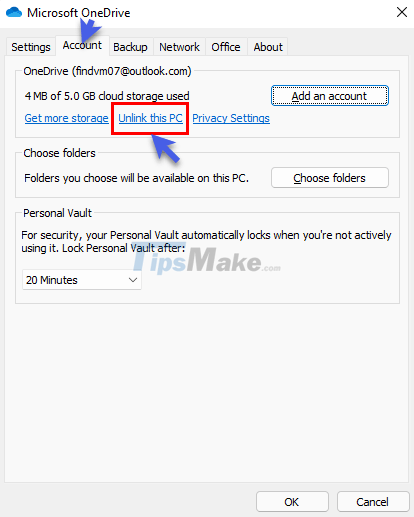
Step 2: An installation window appears, go to the Account tab => then click the Unlink this PC link.
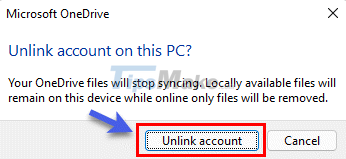
Step 3: Please confirm unlinking by clicking the Unlink account button
Next, another window will appear asking you to enter the Email with which you have registered your OneDrive account to complete the deactivation process.
NOTE: Note that this method will not hide the OneDrive icon on the Taskbar. And if you later want to use it again, re-link, you just need to re-login the Email.
4. How to Uninstall OneDrive on Windows 11 Using the CMD . Command
The commands in CMD are too cool, you can do a lot of things through this command line window. And of course, you can also use the command in CMD to remove OneDrive on Windows 11 easily.
Step 1: You open the CMD window by pressing the Windows + R key combination to open the Run dialog box => then enter the cmd => command and press Enter to execute.
Then you execute the following commands in turn:
taskkill /f /im OneDrive.exe
%SystemRoot%SysWOW64OneDriveSetup.exe /uninstall
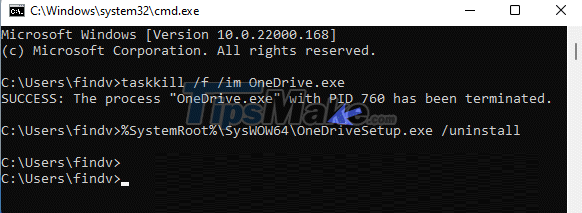
If prompted to confirm uninstall, click OK. It's that simple.
Well, similarly, To use the OneDrive service again, just follow the note in part 1 above.
5. Remove OneDriver on Windows 11 with Registry Editor
Before doing it this way, I recommend you to backup Regedit first, because if you do it wrong, it will be easy to make mistakes.
Step 1: You open the Registry Editor window by opening the Run dialog box (Windows + R) => and enter the command regedit => and press Enter.
Step 2: Go to the following link:
HKEY_LOCAL_MACHINESOFTWAREPoliciesMicrosoftWindowsOneDrive
Step 3: Here you will see a DWORD named DisableFileSyncNGSC => double click it and reset the value from 0 to 1 => click OK.
Finally, restart your computer to apply the changes.
6. How to pause OneDrive data sync on Windows 11
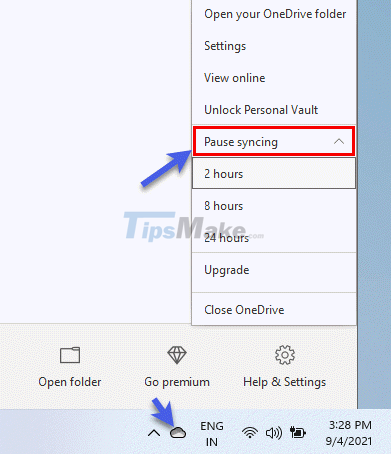
In case you only need to stop syncing data for a period of time, you can use the Pause syncing feature.
Implementation: This way is straightforward, right-click on the icon of OneDrive on the Taskbar => then select Pause syncing and you're done.
7. How to stop syncing for a specific folder on OneDrive?
In case you just want to exclude some folders, don't let it sync, and other folders still sync normally, you can set it up as follows:
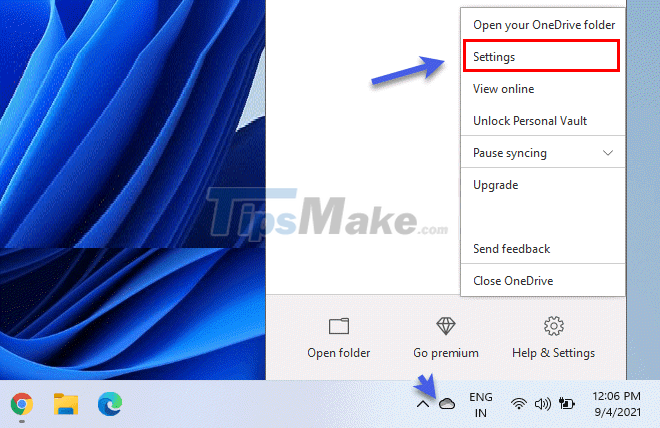
Step 1: Right-click on the OneDrive icon on the Taskbar => and select Settings as shown below.
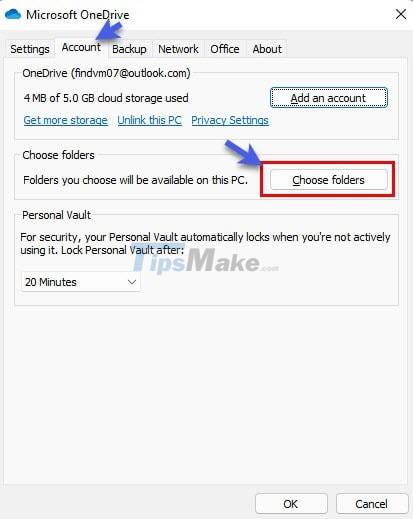
Step 2: A new window appears, here you go to the Account tab => then select the Choose folders button.
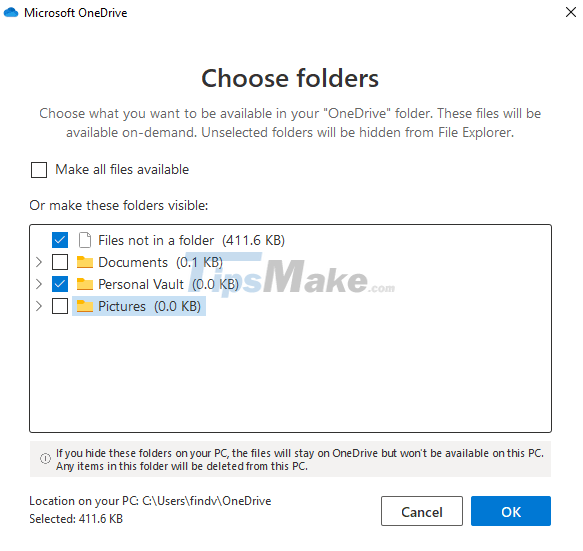
Step 3: Okay, here, uncheck the folders that you don't want to sync anymore => then click OK to complete the setup.
8. Conclusion
Well, that's it, I have finished showing you how to disable OneDrive or remove OneDrive on Windows 11.
Basically, all the tips related to turning off OneDrive on Windows 11 operating system have been presented quite fully in this article already.
Hope the article will be useful to you, good luck!
FAQ
What does this guide explain about Steps to Disable or Uninstall Onedrive on Windows 11?
It explains the main concepts, practical considerations, and useful steps related to steps to disable or uninstall onedrive on Windows 11 without requiring advanced knowledge.
Who can benefit from learning about Steps to Disable or Uninstall Onedrive on Windows 11?
This information is useful for readers who want a clear overview, practical guidance, and reliable steps related to steps to disable or uninstall onedrive on Windows 11.
What should I check before applying this information?
Review the requirements, confirm that your device, software, or situation matches the instructions, and back up important data before making major changes.
Related Articles
 Steps to Disable or Completely Remove the Onedrive Application on6 minutes read
 How to Turn Off Onedrive, Disable and Completely Remove the Onedrive2 minutes read
 How to Troubleshoot Onedrive After Resetting on Windows 104 minutes read
 How to Reinstall Microsoft Onedrive on Windows 104 minutes read
 How to Pause or Disable OneDrive in Windows 113 minutes read
 How to Completely Uninstall WSL on Windows 10/114 minutes read
Reader Comments 0
Sign in with email or Google to join the discussion.