Instructions for resetting Recall in Windows 11
The recent update Windows 11 build 26200.5651 (Dev 24H2) allows users to reset Recall to delete all snapshots and restore all settings for Recall to default.
Table of Contents
Recall & Snapshots is an AI feature in Windows 11 that acts as a photographic memory by saving screenshots of your screen. You can then use Recall to quickly search for snapshots and find things you saw on your computer. The recent update Windows 11 build 26200.5651 (Dev 24H2) allows users to reset Recall to delete all snapshots and restore all Recall settings to default. Here's how to reset Recall in Windows 11.
How to reset Recall in Windows 11
Step 1:
You access Settings on Windows, then we click on Privacy & security on the left side of the interface, then select Recall & snapshots .

Step 2:
Next, the user clicks Advanced settings in the Privacy & security interface . Then selects Recall & snapshots to adjust this tool.
Then the user will see the Reset Recall button for us to proceed.

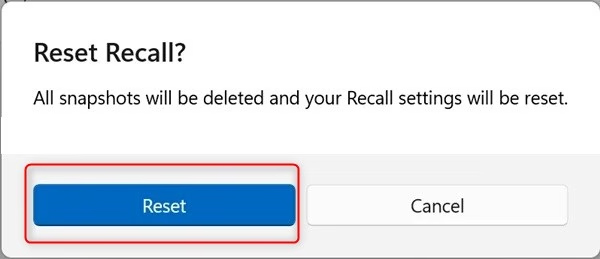
Step 3:
Now you are asked if you are sure you want to reinstall Recall in Windows 11, we click Reset to do it.
Resetting the Recall feature in Windows 11 is a simple process that can help you manage snapshots and restore settings to their default state.
Was this article helpful?
Your feedback helps us improve.
Related Articles
 Microsoft now wants users to try its controversial Windows Recall feature again9 minutes read
 Microsoft is ready to release Windows Recall after nearly a year of delay3 minutes read
 How to check if your computer has Windows Recall enabled4 minutes read
 Microsoft declares 2026 to be the golden age for PC AI, and will heavily promote Recall and Copilot on Windows 11.5 minutes read
 How to disable Windows Recall on Copilot+ PC4 minutes read
 Microsoft doesn't allow users to uninstall the Recall feature in Windows 113 minutes read
Reader Comments 0
Sign in with email or Google to join the discussion.