Table of Contents
This updated guide explains how to Check the Reserved Storage Capacity in Windows 10 through clear steps, practical examples, and important checks that help prevent common errors.
To make sure your device can update successfully and run best, Windows dedicates a portion of the storage space on the device to use for temporary files, cache and other files.
When the device runs out of space, Windows removes this reserved memory to use for other processes, such as Windows updates. This reserved memory also helps keep disk space usage on the device more predictable and stable.
This guide will show you how to check the Reserved Storage capacity in Windows 10.
Check the Reserved Storage Capacity in Settings
1. Open Settings and click the System icon .
2. Click Storage on the left side and click the Show more categories link on the right.
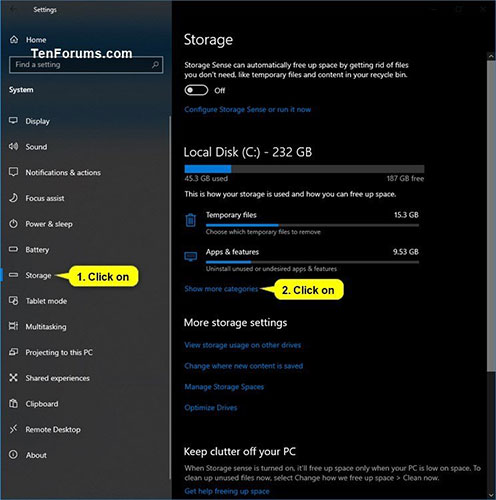 Click Storage on the left
3. Click System & reserved .
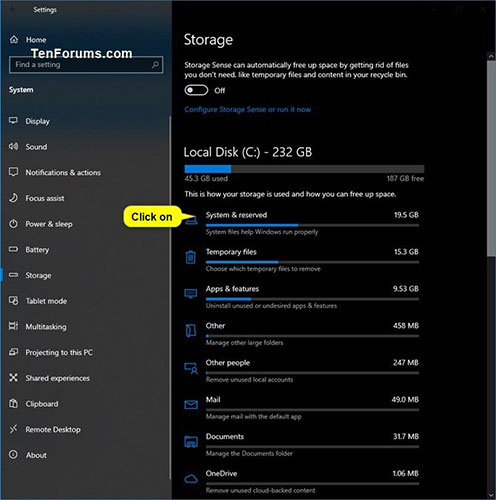 click System & reserved
4. Look at the capacity in the Reserved storage section .
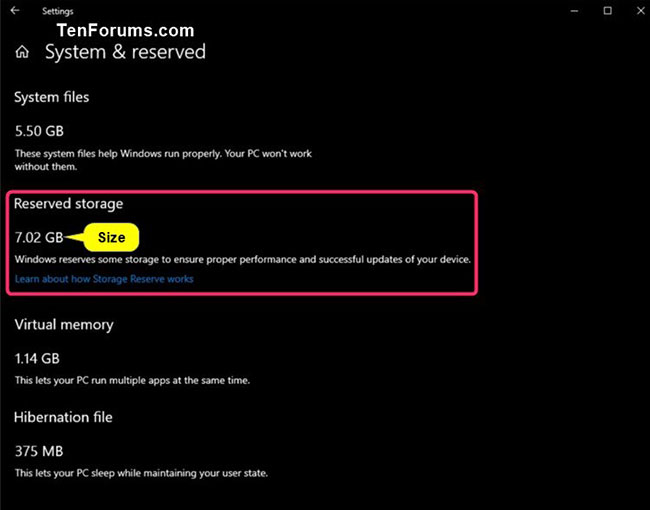 Look at the capacity in the Reserved storage section
5 When done, you can close the Settings if desired.
Check the Reserved Storage Capacity in the Command Prompt
Note : You must be logged in as an administrator to perform this option.
1. Open Command Prompt with admin rights.
2. Copy and paste the command below into the Command Prompt and press Enter .
fsutil storagereserve query C:
3. You should now see a summary of all Reserved Storage on your C: drive in Windows.
 A summary of all Reserved Storage on C:
4. When done, you can close the Command Prompt if you like.
FAQ
What is the easiest way to Check the Reserved Storage Capacity in Windows 10?
Start with the requirements in this guide, then follow each step in order. Check the result after every major change so problems are easier to identify.
Can beginners follow these instructions?
Yes. The process is organized into practical steps, and you can repeat any step before moving forward.
What should I check if the method does not work?
Confirm your software or device version, permissions, settings, file format, and internet connection when the task depends on online services.
Related Articles
 How to Turn Off Reserve Memory in Windows 105 minutes read
 How to Disable Reserved Storage on Windows 107 minutes read
 Instructions to Turn Off the Reserved Storage Feature on10 minutes read
 How to Reduce the Reserved Storage Space on Windows 108 minutes read
 How to Check Laptop Storage Capacity on Windows and MacBook8 minutes read
 How to Turn Off Reserved Storage to Free up Windows Space4 minutes read
Reader Comments 0
Sign in with email or Google to join the discussion.