How to disable Reserved Storage on Windows 10
Starting with the May 2019 update, Windows 10 will spend about 7GB of storage on the device for updates and optional files. This will ensure easy installation of future updates, but you can restore it if you want.
Starting with the May 2019 update, Windows 10 will spend about 7GB of storage on the device for updates and optional files. This will ensure easy installation of future updates, but you can restore it if you want.
What is Reserved Storage?
Windows requires a certain amount of free disk space to update. You will not be able to install updates if the computer does not have enough free space. With the recent May 2019 update, Microsoft spends disk space for updates to fix this problem.
Previously, if there was not enough free disk space on your PC, Windows would not install the update properly. The only solution is to free some storage space before continuing.
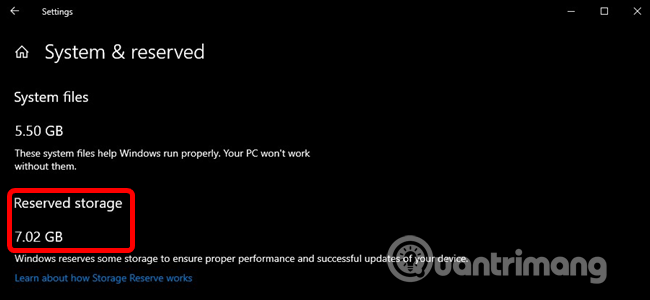
With Reserved Storage, Microsoft makes sure Windows 10 spends at least 7GB of free space on the drive to make sure it can download the update regardless of the amount of disk space remaining.
When not used for update files, Reserved Storage is used for applications, temp files and system memory, improving PC's daily functions.
In other words, Windows does not use up all 7GB of storage for Reserved Storage. It can store some temporary files that are usually stored elsewhere on the system.
How to check Reserved Storage on PC
Before disabling it, you should make sure the system is using Reserved Storage. Otherwise, you do not need to disable it because Windows does not occupy any memory on your device. You can check in Settings to see if the system uses more memory and capacity.
This feature will turn on automatically on new computers preinstalled with Windows 10 version 1903 and on computers that install Windows 10 version 1903 from scratch. If updating from a lower version of Windows 10, Reserved Storage will not be enabled.
To check whether Windows uses Reserved Storage, go to Settings> System> Storage . You can quickly open the Settings app by pressing Win + I Click S how More Categories in the list of items that take up disk space.

Click System & Reserved .
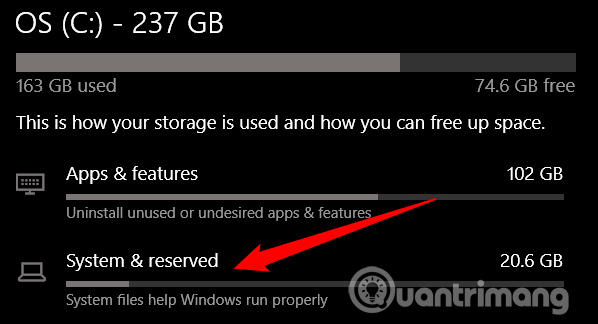
If this feature is enabled, you will see the Reserved Storage section with 7 + GB storage capacity used. If no Reserved Storage is found, the system has not enabled this feature.
Should I disable Reserved Storage?
You can free up some of the occupied storage by uninstalling optional features ( Settings> Apps & Features> Manage Optional Features ) and language packs ( Settings> Time & Language> Language ).
However, if you want to free up the maximum capacity, you need to completely turn off the Reserved Storage feature. Microsoft advises users not to do so.
The purpose of this feature is to improve the day-to-day functionality of the computer by making sure the important functions of the operating system always have access to the disk space. If Reserved Storage is not used and when running out of space, Windows and applications may not work as expected when they need free space to operate. With Reserved Storage, updates, applications, temp files and cache will be less likely to occupy valuable free space and continue to operate as desired.
But, if you need space, you can disable Reserved Storage. Because most Windows 10 computers still work well without this feature.
How to disable Reserved Storage
You should note one thing is that the change will not take effect immediately. Reserved Storage will not be deleted from the system until the next update is installed. However, Microsoft usually releases updates once a month, so Reserved Storage will be deleted from the system without waiting for long.
Disable Reserved Storage using Registry Editor
Warning: Registry Editor is a powerful tool and its abuse will make the system work unstable or even inoperable. This is a pretty simple "trick" and if you follow the instructions correctly, you won't have any problems. If you have never used Registry Editor, learn about Registry Editor before you start, remember to back up the Registry (and the computer) before making changes.
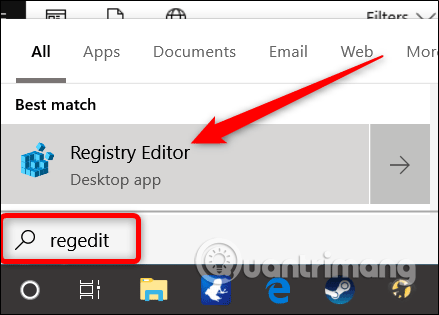
Open Registry Editor by clicking Start and typing regedit , press Enter , then allow changes to be made on the computer.
In Registry Editor, use the left bar to navigate to the following key. You can also copy and paste it into the address bar of Registry Editor.
HKEY_LOCAL_MACHINESOFTWAREMicrosoftWindowsCurrentVersionReserveManager
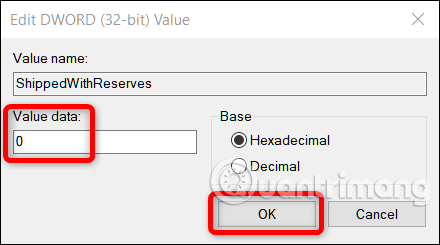
Once here, locate ShippedWithReserves and double click on it.

Change the number below Value Data from 1 to 0 , then click OK .
Close Registry Editor, then restart Windows to apply the changes.
So Reserved Storage has been disabled but you may have to wait a few weeks before Windows installs the update and deletes Reserved Storage.
Download the Registry Hack one click
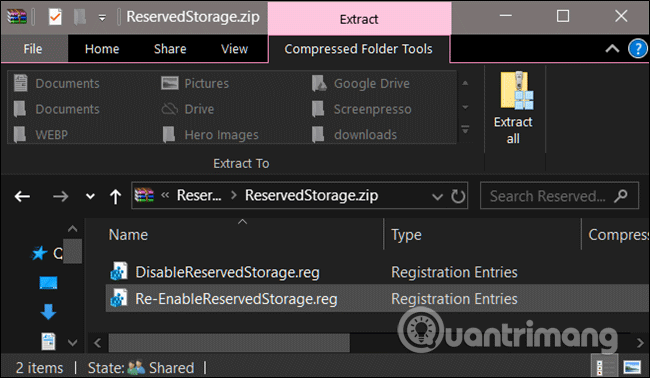
If you don't like using Registry Editor, you can download the registry hack below and extract the Zip file.
https://www.howtogeek.com/wp-content/uploads/2019/06/DisableReservedStorage.zip
When decompressing is finished, you will see a REG file to disable Reserved Storage with another file to reactivate if you want. Double-click the file you want and accept the prompt to make changes to the Registry.
This hack file changes the ShippedWithReserves value to 0, just like in the previous section. Another file will reactivate Reserved Storage by changing Value Data to 1.
I wish you all success!
- How to check the Reserved Storage capacity in Windows 10
- How to reduce the reserved storage space on Windows 10
- How to turn off Reserved Storage to free up Windows space
- How to disable USB ports on Windows, Mac and Linux
- Disable, remove notification icon Get Windows 10
- How to disable the Insert key in Windows 10
- Summary of some simple ways to disable USB ports on Windows computers
- Disable Windows 10 keyboard in 5 simple ways
- Install CentOS on Windows 10 WSL
- What is the USO Core Worker Process or usocoreworker.exe? Are they viruses?
- How to exclude files and folders with Robocopy in Windows 10
- Fixed a bug with C drive with yellow exclamation on Windows 10
- How to disable SMB3 in Windows 10
- 3 ways to remove a Windows 10 computer from a domain that no longer exists
- How to create a yellow circle around the mouse cursor on Windows
- How to open the camera on laptop Windows 7/8/10
- How to change the Start button on Windows 10
- How to install Owncloud server on Windows 10 (WSL)


-
 How to check laptop storage capacity on Windows and MacBook
-
Why should you stop paying for Google Drive and switch to Copyparty?
-
How to manage storage in Perplexity AI
-
How to set SD card as default storage on Android
-
Microsoft wants users to stop caring about local files
-
How to use Storage sense Windows to free up disk space
 How to check laptop storage capacity on Windows and MacBook
 Why should you stop paying for Google Drive and switch to Copyparty?
 How to manage storage in Perplexity AI
 How to set SD card as default storage on Android
 Microsoft wants users to stop caring about local files
 How to use Storage sense Windows to free up disk space