
How to change the value of HungAppTimeout in Windows 10
If the application (task) does not automatically end (close) when you restart, shut down, or log off from Windows 10, the system will wait 5 seconds ( HungAppTimeout ) by default before the End Task dialog box appears, requires you to cancel or close the listed applications and restart, shut down or log out at all costs.
If you do not make a selection in the End Task dialog box before the 1 minute expires, Windows 10 will automatically cancel the reboot, shutdown or logout by default.
HungAppTimeout also specifies the time (5 seconds by default) the system waits for the user process to finish, after the user clicks the End Task task button in Task Manager. If this threshold is exceeded, the End Task dialog box appears, indicating that the process is unresponsive.
This tutorial will show you how to specify a HungAppTimeout value, to indicate how long the system will wait before the End Task dialog box appears in Windows 10.
Change the HungAppTimeout value only for the current user
1. Press the Win+ keys Rto open Run , type regedit in Run, and click OK to open Registry Editor.
2. Navigate to the key below in the left panel of the Registry Editor .
HKEY_CURRENT_USERControl PanelDesktop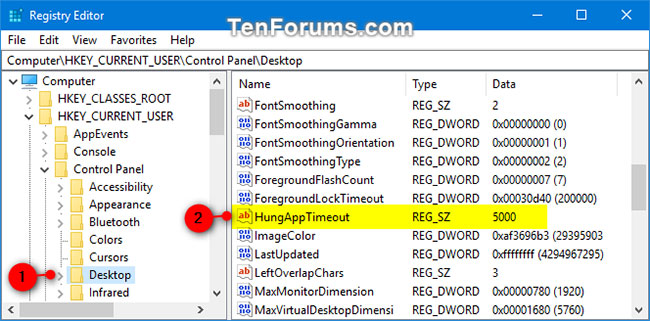
3. In the right panel of the Desktop key , double-click the HungAppTimeout string value to modify it.
If you do not have the HungAppTimeout string value, right-click or hold and hold a space in the right panel of the Desktop key , click New , click String Value , enter HungAppTimeout in the name field, and click Enter.
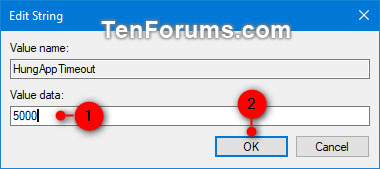
4. Enter the number of milliseconds you want for the HungAppTimeout value and click OK.
Note:
- The default value is 5000 milliseconds (5 seconds). You can also delete the HungAppTimeout string value to default to 5000 milliseconds.
- Values should not be set below 1,000 milliseconds (1 second).
5. Log out and log back in to apply the changes.
Change the HungAppTimeout value for all users
Note : You must be logged in as an administrator to perform this option.
This section will override the above option.
1. Press the Win+ keys Rto open Run , type regedit in Run, and click OK to open Registry Editor.
2. Navigate to the bottom key on the left of Registry Editor.
HKEY_USERS.DEFAULTControl PanelDesktop3. In the right panel of the Desktop key , double-click the string value.
If you do not have the HungAppTimeout string value , create a new value as in step 3 above.
4. Enter the number of milliseconds you want for the HungAppTimeout value and click OK.
Note:
- The default value is 5000 milliseconds (5 seconds).
- Values should not be set below 1,000 milliseconds (1 second).
5. Log out and log back in to apply the changes.
You should read it
- How to change SDR and HDR light balance in Windows 10
- How to convert Windows 8 / 8.1 keyboard language
- Instructions for changing Windows 10 wallpaper timer
- How to change time, date and month in Windows 10?
- How to change the function of the Fn key on Windows 10 and 11
- How to change the download folder Windows Update in Windows 10
- How to change the default Windows 10 font
- Instructions to change the wallpaper on Windows 11
- Steps to change the Windows 11 theme so that the computer has a new and more beautiful interface
- How to use the Theme on Windows 10
- Instructions for changing Windows passwords without having to remember the old password
- How to change username in Windows 11
Maybe you are interested
Top 6 Phone Call Translation Software 11 Popular Websites From the 90s That Are Still Active Today How to quickly view Lien Quan top-up history Forget about stalking your crush on Facebook with this new feature! Nvidia 'expects' RTX 5090/5080 power connector won't melt thanks to new PCIe plug tech What is Apple's Assistive Access feature? How to use?