Turn the webcam into an anti-theft 'god's eye'
In addition to being a camera that displays your images while chatting with friends and relatives, if you take advantage of it, you can easily turn your webcam into an anti-theft ' god's eye ' for your beloved home.
i-Catcher Console is software that helps you do that. The program has 3.2MB capacity, free download here.
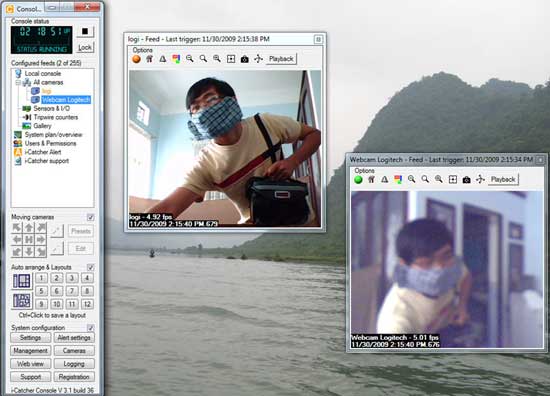
After installing and activating the program, you will see the program interface on the left side of the screen. To create a connection observation channel for your webcam, press the Cameras button , in the System Configuration frame will appear the i-Catcher Console - Cameras feeds dialog box, where you press the New camera button to display the Camera Type window . You name the observation channel in the Feed name box, check the Local Camera section and click Next . In the next interface, click on the Device drop-down arrow to select the webcam to use and click Next . Wait a moment when the webcam has displayed your image, click Finish to complete the setup.

Going back to the main working interface of the program, you will see the observation channel has started capturing images and displaying them on a separate window.If you successfully create multiple observation channels with multiple webcams, these channels are all active at the same time and recorded at angles you arrange.

So you've set up the basic part, now we will exploit more useful features in the System configuration frame :
- Set advanced properties: Click Settings button will display a window with a lot of feature tags.
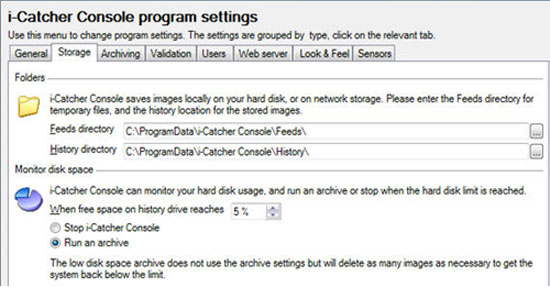
+ Storage : You can choose where to save the captured image on your computer or on a network drive. In the Folder frame, click the Browse button of the two Feeds directory and History directory to point to the folder to be archived. If you choose where to store the default image, you want to access the archive folder later, go to C: ProgramDatai-Catcher ConsoleHistory . In addition, in the Monitor disk space frame , you can allow the image compression program to be collected or stopped executing the program when the free space on the hard drive has reached its limit.

+ Archiving : Schedule a compressed old image to manage the free space of the hard drive effectively. Check the Enable scheduled archiving box> select the time period to be compressed (Run scheduled archive at) and allow after many days to automatically delete old compressed packages (Archive stills older than> Delete old stills) or move Move it to the new folder (Move old stills to).
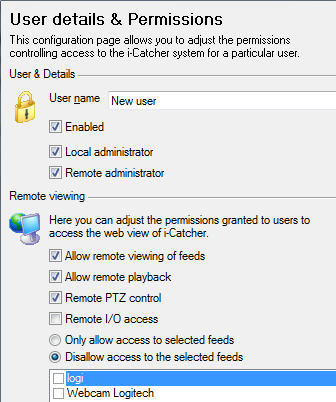
+ User : Create a list of users allowed to access. Click the Next button to display the User details & Permissions > window named User name > check box Enable and the properties below depending on whether you want to grant the user what to do: Local administrator, Remote administrator, Allow remote viewing of feeds, Allow remote playback, Remote PTZ control, Only allow access to selected feeds .

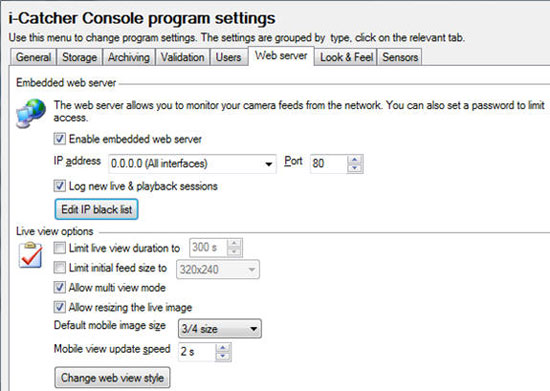
+ Web Server: Allows you to monitor images obtained via the network. Check the Enable embedded web server box and enter the IP address and port number (Port) . If you want to block the addresses that you do not connect to, click the Edit IP Black List button . In the Live View Options frame below, you can choose more interesting features such as: Limit live view duration to (time limit for each view), Limit initial feed size to large (set display size when viewing using web browser), Allow multi view (Allow remote viewers to select one of the many webcams recorded for viewing recorded images), Allow resizing the live image (Allow viewers to change the size of the currently viewed image ), .

- Set up alerts: Click Alert settings button will appear Global Alerts dialog box, by default you will be working with Misc alerts first.
+ To set the music player to issue sound notification when the webcam detects that someone appears in the scan area, please check the Enable box of Audio alerts section and then click the Browse button pointing to the audio file (format WAV).
+ Use Windows message to send NetBIOS messages to a user (user) or a group (group machines): Check the Enable box of the Windows message frame and enter the username (To box) and the message to be sent ( Message box).
+ Send an SMS message to your mobile phone: Check the Enable box of the SMS alerts box and enter your mobile phone number (To box) and message content (Message box).
+ Send an alarm email: You can send via email > Select Enable > enter email addresses to receive a warning in the To box, enter the title in the Subject box and the message content in the Message box. Next you specify the minimum time between emails (Minimum time between emails) and the number of photos attached (Attach the last images).
+ Upload the captured image to the website by FTP: Transfer via FTP / Web card> check the Enable box and use Use FTP > fill in the necessary information for the Server, Username, Password, select the maximum number of images will upload (Maximum images stored on the server) .
- View the recorded schedule from the observation channels: Clicking Logging button will bring up the i -Catcher Console Logging window . Here you can follow a lot of information from the program's activities such as the time of recording, the time of Playback, the time of changing settings, the time of monitoring via the internet, .
- Control via web browser: Click the Web View button to display a new web page on the browser window, but you should note that if the computer does not have Java support installed, you will get an error message, and you must go to www.java.com/en/download/inc/windows_new_xpi.jsp or http://tinyurl.com/yge8bd9 to download and install, then restart your web browser and you can view the recorded images.

At the web page that appears, in the Playback frame on the left, you choose the name of the observation channel connected to the webcam at any angle to see (if you use a lot of observation webcams, you need to remember the name of the channel you want With the webcam located in your home), immediately in the middle frame will display the images that the webcam has obtained. To view the slide show image continuously, press the Play button in the Playback Controls frame and then use the left and right navigation buttons to view the images before and after the current image. If the image the webcam has recorded is too much, for faster viewing you can change the presentation speed by dragging the Speed slider to the right until you get a satisfactory performance. Also in this frame, you can also know information about the date and time of each photo taken (Date and Time box) so that you can verify when the thief broke into your home.
In case you want to observe the larger image, move the Size and Quality slider a little to the right at the Image frame above the image display frame.
To access the i-Catcher Console on your computer, click the Administration button under the Playback frame and enter the administrator account name and password that you have created.
Here you can change the extension settings ( Settings ), control image compression to manage hard drive capacity ( Storage, Arcgive ), configure the Feed settings , configure the report mode. Dynamic ( Alert settings ), View recorded calendar ( Logging ) .
You should read it
- ★ Fixed a problem with invalid webcam windows 10
- ★ Activate the features immediately after buying the device to avoid iPhone theft
- ★ How to use the old smartphone as an anti-theft surveillance camera
- ★ How to use a DSLR camera as a webcam
- ★ Canon released software that turns the camera into a webcam