Instructions for creating status classification folder on Lotus
The status folder creation feature, in Lotus, will help you post your own status for events, trips or achievements based on the created folders.
Table of Contents
Lotus has an interesting feature that few people pay attention to, it is creating separate folders for statuses. You can create separate folders for each event, such as birthdays, travel, the process of achievement . and post separate status for that event. How to create the status Lotus folder you can see in the article below.
- How to create application folders on iPhone
- Experience trying Lotus social networks
- Special content tools and formats on Lotus, helping users create the best content
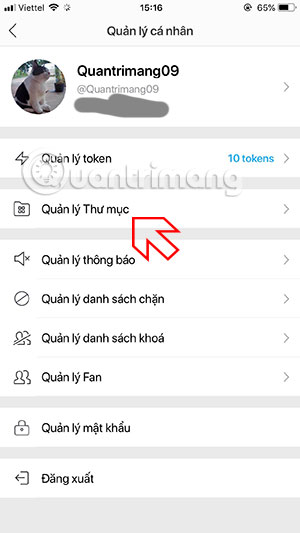
How to create Lotus status folder
Step 1: Go to Lotus Profile Management , select Manage folders and click Create new folder .

Step 2: Enter the content and title of your folder and click Create New below.

Now every time you post a new status, you can choose Post to folder, select the folder you want to post and click Close in the upper corner.


Next, go out to write the content, add a photo or link as status and post normally.

This is a nice feature of Lotus because you can keep track of your directory and know which events you participated in or gained achievements in the folders you created.
Was this article helpful?
Your feedback helps us improve.
Related Articles
 The most beautiful lotus wallpaper for computers you can't miss2 minutes read
 Instruction for registering Lotus account4 minutes read
 Instruction to change Lotus account password3 minutes read
 Instructions for creating chat folders on Telegram3 minutes read
 Instructions for cooking lotus seed mung bean rib soup2 minutes read
 How to make beautiful lotus flowers from Oishi candies displayed on the altar of Tet4 minutes read
Reader Comments 0
Sign in with email or Google to join the discussion.