How to Install a UHF Connector
A UHF connector is a type of coaxial connector with a threaded coupling that helps prevent accidental detachment. Installing one is a simple, straightforward process. Start by stripping your cable about from its end. A cable stripping tool...
Table of Contents
Method 1 of 3:
Stripping Your Cable with a Cable Stripper
-
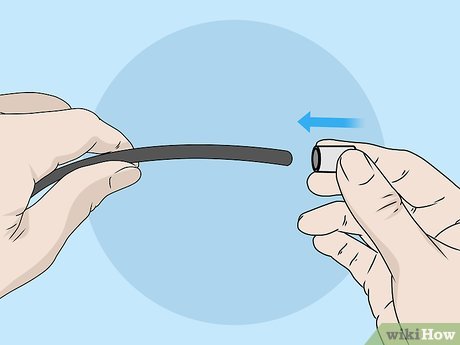
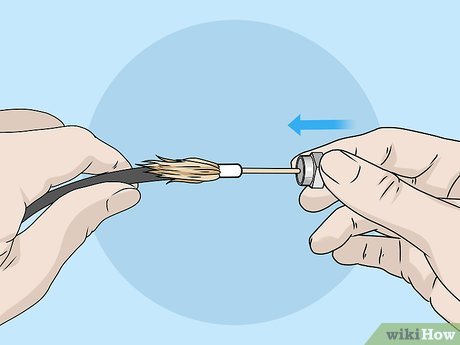
 Slide the crimping ferrule over the cable's outer jacket. Start by inserting your cable through the crimping ferrule. Typically, a UHF connector set includes the connector housing itself and a crimping ferrule, which is a metal cylinder that helps secure the connector to the cable.[1]
- It doesn't matter if the ferrule slides down the cable's length while you cut the end and attach the connector. You just don't want to slide off the cable's other end and get lost, so keep an eye on it if your cable isn't very long.
-
 Use a stripping tool labelled for your cable. A cable stripping tool is your best bet, since it cuts through the outer jacket and inner dielectric insulation without damaging the metal conductors. All you need to do is insert the end of your cable into the stripper and squeeze the tool to slice through the insulation. Then, slide off the outer jacket and dielectric insulation from the points where the tool cut them.[2]
- You can find a cable stripper at a home improvement store or online for about $15 USD.
-
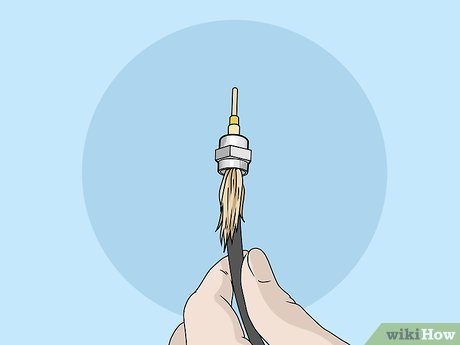
 Fold back the braided shield. After you've cut the end of the cable, you'll see fine, braided threads surrounding the foil that encases the inner conductor. Fold these threads back from the inner casing and wrap them clockwise around the cable.[3]
- A stinger is when one of these tiny wires touches the center conductor after you've installed the UHF connector. Stingers are terrible for signal quality, so take care to peel them all back and keep them away from the conductor.[4]
- A cable stripper cuts the braided shield and insulation below it at the very tip of the cable. This exposes the center conductor. However, the stripper will still leave a short length of braided threads that you'll need to fold back over the cable's outer jacket.
Method 2 of 3:
Stripping Your Cable with a Knife
-
 Place the crimping ferrule over the outer jacket. Just as if you were using a stripping tool, slide the crimping ferrule over the cable's outer jacket.[5] Don't worry if it slides down the cable a bit, but make sure it doesn't slide off the other end and get lost.
 -
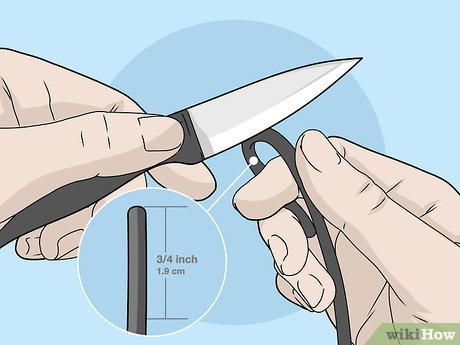 Cut the jacket 3⁄4 inch (1.9 cm) from the end. Bend the cable slightly around a finger to make a gentle curve about 3⁄4 inch (1.9 cm) from the cable's end. Carefully slice the outer jacket at the curve with a sharp utility knife. Bend it in the other direction so you can slice around the other side. Then, after you've sliced around the entire circumference, pull off the jacket from the cable's end.[6]
- Wear work gloves to help prevent accidentally cutting yourself.
- It takes finesse and a steady hand to strip the cable with a knife without damaging it. If you've never done it before, it's wise to practice on a piece of scrap wire before trying it on the wire you're using for your project.
- When you bend the cable, just make a gentle curve so it's a bit easier to cut one side at a time without slicing anything but the jacket. Don't bend it at an angle, or you might damage the conductor.
-
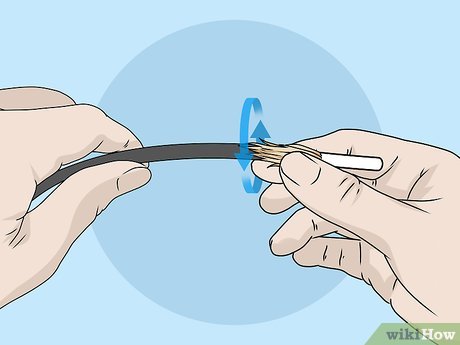 Pull back the braided shield and twist the threads around the cable. You'll be left with a 3⁄4 inch (1.9 cm) length of fine braided threads that run from the tip of the cable to the point where you cut the outer jacket. Peel the threads back from the tip of the wire, fold them over the outer jacket, and twist them snugly over the jacket.[7]
- The crimping ferrule will need to slide over the braided threads when you fasten it to the UHF connector, so twist them tightly around the cable. Make sure you peel back each wire, as any stray stingers that touch the center conductor will interfere with signal quality.[8]
- A stripping tool cuts through the braided shield and the layer of insulation underneath it. Since the threads are so fine, it's impractical to cut them without a cable stripper. You'll have to fold back the threads from the end of the cable so you can access the inner layer of insulation beneath them.
-
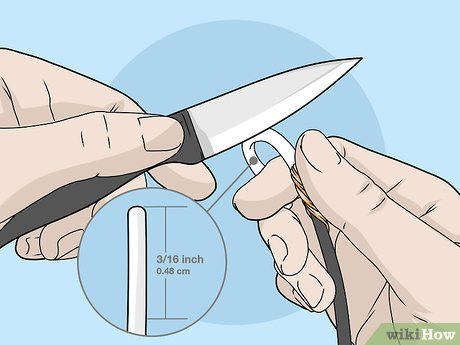 Cut the inner insulation about 3⁄16 inch (0.48 cm) from the cable's end. Folding back the braided threads will expose the inner dielectric insulation that surrounds the center metal conductor. You'll need to be even more careful cutting this than you were when you stripped the outer jacket. Slice only the thin polyfoam insulation without nicking the center conductor.[9]
- Once you've sliced around the circumference of the dielectric insulation at 3⁄16 inch (0.48 cm) from the cable's tip, slide off the insulation to expose the center conductor.
Method 3 of 3:
Securing the Connector
-
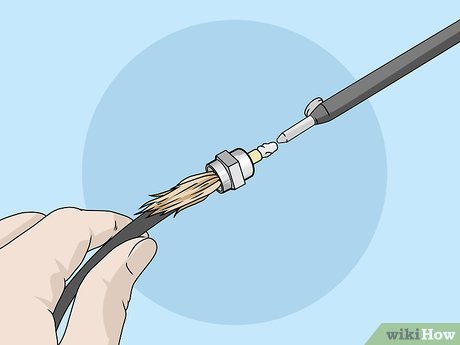
 Slide the connector housing onto the cable. After you've stripped the cable using either a stripping tool or a utility knife, insert it into the back end of the connector housing. The connector's back side has a short hollow length where you insert the cable, and the crimping ferrule will eventually slide over this length. The cable's conductor slides into a hollow center pin that sticks out of the connector's front side.[10]
 -
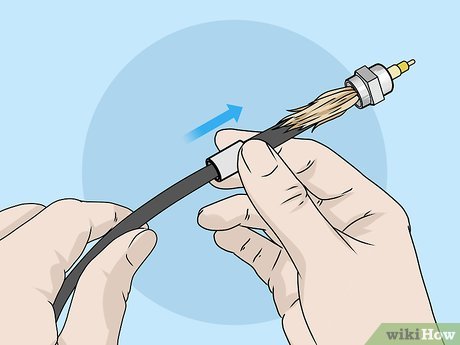
 Make sure the conductor tip slides all the way through the center pin. The conductor tip should reach the end of the connector's center pin or slide a little past it. You can just trim off excess if the conductor reaches past the end of the center pin.[11]
- You'll need to cut a bit more of the outer jacket if the conductor doesn't reach the center pin's tip.
-
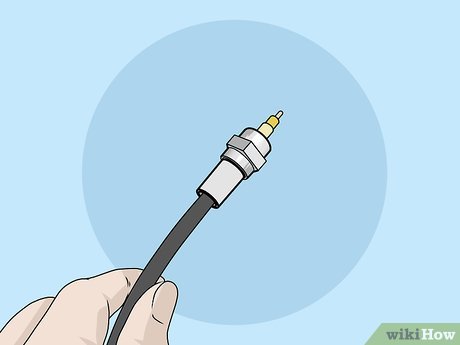
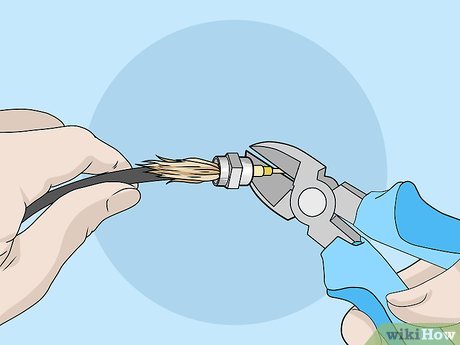 Trim off excess conductor. You might find that a bit of the conductor extends further than than the connector's center pin. Use a pair of wire cutters to snip off excess conductor so it's flush with the center pin.[12]
 -
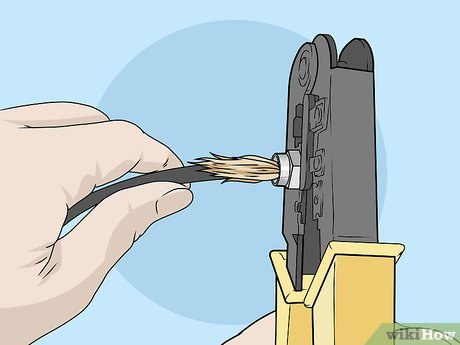 Crimp the center pin and conductor if your connector is labelled for crimping. Use your fingers or a pair of pliers to hold the connector over the cable's end to keep the conductor snugly inside the center pin. Place the center pin (with the conductor inside) into the jaws of a crimping tool, then squeeze the tool to fasten the connector's pin to the conductor.[13]
- Some UHF connectors, such as RG58, RG141, and LMR-195 connectors, can be easily crimped. Others need to be soldered. Check your product's instructions for specific instructions.
- You can also find your connector type on this connection guide: https://www.rfconnection.com/uhfcrimpassem.htm.
- You can find a crimping tool designed for your connector type online or at a home improvement store.
-
 Solder the center conductor to the connector if necessary. If your connector and conductor need to be soldered together, hold a soldering iron to the tip of the conductor and center pin. After about five seconds, they should be hot enough to melt solder so it can flow evenly.[14] Hold your solder to the heated tip and allow it to flow into the gaps between the center pin and conductor.[15]
- Use as little solder as possible, and pay close attention so you don't overfill the gaps and force solder through the other side of the center pin's barrel.[16]
-
 Slide the ferrule to the base of the connector and crimp it. Once you've crimped or soldered the center pin and conductor tip, you can crimp the ferrule to the back of the connector housing. Slide the ferrule over any exposed braided threads and over the the back side of the connector. When it's flush, insert it into the jaws of the crimping tool and squeeze the tool to fasten the ferrule to the connector housing.[17]
 -
 Finished.
Was this article helpful?
Your feedback helps us improve.
Related Articles
 What is an MCP Connector? What makes it special?4 minutes read
 Comparing Copilot connector and Power Platform connector9 minutes read
 5 disadvantages of the USB-C connector you should know6 minutes read
 Use the MCP connector correctly.13 minutes read
 Managing Receive Connector - Part 49 minutes read
 Instructions on using the Connectors feature in Claude AI.11 minutes read
Reader Comments 0
Sign in with email or Google to join the discussion.