How to Flash AMD Graphics Card BIOS
AMD is probably the name is not too strange for PC users in the past year again, especially during the time when the VGA is sold out for the copper coin ( electronic money ) are achieving record prices like this 2021 year.
AMD's graphics cards do not have the same gaming performance as NVIDIA's green team, but are still favored by gamers and crypto plows due to their low cost and impressive mining performance.
Especially if you can buy AMD VGA from the virtual money, also known as buffalo card (buffalo VGA), the price is as cheap as given.
But of course, going with that cheap price will contain many risks and failures because the uptime is almost 24/24 at the highest capacity and no longer under the warranty of AMD.

In addition, buffalo VGA cards are usually modded BIOS to increase mining productivity, so if you still use that MOD version, you may encounter an error that cannot install the driver for the card, long use will affect to the lifespan of VGA.
That is why in this article, I will guide you how to Flash the AMD graphics card BIOS in the most detailed and easy-to-understand way, so that you can use the card more effectively!
I. Flash BIOS What is VGA?
Like motherboards, VGA also has BIOS. But the difference is, the VGA BIOS does not have the regular patch updates like the motherboard and the parameters can only be changed by the manufacturer of that VGA.
Flash BIOS VGA, you can simply understand that you install a new BIOS for your VGA.
However, the manufacturer recommends that users should not manually edit another BIOS flash for the graphics card, because the parameters in the original BIOS have been carefully calculated to ensure both stability and age. long service life.
But for the plow coin, on the other hand, the performance that the BIOS delivers is not really worth the hundreds of millions that they have invested.
As a result, they often install new BIOS versions that have been modified to remove those limitations, greatly increasing the power and mining performance of the VGA cards.
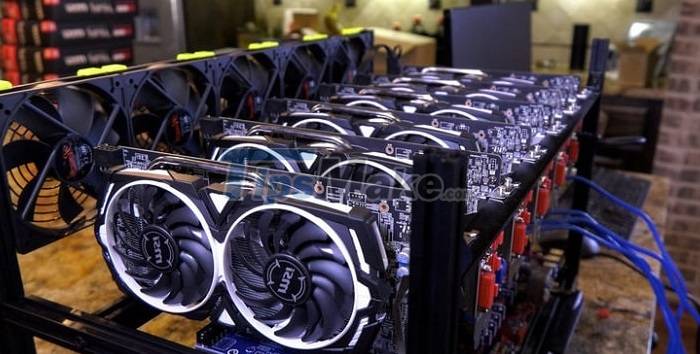
But once the BIOS is flashed, the VGA will be officially no longer warranted by the manufacturer. Because it has too deeply interfered with the specifications of the product.
In addition, the Flash BIOS comes with a very high risk of damaging the VGA, so I also do not encourage you to arbitrarily Flash BIOS miscellaneous to increase VGA performance after reading this tutorial!
Instead, use specialized graphics card overclocking tools such as ASUS GPU Tweak III or MSI Afterburner, ZOTAC FireStorm, EVGA Precision X1 to safely increase graphics card performance. leads already on blog.
And if you really want to experience and want to play, not tired of the failure, then just go, think more.
#first. Identify important information
First of all, you need to determine the correct graphics card information in order to choose the correct BIOS version. If the parameters in the new BIOS do not match, the risk of VGA failure is very high.
In this article we will use the VGA hardware information viewer GPU-Z of the famous technology site TechPowerUp.
You just need to download the software and open it up and use it immediately, no need to install anything.
The main interface of GPU-Z will look like the image below, it displays a lot of information, but you only need to care about the following 4 information, for example your RX 470:
- VGA Name (Name): Radeon RX 470
- Manufacturer (Subvendor): MSI
- Memory Standard (Memory Type): GDDR5 (Samsung)
- Memory chip manufacturer (Memory Type): GDDR5 (Samsung)
- Memory Size (Memory Size): 4096 MB
- Graphics card line: Armor OC (see on stamp)

Well, to be sure, you can see the information on the manufacturer's stamp on the back of the VGA PCB board.
In addition to the barcode, this stamp also contains the product name and some other parameters such as manufacturer, memory capacity, memory standard, output ports and this stamp is rarely counterfeited.
As the stamp in the picture shows that my graphics card is Radeon RX 470 ARMOR 4G OC, the manufacturer is definitely MSI, because only this brand has VGA ARMOR OC.
Or simply by looking at the appearance and the Logo printed on the radiator fan, we can already know the manufacturer of that VGA.
Combining the use of GPU-Z software, we will get very accurate information about your graphics card.

#2. Find the appropriate BIOS version for VGA
Once you have the information above, visit the VGA BIOS Collection page here to find the original BIOS for your graphics card.
Now enter the information we have in section # 1 into the Refine Search Parameters section to find the most suitable BIOS version.
- GPU Brand (Type VGA): AMD
- Card Vendor (Manufacturer) = Subvendor: MSI
- Card Model (VGA Name) = Name: RX 470
- Memory Type: GDDR5
- Memory Size: 4096 MB

=> After entering enough information, the list of corresponding BIOS versions will appear right below, with the MSI RX 470 Armor 4G there are up to 4 versions.
However, the bottom 2 versions are for MSI Gaming X series while my is MSI Armor OC so I can't use it either.
Please note, determining the correct VGA line is very important, because if you choose all the correct parameters but the wrong VGA line, when the VGA flash is still open as usual.
Now that there are only 2 BIOS versions at the top are for Armor OC, now you can click on each one to check one final parameter to distinguish different BIOS versions.

Here, scroll down and look at the line Memory Support in the BIOS Internals section. This line indicates which BIOS version for VGA uses the memory chip of which manufacturer.
There are also many memory chip manufacturers for VGA but the most popular are SK Hynix (Hynix), Elpida and Samsung.
=> As you can see in the figure below, the line Memory Support in the BIOS Internals section says Samsung. And as seen in GPU-Z, my VGA also uses Samsung RAM, so this BIOS is suitable and usable.
Once you find the appropriate BIOS, click the Download Now button to download it to your computer, the VGA BIOS file is in .ROM format

II. Instructions to Flash AMD graphics card BIOS
Note: If your VGA is still using the original BIOS, back it up so you can use it when needed. The way to do it is very simple:
Implementation: You click on the arrow next to the line BIOS Version => and select Save to file . to save.

To Flash the AMD graphics card BIOS, we will use a dedicated software called AMD VBFlash / ATI Flash, access one of the links below to download.
Download link: MediaFire / Link MediaFile reserve / Link Mega / Link Google Drive / Link Dropbox
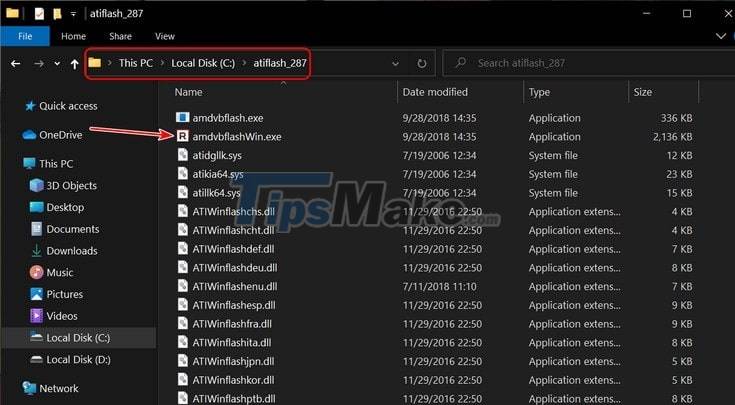
=> After downloading, you will unzip the folder atiflash_287, you should unzip somewhere easy to find and a short path, such as drive C: for example.
Option 1: Flash with AMD VBFlash software
This method only applies when you need to upload bios to a newer version and not use it to install the BIOS of another graphics card, for example, RX 470 but install the BIOS of RX 570 cannot do this.
In the directory atiflash_287, run the file amdvbflashWin.exe to start AMD VBFlash software.
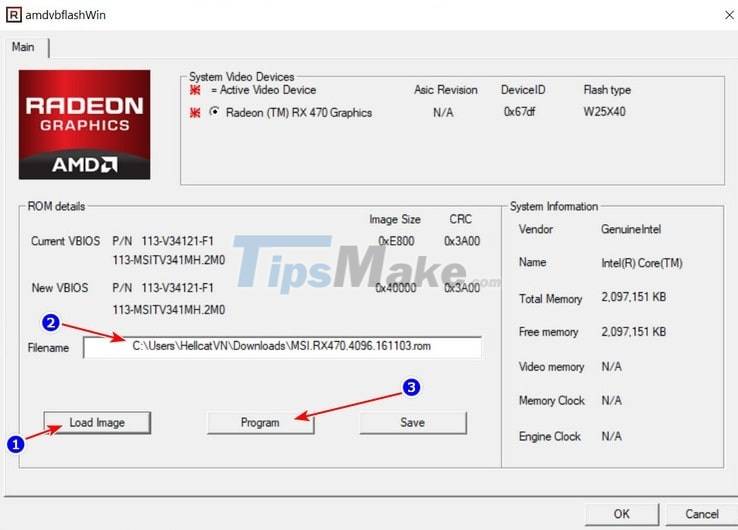
The main interface of the software will be similar to the image below, please click the button Load Image => and select the downloaded BIOS file (.ROM) above.
=> When everything is ready, press and the Program button to start the process of installing a new BIOS for VGA.
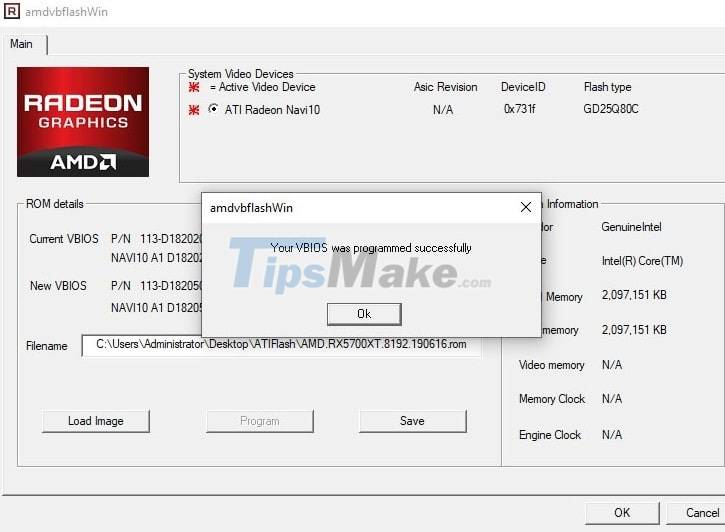
This process is very fast, only about a minute is done. Of course, the BIOS I installed above is no different from the installed version of VGA, so it will not be flashable.
But rest assured, if there is no error, you will receive the message Your VBIOS was programed successfully as shown below.
Now restart your computer for this new BIOS to take effect. This is also the most heartbreaking step because it determines the success or failure of the Flash BIOS VGA.
If the computer boots up but does not display or shows up but there are phenomena such as stripes, the screen blinking, not getting the correct resolution, not receiving the driver, congratulations!
In case of booting up normally, don't be in a hurry, you have to perform Stress Test, play heavy games to check performance and stability.
Because maybe with normal tasks, it's okay, but when operating at full capacity, it is not stable or darker than shutting down the power. Now you need to find a new BIOS that is more suitable or flash the original BIOS again.
Method 2: Flash with Command Prompt
You use this method to install the BIOS of your graphics card other than VGA, or to restore to the original BIOS, and often use it to flash the original BIOS for the buffalo card.
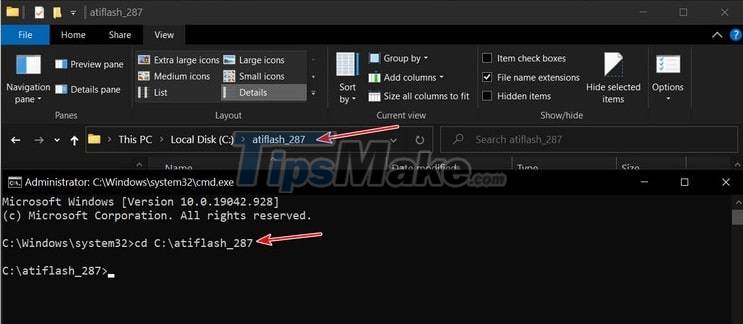
You open the Run dialog box (Windows + R) up => enter the command cmd => then press Ctrl + Shift + Enter to run CMD as administrator .
Next, you use the cd command to access the atiflash_287 unzipped directory above, here I extract it directly to drive C: so I will enter the command cd C: atiflash_287 => then press Enter.
NOTE: Where you have extracted it, enter cd + the path to the atiflash directory.
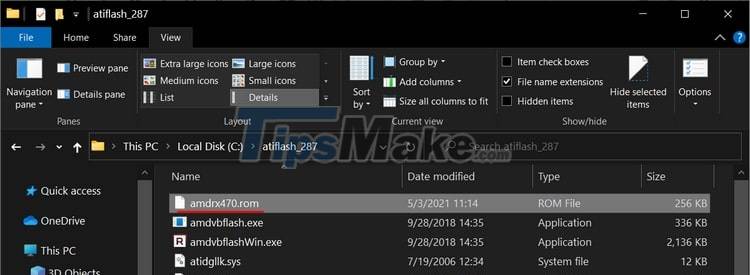
Next, copy the prepared BIOS file to the atiflash_287 directory and rename it a bit to make it easier to type the command, because the initial name is quite long, I will edit it to amdrx470.rom
Finally, I will use the command amdvbflash.exe -p 0 -f name-file.rom => and then press Enter to flash the new bios for your graphics card.
Here I named-file.rom amdrx470.rom so I will use the command amdvbflash.exe -p 0 -f amdrx470.rom => and Enter only.
This flash process is also extremely fast and when finished you will see the line Restart System To Complete VBIOS Update as shown below. Now you just need to restart your computer again.

III. Epilogue
So I have just finished showing you how to flash BIOS for AMD graphics cards. This job is very simple but contains a lot of risks of errors and VGA corruption, so I do not encourage you to regularly do this as well as 'try to flash' miscellaneous. Hopefully, the tips I just shared above will be of help to you in improving the performance of the AMD card if you really need it. Good luck !