Table of Contents
Learning how to quickly remove BIOS password on computer doesn't have to be complicated. This updated guide presents a clear workflow, practical checks, and troubleshooting advice you can use while completing the process.
Key Takeaways
- Review method 1: remove the CMOS battery.
- Explore method 3: using command prompt.
- Understand method 4: reset using CMOS jumper.
Method 1: Remove the CMOS Battery

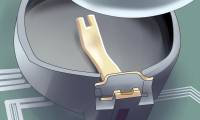
This is a relatively simple way. Your job is to open the computer case and find the CMOS battery and remove it. Because this method requires opening and removing the CMOS battery, it is only suitable for desktop users, not laptop users.
Start by to remove all the power cables and then open the case. Next, find the CMOS battery on the motherboard and remove it for about 5 minutes and then reinstall it.
This method is suitable for laptop users, because it can be done directly on Windows. And removing BIOS password only takes a few clicks. First, you need to download CMOS De-Animator software here.
Installing and opening the software, the following interface will appear: after downloading.

Just select Clear CMOS and 256-byte CMOS and then click Proceed.
Method 3: Using Command Prompt
Step 1: Press Windows + R to open the Run window, then type cmd in it and press Enter to open Command Prompt.
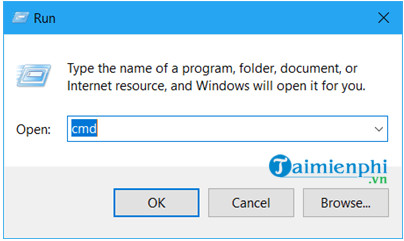
Step 2: Type each command below and press Enter:
DEBUG - O 70 10 - O 71 10 - Q
Note: 64-bit versions of Windows 10, 8, and 7 don't support the DEBUG command.
You can download the DOSBox software and run debug.exe on your computer.
Step 1: Install DOSBox on your computer, note don't install on drive C.
To download and install DOSBox, visit here.
Step 2: Add debug.exe to E:/TASM.
Step 3: Find the drive where you want to install DOSBox, then double-select the DOSBox 0.74 Options.bat file. The file will open in Notepad, copy the code below and paste it at the end of the file:
MOUNT CE:TASM C: debug
Step 4: Run DOSBox to run the remaining commands.
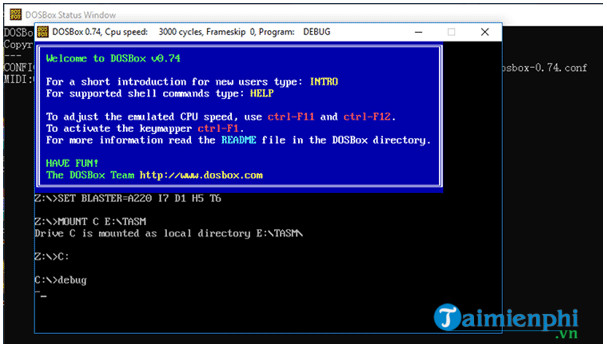
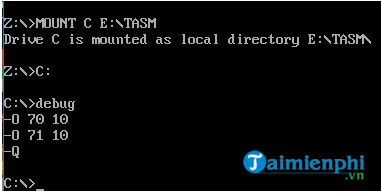
Step 5: Finally restart your computer, now the password, BIOS pass is no longer there.
Method 4: Reset Using CMOS Jumper
On your computer's motherboard, find the clear or password jumper, BIOS pass, or DIP switch and change it to the new position. This jumper is usually labeled CLEAR, CLEAR CMOS, JCMOS1, CLR, CLRPWD, PASSWD, PASSWORD, PSWD, or PWD. Remove the jumper from its current position and put it in the new position. This helps you clear the BIOS password.
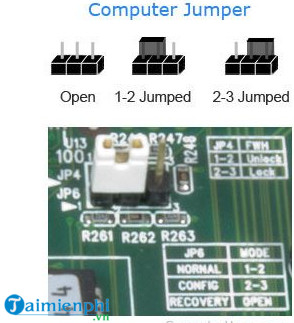
Method 5: Contact the Manufacturer
The last resort is to try contacting the computer or motherboard manufacturer for detailed instructions if you have tried everything but still can't do it.
The BIOS password will be cleared and all settings will be returned to default. Thanks to that, you can easily customize hardware parameters and settings for your computer.
Final Thoughts
The most reliable way to handle quickly remove BIOS password on computer is to follow the process in order, verify each important setting, and test the result before moving on. Use the guidance above as a practical reference, then adjust the details for your device, software version, or specific goal.
FAQ
What should I check before I quickly remove BIOS password on computer?
Use the latest available software, confirm that your device meets the requirements, and make sure you have the necessary permissions, account access, or backup before changing anything.
Why might I be unable to quickly remove BIOS password on computer?
Common causes include outdated software, missing permissions, incompatible settings, incomplete setup steps, or a temporary network problem. Recheck the process from the beginning and restart the app or device if needed.
Is it safe to quickly remove BIOS password on computer?
It is generally safe when you use official tools, review every permission, and back up important data before making system-level or account-level changes.
Related Articles
 Ways to Reset BIOS Password or Remove BIOS Password10 minutes read
 Computer: How to Reset a Bios Password10 minutes read
 Set BIOS and UEFI Password to Protect Data on Your Windows 108 minutes read
 5 Tips for Using the BIOS to Help You Master Your Computer8 minutes read
 How to Reset BIOS Password5 minutes read
 How to Delete BIOS Password When Forgotten4 minutes read
Reader Comments 0
Sign in with email or Google to join the discussion.