Photoshop is a professional photo editing application and it is not strange that Photoshop is used by publishers every day. If you are first using Photoshop in the field of printing, please refer to some instructions for exporting printing files in the following article.

1. Export image file to go print complete
To export the completed image file, we must set the highest image quality. The recommended Color Model for printing must be the CMYK system. If your color system is not a standard CMYK then proceed with the conversion as follows.
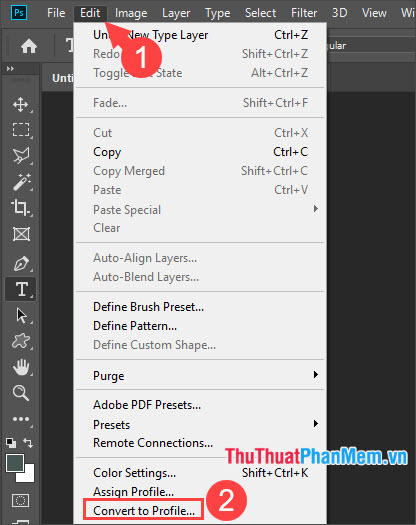
Step 1: Go to Edit menu (1) => Convert to Profile . (2) .

Step 2: Choose Profile as Working CMYK (1) and click OK (2) to finish.
Step 3: We start back up files, Select File => Save As or press the Ctrl + Shift + S . Next, choose the file format to save as JPEG .
Step 4: You set up Quality is the Maximum or at 10-12 . Then click OK to save.
2. Export a sample print file to a website or social network
Exporting files to post products on the website we need the image's sharpness to be good and ensure the image size is not too large so that when downloading websites, social networking sites more quickly.
Method 1: Save the image file and set it manually.
Step 1 : You press Ctrl + S or go to File / Save to save the image file and select JPEG format to optimize the image file with a low capacity.
Step 2: In JPEG Options, you should set the Quality at 6-8 so that the image quality is good and not blurry but the capacity is not too high.
Method 2: Export files with automatic optimization settings for the website
Step 1: You go to the menu File => Export => Save for Web , or use the key combination Alt + Shift + Ctrl + S .
Step 2: You choose the Optimized card (1) , with Preset (2) you should choose settings like JPEG Low, Medium or PNG (3) to export images with good quality while ensuring image size is not too high . Then click Save (4) to save.
3. Export the demo image file via email
Surely we would not want to fall into the case of sending the sample file to the customer and the customer takes the sample file to print and does not pay us. To avoid such a situation, we have to send the sample image file smaller than the A4 print size and use a low quality photo file.
Method 1: Export image files in low quality JPG format
Step 1: You save the image file by going to the menu File => Save As or press the key combination Shift + Ctrl + S . Next you save the image as a JPG .
Step 2: You set the Quality to Low and the parameters from 1-3 .
Method 2: Export image files to PDF files
Step 1: You go to the menu File => Save As , or use the key combination Shift + Ctrl + S . Next you choose the file format to save as Photoshop PDF (* .PDF, * .PDP).
Step 2: You set up Adobe PDF Preset (1) is the Smallest File Size (2) .
Step 3: You switch to the Compression (1) => Image Quality (2) => Low (3) => Save PDF (4) is done.
With the procedure to export the print file in Photoshop shared in the article, hopefully after reading the article, the reader will not be surprised and more secure when printing in Photoshop. Good luck!
