How to export printing files in AI (Adobe Illustrator)
How to export printing files in AI (Adobe Illustrator). Normally, users of AI files often choose to print directly on the software because they can set more settings. But unfortunately, the location you print does not support Adobe Illustrator software, forcing you to export them to * .JPG and * .PNG files to print.
Table of Contents
Adobe Illustrator is currently known as the most famous Vector graphic design tool in the world with a series of top-notch features. But, if you have to bring the files in Adobe Illustrator to print, how to do? In this article, Software Tips will guide you how to export print files in Adobe Illustrator software fastest and most quality.
Normally, users of AI files often choose to print directly on the software because they can set more settings. But unfortunately, the location you print does not support Adobe Illustrator software, forcing you to export them to * .JPG and * .PNG files to print.
1. How to export a PNG printing file in AI
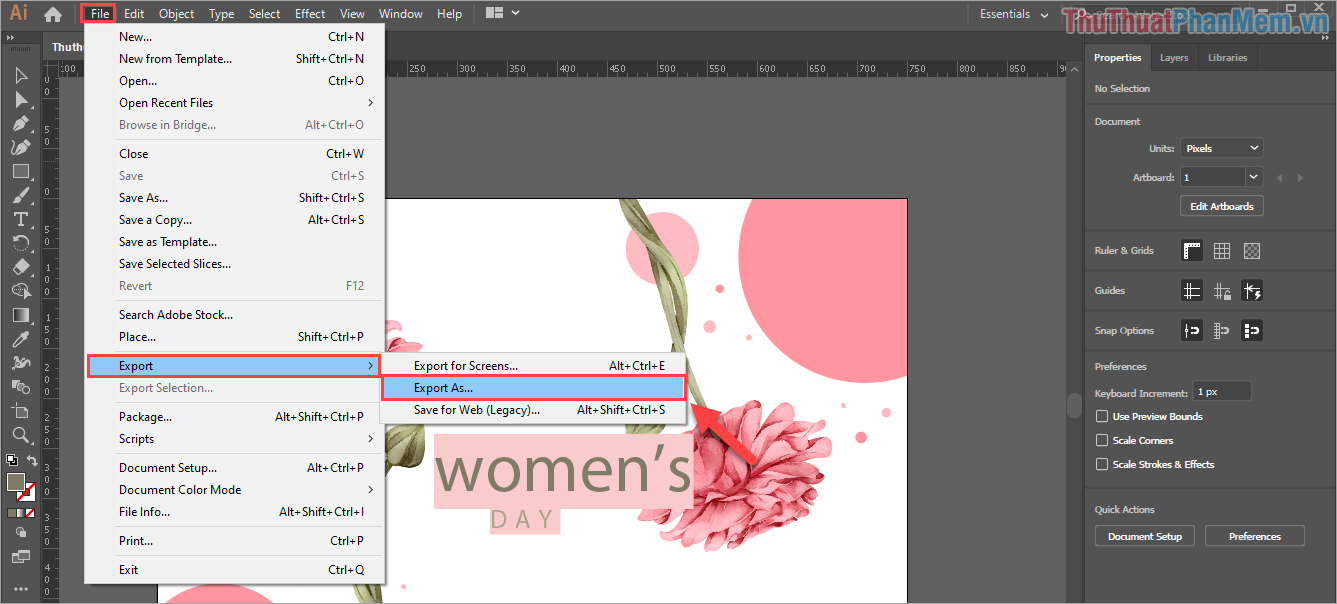
Step 1: Open the file you want to print in AI and select File -> Export -> Export As .
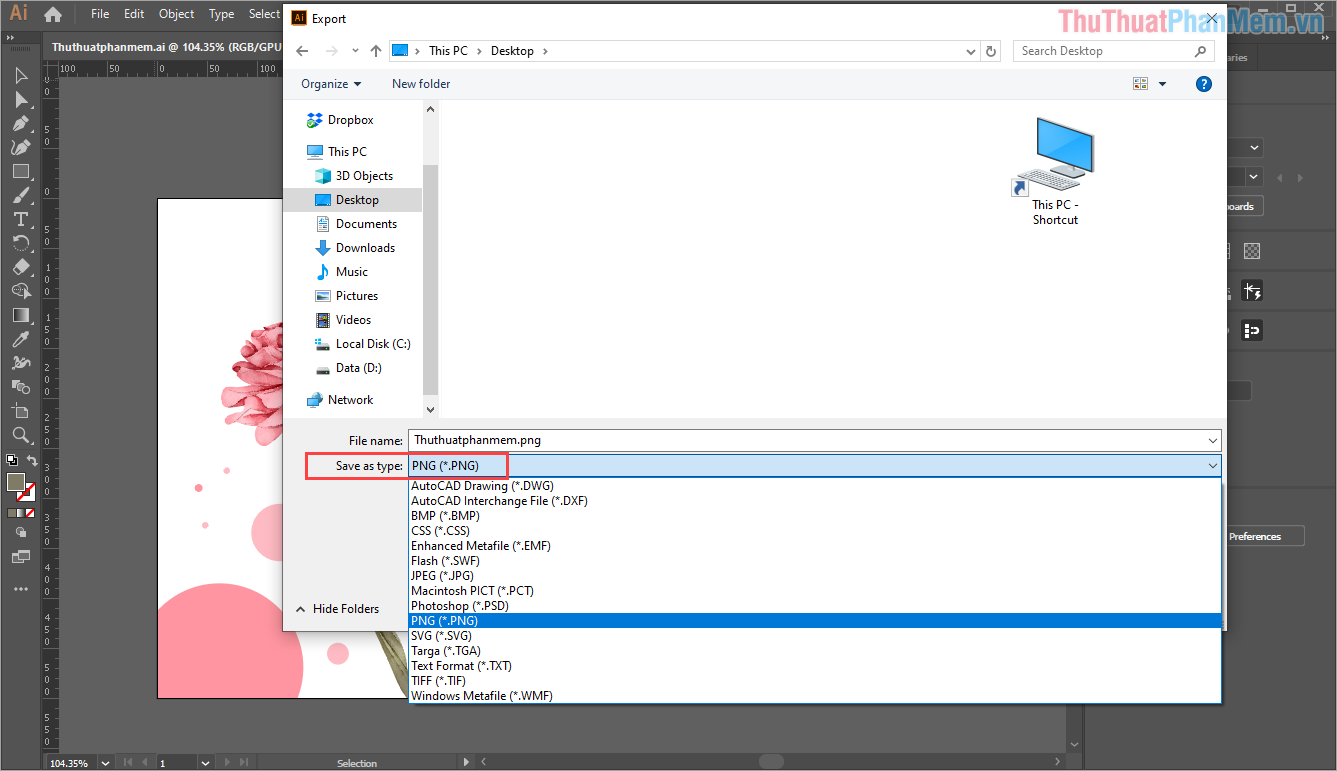
Step 2: Export window appears, proceed to select Save as type: PNG (* .PNG).
Step 3: Next, we have the following settings:
- Save use artboards: Export images to the blueprint (if you don't choose then everything in your AI work file will be exported). For professionals working on AI, they also use color system, draft template, . so they will prioritize this item to export all the necessary things and print.
- All: Export entire pages (in case of setting up multiple pages)
- Range: Select specific pages to export.
For this setup, you should set up according to your needs to use to bring the highest efficiency.
After setup is complete, you click Export to move to the next step.

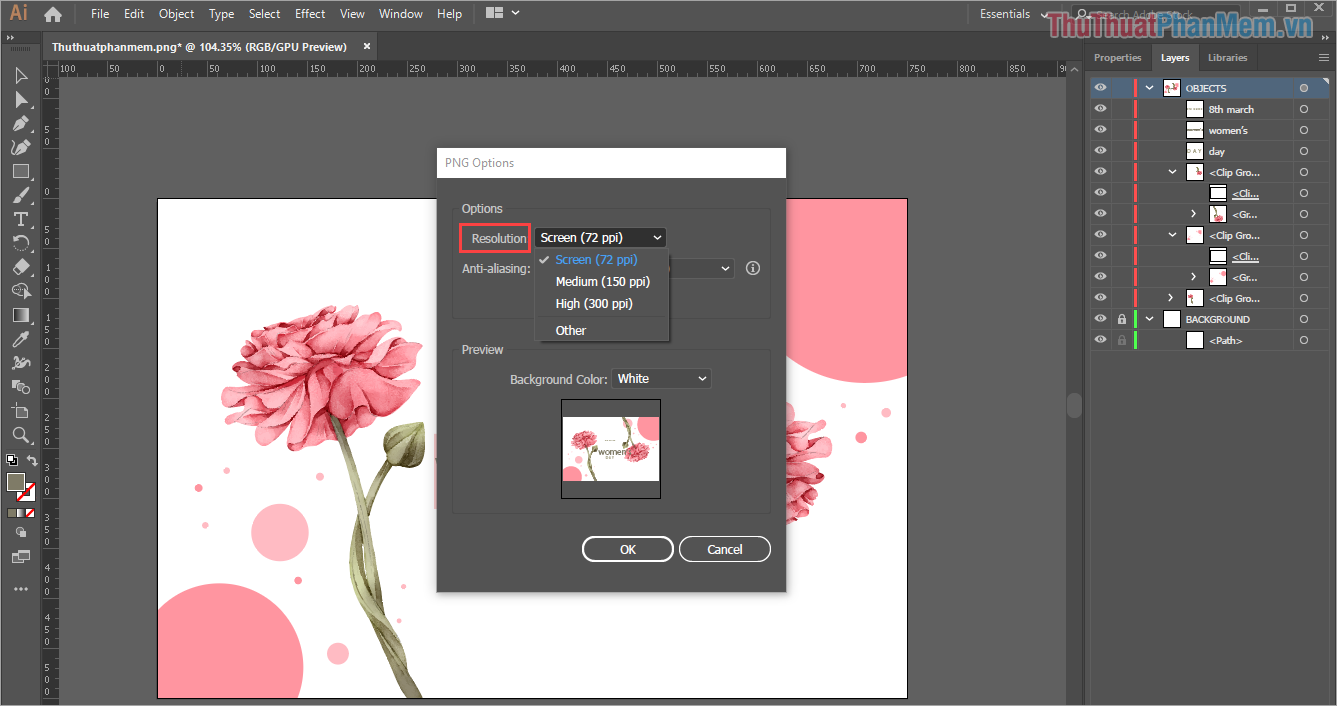
Step 4: In the PNG Options window , you proceed to set the Resolution (most important). If you print the small file size, just leave the Resolution at 72-150ppi, the file size is 300ppi missed and very large files, select Other to set ppi level from 300 and above.
The bigger the resolution, the heavier the image file is, but when you take it to print on large sizes, it won't break. Because of that, you should export files with high Resoluiton because when printing they will be much sharper.
Step 5: In addition, we have some settings such as:
- Interlaced: Displays sub-versions with a lower resolution than the original image if the image is downloaded from the browser.
- Anti-Alias: Smooth lines in the design. (Should choose Optimized Type)
- Backround color: The background color you want to display. (Depending on needs)
After setup is complete, you click OK to export photos to print.

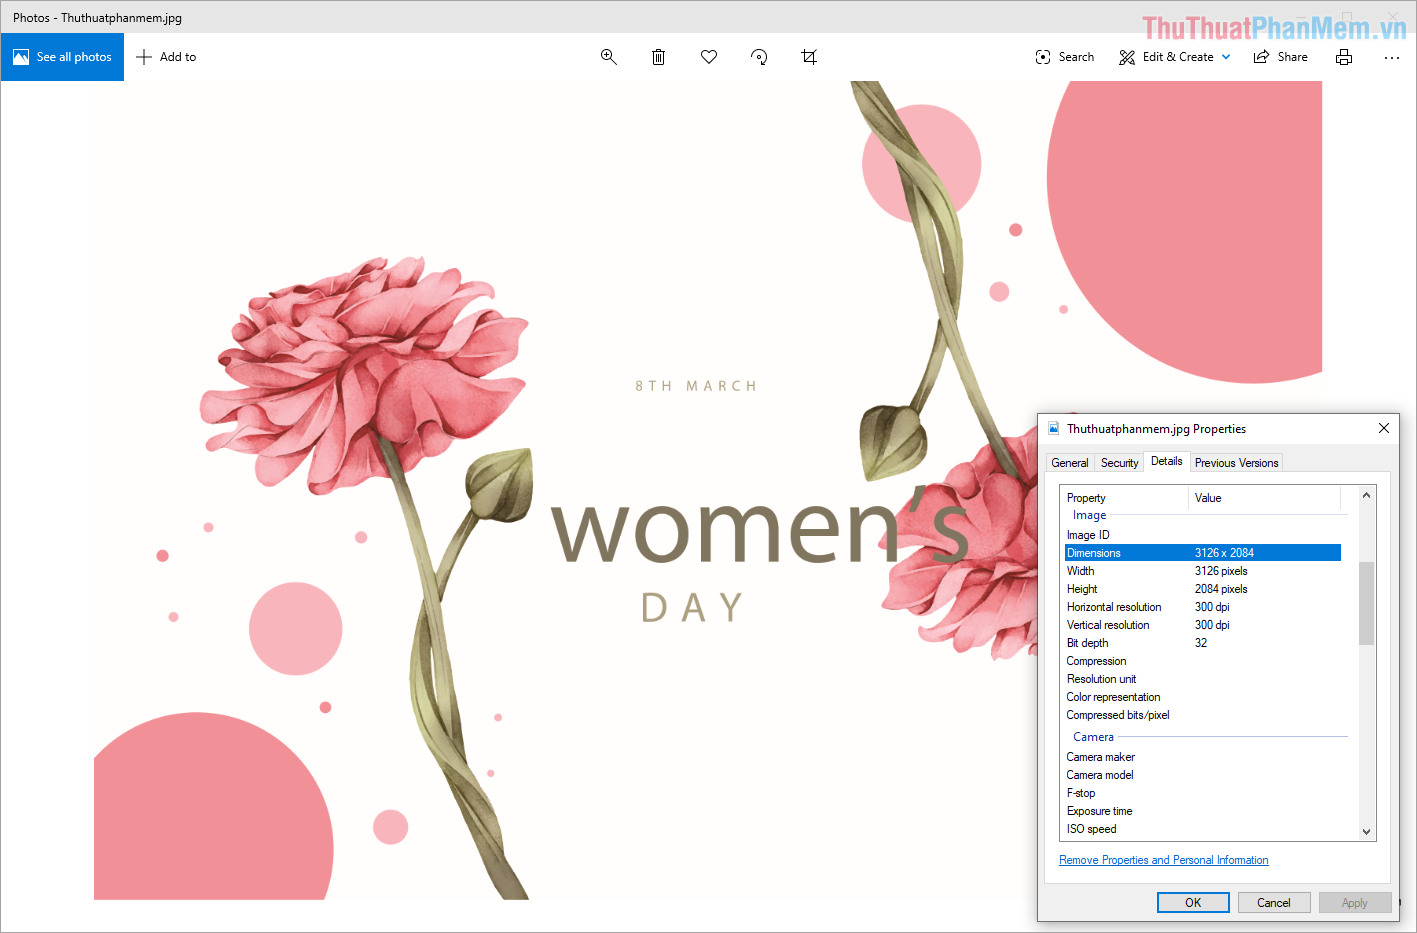
And this is our result after exporting the AI file for printing. With this size, you can print in large sizes without breaking.
2. How to export JPG printing files in AI
Step 1: Open the file you want to print in AI and select File -> Export -> Export As .

Step 2: Export window appears, proceed to select Save as type: JPEG (* .JPG).
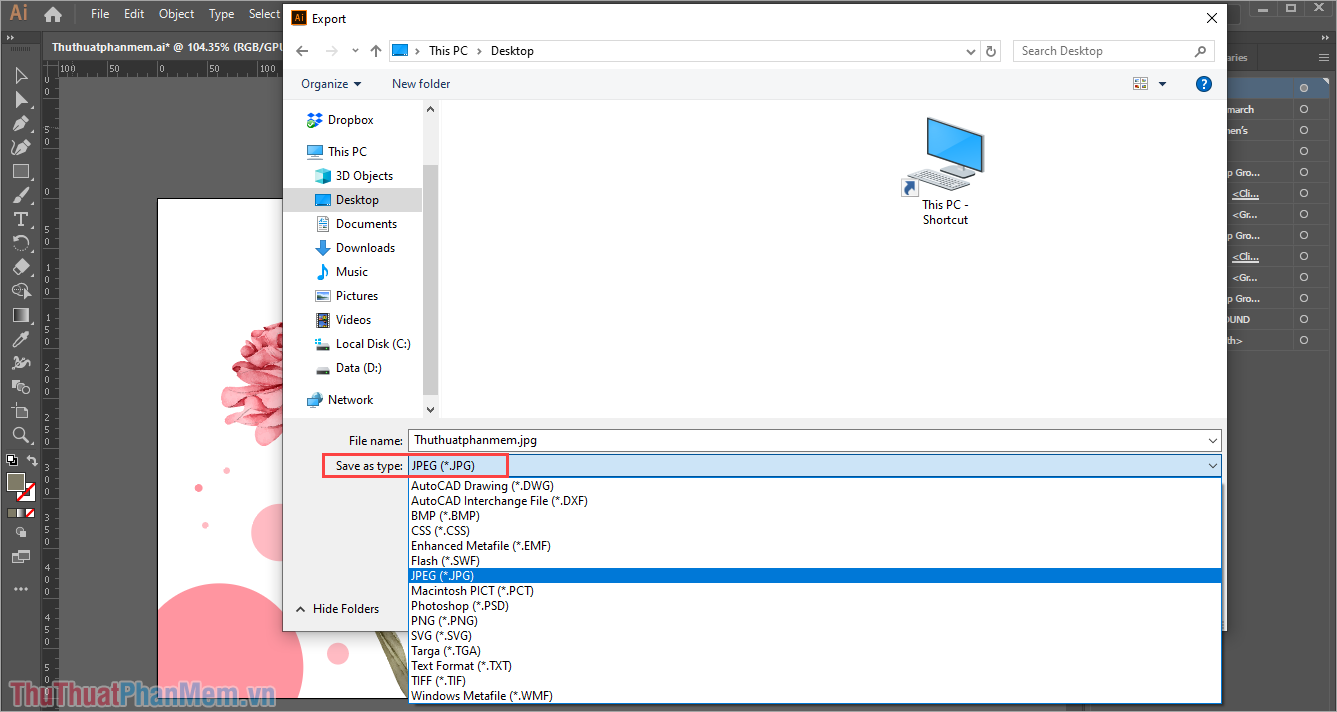
Step 3: Next, we have the following settings:
- Save use artboards: Export images to the blueprint (if you don't choose then everything in your AI work file will be exported). For professionals working on AI, they also use color system, draft template, . so they will prioritize this item to export all the necessary things and print.
- All: Export entire pages (in case of setting up multiple pages)
- Range: Select specific pages to export.
For this setup, you should set up according to your needs to use to bring the highest efficiency.
After setup is complete, you click Export to move to the next step.
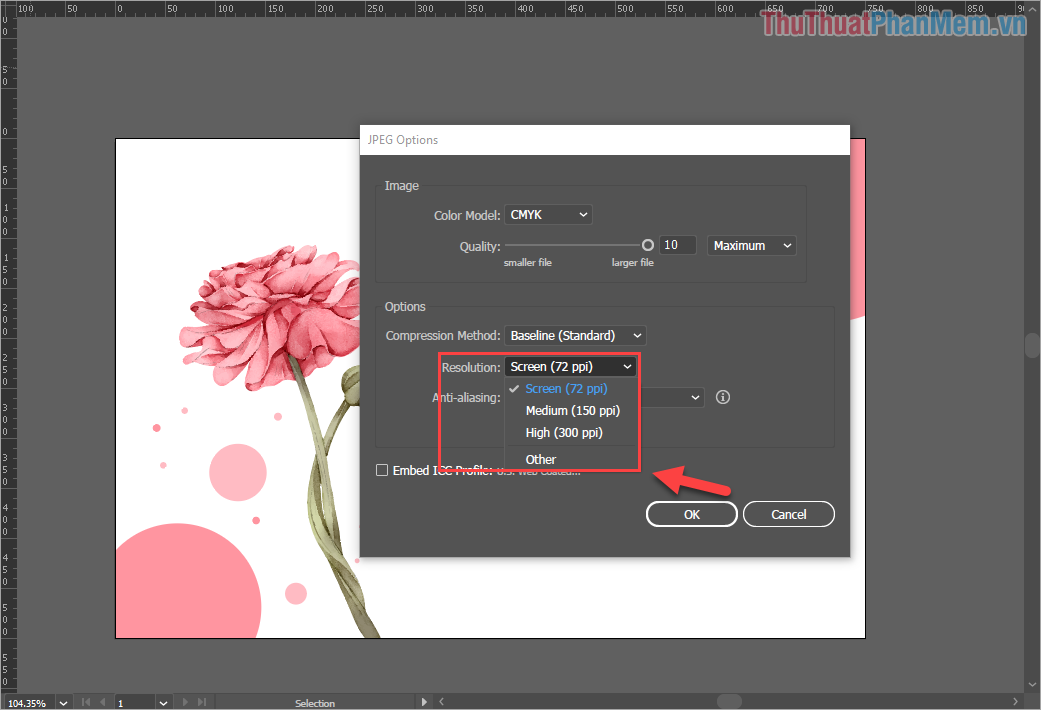
Step 4: Next, we have the following settings:
- Color Mode: Color mode , because it is for printing, forces you to choose CMYK.
- Quality: Picture quality, set Maximum to bring out the best quality.
- Compression Method: Leave the default
Continue, you need to pay attention to the Resolution section and set the following:
If you print the small file size, just leave the Resolution at 72-150ppi, the file size is 300ppi missed and very large files, select Other to set ppi level from 300 and above.
The bigger the resolution, the heavier the image file is, but when you take it to print on large sizes, it won't break. Because of that, you should export files with high Resoluiton because when printing they will be much sharper.
Step 5: After setup is complete, you select OK to export images. And here is the result of our image after export. For this file, you can freely print without losing quality.
In this article, Software Tips showed you how to export printing files in AI (Adobe Illustrator) fastest and most effective. Good luck!
Was this article helpful?
Your feedback helps us improve.
Related Articles
 How to save AI file in Adobe Illustrator to JPG and other image formats6 minutes read
 Adobe Illustrator 2021.26.0 - download Adobe Illustrator 2021.26.0 here3 minutes read
 What is Adobe Illustrator? Learn Adobe Illustrator for what5 minutes read
 What is Adobe Illustrator? Adobe Illustrator job openings.5 minutes read
 Tutorial drawing ... 'unicorn' in Adobe Illustrator10 minutes read
 Getting to know Adobe Illustrator13 minutes read
Reader Comments 0
Sign in with email or Google to join the discussion.