Table of Contents
This guide explains how to create GIF Animations with PowerPoint, with clear steps, practical tips, and important checks before you begin.
To create gif images in PowerPoint, you need to have PowerPoint 2013 or higher. For PowerPoint 2010 and earlier, you can only create videos but cannot create gif images directly with PowerPoint.
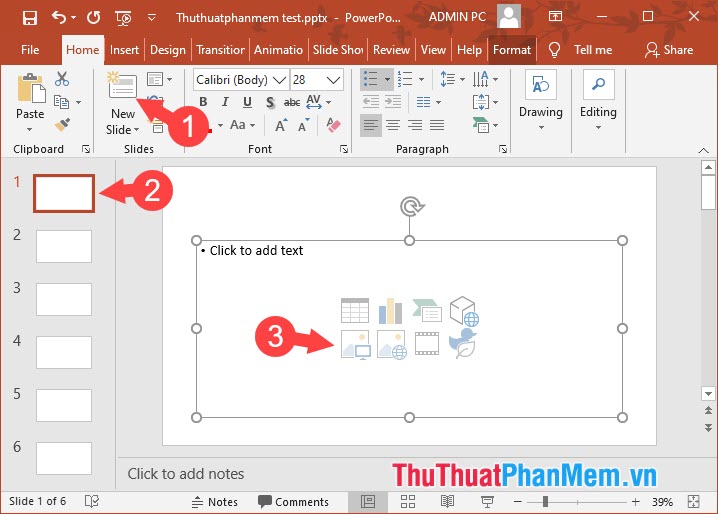
Step 1: You create a Slide to insert pictures with New Slide (1) . Next, click Slide (2) => Insert Photo (3) .
Step 2: You proceed to insert images by selecting images (1) => Open (2) . You continue to insert all images into the slides with each Slide / one image.

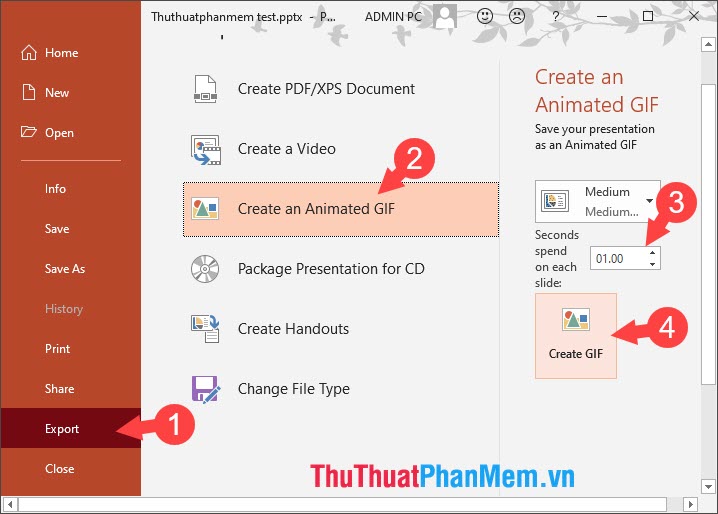
Step 3: Once you've inserted the images into the desired Slide, we start creating gif images with Powerpoint. First, you need to click on the File menu.

Next, select Export (1) => Create an Animated GIF (2) . You set the time for the Slide transition fast or slow in the Seconds spend on each slide (3) and finally you click on Create GIF (4) to create GIF images.
Step 4: Choose a location to save the file (1) , name the gif image file (2) and save with Save (3) .

With the tutorial, you have learned an interesting way to create GIF animations right on the Microsoft PowerPoint tool. If you have any difficulties or questions about the article, please leave a comment for TipsMake. com in the comment section below!
FAQ
What should I know about Create GIF Animations with PowerPoint?
Focus on the key features, requirements, limitations, and practical use cases explained in this guide.
How do I get the best results with Create GIF Animations with PowerPoint?
Follow the recommended steps, use current software or information, confirm compatibility, and review settings before major changes.
Are there any risks or limitations?
Potential limitations depend on compatibility, data quality, cost, privacy, support, and how the product or method is used.
Related Articles
 PowerPoint 2019 (Part 18): Adding Animations to Text and Objects10 minutes read
 How to Create GIF Images in PowerPoint: Step-by-Step Guide3 minutes read
 PowerPoint 2019 (Part 1): Getting Started with PowerPoint: Explained7 minutes read
 How to Add Animations in Microsoft PowerPoint: Clear Instructions10 minutes read
 How to Add Animation Effects in Microsoft Powerpoint10 minutes read
 How to Insert Animations into Powerpoint3 minutes read
Reader Comments 0
Sign in with email or Google to join the discussion.