Trick to increase the number of items displayed in Jump List on Windows 10
Normally, Jump List only displays 12 items but if you want to increase more, you have to perform tricks to change the number of items displayed in Jump List on Windows 10, here are tips to increase the number of items in Jump List.
Table of Contents
See also: Steps to clear Jump Lists history on Windows 10
Access commonly used items in Windows 7 with Jump Lists
In previous versions of Windows, users could change the number of recently visited folders displayed in the Jump List with a simple option in the taskbar. However, Microsoft removed this feature in Windows 10 version without giving any reason. But okay, just a few small tricks you can increase the number of items in the Jump List.
Increase the Jump List limit by editing Registry Manually
By default Windows 10 only displays 12 items in the Jump List. To increase the number of items, you only need to change the settings in the Windows Registry.
Note: Registry Editor is a powerful tool. If you misuse it, your computer may become unstable or even shut down. This is a pretty simple trick, if you follow the instructions, there won't be any problems. If you haven't used the Registry, read the instructions before starting. Make sure you back up the Register (and the computer) before making changes.
Open Register Editor by clicking on Start and typing "regedit" . Press Enter to open Register Editor and allow changes to your computer.

In the Register Editor window, use the left bar to follow these instructions:
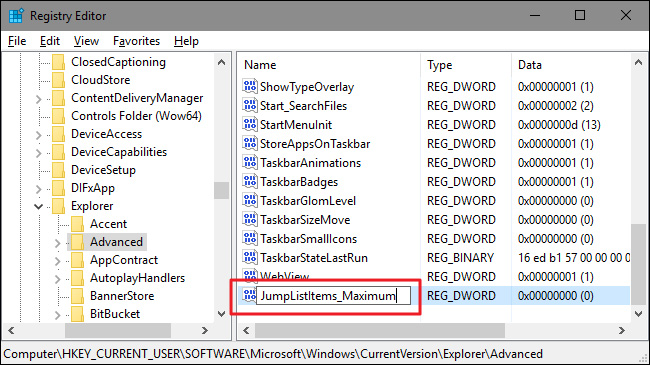
HKEY_CURRENT_USERSOFTWAREMicrosoftWindowsCurrentVersionExplorerAdvanced

Next, create and name the new value domain inside Advanced key . Right-click on the Advanced folder and select New> DWORD (32-bit) Value . Name the new value JumpListItems_Maximum , then double-click the value to open its properties window.
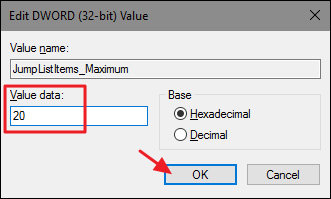
In the properties window of the value, enter the number of new entries that you want the jump list to display in the "Value data" box . Numbers ranging from 15 to 20 are quite reasonable numbers and still allow all Jump Lists to display on the screens. However, you can set a higher number if you want, then click OK.
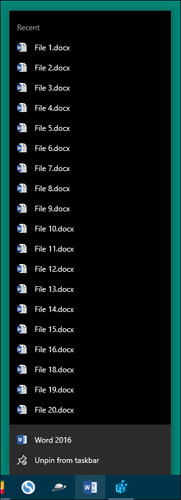
You can now exit Registry Editor without restarting the computer or doing anything else. The change will take effect immediately so just open a jump list to check if you have finished. In the tutorial, we have increased the number to 20 and you can see that many other items are displayed.
If you want to reset the default number of items, just return to Advanced key and set the JumpListItems_Maximum value to 0.
When you increase the item displayed in Jump List, users will also be able to easily open multiple folders, files or web pages faster without having to open them through support tools and software.
Was this article helpful?
Your feedback helps us improve.
Related Articles
 Steps to clear Jump Lists history on Windows 102 minutes read
 Access commonly used items in Windows 7 with Jump Lists2 minutes read
 Microsoft adds color to the Windows 10 interface2 minutes read
 How to Change the Number of Recent Items Shown on a Mac2 minutes read
 How to fix a thumb image error is not displayed on File Explorer Windows 104 minutes read
 How to download and play Pokémon game: Magikarp Jump7 minutes read
Reader Comments 0
Sign in with email or Google to join the discussion.