
Instructions for installing and using VPN on Windows 11
Connecting to a VPN is the ideal solution for secure and private browsing and accessing geo-blocked websites. The steps to configure a VPN on Windows 11 are quite simple.
Table of Contents:
1. How to install VPN on Windows 11.
2. Connect to VPN on Windows 11.
3. Disconnect VPN on Windows 11.
4. Delete VPN connection on Windows 11.
Instructions for installing and using VPN on Windows 11
However, before proceeding with the installation steps, you need to install Win 11 first.
1. How to install VPN on Windows 11
Step 1: First open the Settings window by pressing Windows + I.
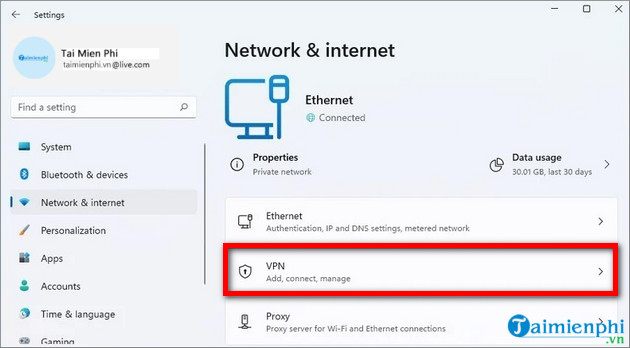
Step 2: Next, find and click Network & internet, then click VPN in the right frame.
Step 3: In the VPN connections section, find and click the Add VPN button.

Step 4: In the VPN provider menu, select Windows (built-in).
Step 5: Next, in the Connection name menu, enter the name of the VPN connection you want to connect to.
Step 6: In the Server name or address field , enter the VPN server address, such as vpnserver.com or 122.122.122.122.
Step 7: In the VPN type menu, select the Automatic option or the protocol required to connect to the specific VPN server.
Step 8: In the Type of sign-in info menu, select the authentication method.
Note: This option depends on your VPN service provider's settings.
Step 9: Finally confirm the username and password, if you choose the User name and password option.
Step 10: Click the Save button to save the changes.
Once you complete the steps, you can connect to the VPN from the Settings app or the Taskbar.
2. Connect to VPN on Windows 11
Method 1: Connect VPN on Windows 11 from Settings
Step 1 : Open Settings by pressing Windows + I, then click Network & internet.
Step 2: Next, click VPN in the right pane and then click the Connect button .
Follow the steps above to connect your Windows 11 computer to the VPN server.
Method 2: Connect VPN on Windows 11 from the Taskbar
Follow the steps below to connect to VPN on Windows 11 from the Taskbar:
Step 1: Click on the network icon on the Taskbar, then click on the VPN button .
Step 2: Select the VPN connection you want to use and click the Connect button .
3. Disconnect VPN on Windows 11
Method 1: Disconnect VPN on Windows 11 from Settings
Step 1 : Open Settings , then click Network & internet.
Step 2: Next, click VPN in the right frame and then click the Disconnect button to disconnect.
Step 3: Finally, click the Confirm button to confirm and you're done.
Method 2: Disconnect VPN on Windows 11 from the Taskbar
Step 1: Click on the network icon on the Taskbar, then click on the VPN button.
Step 2: Select the VPN connection and then click on the Disconnect button.
4. Delete VPN connection on Windows 11
Step 1: Open the Settings app (by pressing Windows + I), then find and click Network & internet.
Step 2: Next, in the right pane, find and click VPN.
Step 3: Click on the VPN connection to access the settings.
Step 4: In this step, find and click on the Disconnect button (if available) then click on the Remove button to delete the VPN connection and you're done.
Hopefully, the instructions for installing and using VPN on Windows 11 that TipsMake has just introduced above will help you master Windows 11 more easily. You can also refer to how to fix the error of losing Wifi on Windows 11 here to fix the error if any.
In addition, if you have any questions or need further answers, readers can leave their comments in the comment section below the article.
You should read it
- Here's how to uninstall Windows 10 to return to using Windows 7 or 8.1
- The chart for the 10 most amazing versions of Windows
- Windows revolution and breakthrough changes through each version
- Summary of several logout methods on Windows 8 and Windows 10
- Looking back at 27 years of 'evolution' of Windows
- Instructions on how to upgrade from Windows XP to Windows 8
- 4 ways to 'revive' Windows XP on Windows 10
- What is Windows Hello? How does Windows Hello work? How to install Windows Hello
- Instructions for setting up Windows Hello face recognition on Windows 10
- 9 Windows 8.1 errors have not been resolved
- How to download Windows 10 Theme for Windows 7
- Compare Windows 10 and Windows 11
Maybe you are interested
How to Fix USB error or SD memory card error 'Elixir' for health but everyone is throwing away without knowing it The community of League of Legends pity or Thich Bon Thuan infected with COVID-19 in Italy How to restore or reset iPhone without iTunes 3D computers 'embed' user hands into the screen Set up auto-sending, Forward email to another account in Gmail?