Instructions for setting up Windows Hello face recognition on Windows 10
Windows Hello is a convenient and useful new feature integrated by Microsoft for Windows 10 with the ability to identify user faces, security support and support for faster login when using the operating system.
Table of Contents
If you want to use face recognition, you must have a 3D camera, such as Intel RealSense. With this type of camera you can set up Windows Hello, use your face to access your computer, or verify the completion of transactions on the Windows Store.
If you have a RealSense camera, you will be able to set up Windows Hello to make your login security screen, help you verify your identity without pressing the keyboard to login, even logging in to Purchasing completely in Store is also supported.

Note:
If your Windows 10 computer is not supported, the Windows Hello feature will not appear.
List of Windows 10 computers that support Windows Hello:
- Dell Inspiron 15 5548
- Acer Aspire V 17 Nitro
- Lenovo ThinkPad Yoga 15
- Lenovo ThinkPad E550
- Asus N551JQ
- Asus ROG G771JM
- Asus X751LD
- HP Envy 15t Touch RealSense Laptop
- Lenovo B5030
- Dell Inspiron 23 7000

Set up Windows Hello face recognition on Windows 10
Step 1. Open Settings then click on Accounts and then choose Sign-in options.
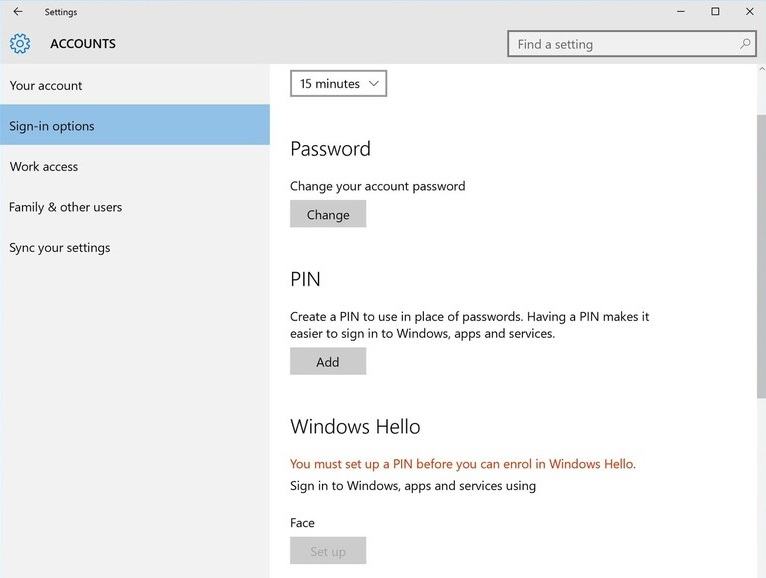
Step 2. Set up a PIN by clicking the Add button in the PIN section to (however, skip this step if you already have a PIN). After you have completed the steps, you will see the Windows Hello setup options.

Step 3. Now you will see an option called Face , you just need to click Set up under the Face option.

Step 4.Click select Next Get Started .
Step 5. Next, you will be transferred to Windows Hello's face view, just look directly at the camera, and perform as required.
Windows Hello automatically remembers your face appearance on the system.
Step 6. In addition, Windows Hello has more advanced features in Improve recognition . You can wear glasses so that the device remembers more features and identifies when wearing glasses or without glasses.

Step 7. So you have completed the steps to set up Windows Hello face recognition on Windows 10.
If you want to remove or change your identity, you can use the Remove tool.
In addition, you can choose to request advanced identification by choosing to turn left and right to unlock the lock screen - although it takes quite some time but this feature will be more secure.
Good luck!
Was this article helpful?
Your feedback helps us improve.
Related Articles
 It's time to face the 'reverse side' of face recognition technology13 minutes read
 New face recognition technology can identify objects up to 1,000 meters away3 minutes read
 Windows Hello Face facial recognition technology on Windows 103 minutes read
 Programming a face detection tool in Python12 minutes read
 Facebook stopped automatic face recognition because of a lawsuit2 minutes read
 Smartphone unlock feature with face recognition system makes owner lost 1,800USD while sleeping2 minutes read
Reader Comments 0
Sign in with email or Google to join the discussion.